Introduction
Basket App developed using Flutter, Laravel, and React Js Framework. Laravel ( PHP Framework for Web Artisans) is a web application framework with an expressive, elegant syntax. We’ve already laid the foundation — freeing you to create without sweating the small things. Flutter framework created by Google is open-source mobile application development. It is used to develop applications for Android and iOS, as well as being the primary method of creating applications. React is a free and open-source front-end JavaScript library for building user interfaces based on components.
Basket App comprises 2 Mobile Applications, 1 Web Panel, 1 website –
- Customer application for Android, iOS developed using Flutter.
- Delivery Boy application for Android, iOS and developed using Flutter.
- Admin web panel developed using react js.
- Landing page webiste developed using HTML, CSS, JS.
- API developed using Laravel (Also we are provide the postman collection for api testing)
How to Use and Understand the Full System Operation.
The Basket App is designed to provide a seamless experience for users, from product selection and subscription management to payment and delivery. Additionally, the admin panel serves as a central hub for managing various aspects of the system, including products, subscriptions, delivery boy, pin codes, transactions, etc.
In our streamlined system, we've organized every product into a carefully curated hierarchy of categories and subcategories, ensuring a user-friendly experience. Here's a step-by-step guide on how to make the most of our platform:
- Start with Categories and Subcategories: Begin by adding your product categories, followed by their respective subcategories. This structured approach makes it easy to navigate and manage your product catalog.
- Product Entry: After setting up your categories and subcategories, it's time to add your products. The product entry page offers a wealth of customization options to make your listings stand out:
- Product Details: Fill in essential information, including product titles, images, quantities, prices, and the manufacturer's suggested retail price (MRP).
- Inventory Management: Keep track of stock levels effortlessly with our stock qty filed.
- Special Offers: Highlight any ongoing discounts or special offers to attract customers.
- Detailed Descriptions: Craft detailed product descriptions to inform and engage potential buyers.
- Disclaimers: Include any necessary disclaimers to ensure transparency and compliance.
- Category Customization: Assign products to specific categories and subcategories for better organization.
- Subscription Option: As an added bonus, we offer a subscription feature to enhance your product offerings. You have the flexibility to enable or disable this option for individual products. Here's how it works:
- Subscription-Based Products: Certain products can be marked as subscription-based. This allows customers to subscribe and receive regular shipments based on their preferences, whether it's weekly, daily, alternative schedules, or one-time orders.
Order Type
Our system offers two distinct order types: normal orders and subscription-based orders. The flexibility of our platform allows you to fully customize each product and designate them as either normal or subscription-based.
- Normal Orders: Normal orders provide users with the flexibility to add products to their cart, make payments, and receive deliveries as per their immediate needs. Users can choose products, place them in their cart, complete the payment process, and expect delivery based on your business's standard delivery protocols. This option caters to users looking for one-time, on-demand ordering.
- Subscription Orders: Subscription orders, on the other hand, offer users the convenience of placing a single order but with recurring delivery options based on their preferences. Users can select their desired delivery frequency, such as monthly, weekly, or specific alternative dates. This subscription model is ideal for users seeking a hassle-free, regular supply of products tailored to their delivery schedule.
- Monthly Subscription: With monthly subscriptions, users have the flexibility to choose their preferred start date and specify the quantity of products they want to receive. Once these choices are made, our system takes care of the rest. Users can expect their chosen products to be delivered consistently every month, ensuring a steady supply that aligns with their preferences.
- Weekly Subscription: Weekly subscriptions cater to users who want even more control over their deliveries. Users can select a start date, set the quantity they need for each day, and determine how many days per week they want delivery. Our system then ensures that these deliveries occur consistently on a weekly basis, following the user's specifications.
- Alternative Subscriptions: Alternative subscriptions offer a unique delivery pattern. Users can choose a start date and specify the quantity they require. In this case, our system arranges for frequent deliveries with a one-day gap between each delivery. This option is perfect for users who prefer a more varied schedule while still receiving their desired products regularly.
- One-Time Subscription: For users who prefer a one-time, on-demand approach, our one-time subscription option is available. Users can select a delivery date and specify the quantity of products they need for that specific date. Our system ensures that the delivery occurs as requested, providing a convenient and flexible solution for individual, non-recurring needs.
Basket App's 4 subscription options designed for your needs.
Order Flow:
- Users begin by registering on the Basket App using their phone number for authentication
- Users can explore a wide range of products available in the app by searching through the product catalog.
- They can add desired items to their shopping cart or select a subscription plan, based on calendar
- They can choose to input the address manually or utilize Google Maps integration for precise location details.
- Now users can make the payment or select the COD and then complete the order.
- Once the order is done the admin can confirm the order and check the transaction. Now admin can assign the delivery boy based on order type (Subscription or Normal order).
- The delivery boy can log in, check the order, and mark the order as delivered after completing the delivery.
Delivery Flow
- To handle deliveries, first, add a delivery driver from the Drivers Page. After adding them, you can assign deliveries.
- Our Delivery Boy app allows drivers to log in with their phone number. From there, they can see all their assigned orders, including both subscription and regular deliveries, as well as delivered orders.
- The delivery boy app has the ability to mark products as 'delivered' and 'paid'.
Payments Option
Our system offers two payment options: 'Cash on Delivery' (COD) and 'Pay Now.' Both payment options are available for normal orders, while for subscription orders, once delivered the amount will be auto-deducted from the user's wallet.
Wallet
Our wallet feature offers a convenient way for both users and administrators to manage funds. Users can add money to their wallet, and this balance is primarily intended to cover subscription orders. When a delivery is successfully marked as completed by the delivery personnel or an admin, the corresponding amount is automatically deducted from the user's wallet.
We have implemented an additional logic: If a user's wallet balance is less than the total subscription order amount, no delivery will be processed. This means that the user will be temporarily removed from the upcoming order subscription page and the delivery boy app until they recharge their wallet.
We have also low wallet notification system where we have a condition if the user's wallet amount is less than the given amount then the user will get the low wallet notification. Given amount will ask when you push notifications.
Note users cannot use a wallet to pay normal orders payents.
Transaction Flow
In our system, you can easily monitor all transaction details from the 'Transactions' page. Admins have the capability to review both credited and debited amounts. Additionally, administrators can credit or debit specific amounts to a user's wallet, accompanied by a description for clarity and transparency. The system has two order types normal and subscription order both have a different transition flow.
- Normal Orders: If a user opts for 'Pay Now,' the transaction is automatically recorded in the system. However, when customers choose 'COD' and make a cash payment, the process involves first updating their wallet balance manually and then deducting the required amount from their account
- Subscription Orders: Transactions are updated when the delivery boy or admin marks products as delivered. Money is deducted from the user's wallet when this action occurs.
More Features
- Delivery Report: Export reports by date and delivery personnel for efficient tracking and management.
- Upcoming Orders: easily view a list of upcoming deliveries for both subscription and regular orders.
- Products: Add products with complete details, including price, tax, images, titles, and more.
- Users Management: Manage users and drivers, inputting their respective details for efficient management.
- Web Pages: Admins can easily manage the 'About Us,' 'Privacy Policy,' and 'Terms and Conditions' pages.
- Banner: Add or update banner images for the mobile app, keeping it fresh and appealing for users.
- Pin Code Area: Efficiently manage all delivery location pincodes, ensuring accurate coverage and smooth deliveries.
- Testimonials: Admins can easily add and manage testimonials, showcasing positive feedback and building trust with users.
- Settings: Mobile app and website settings for efficient management and customization.
- Notification: Send notifications for both normal and low wallet balances to keep users informed and engaged
- Payment Getaway: Admins can easily update payment gateway keys via the admin panel.
- Invoice: customize the branding of the invoice page for a personalized and professional look
- Social Media: Add social media links on the app and website that connect users directly to your social media profiles.
- Delivery Location: Display your business's delivery locations, keeping users informed about service areas.
- Holiday’s: Add specific dates to our Holiday Page to skip deliveries on those days. Enjoy your holidays without receiving deliveries!
- Cancel Order: This option ensures that no further action is taken on the order, and no delivery will be performed.
- Stop Order: With the Stop Order function, users can temporarily pause an ongoing order if they don't currently need it.
- Continue Order: If you wish to continue with the order at a later time, you can easily resume it using the "Continue" button.
If you have any questions that are beyond the scope of this help file, Please feel free to email via appwebdevash@gmail.com
Basic
As Basket App is a complete system with lots of modules for web and mobile apps, it is compulsory to have some basic knowledge in server side, mobile app development and web development if you want to do the installation, setup and publishing with your branding yourself.
Server
- Basket App requires PHP v8.1 and MySQL 8.0+
- Mod_rewrite Apache
- BCMath PHP extension
- Ctype PHP, JSON, Mbstring, OpenSSL, PDO, Tokenizer, XML, Zip, Fileinfo, Gd, sodium Extension
In most servers these extensions are enabled by default, but you should check with your hosting provider.
Mobile app
- Android studio
- Flutter SDK setup (version 3.13.1 Stable)
- JDK with path setup (only for vs code)
- Xcode for IPA file build
Web
- React Js.
- NodeJs 16 or 16+
- HTML.
- CSS.
- JS.
API
- Laravel Framework 8.83.23
Installation Guide
We recommend to follow these points one by one to do the complete installation.
- Quick Start
- API Setup
- SMTP Configuration
- Admin Panel Setup
- Firebase Setup
- Mobile App Setup
- Web App Setup (Landing page)
Quick Start
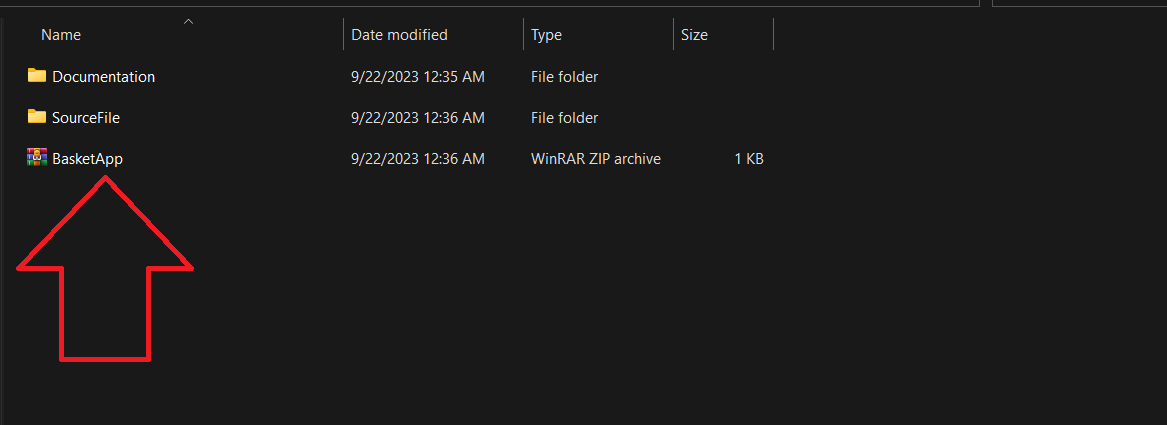
- Step 1 -Unzip the BasketApp file.
- BasketApp Zip included two folders Documentation and Source file.
- The Documentation folder is all about the doc for installation and customization of apps, and the Sourcefile folder included all codes folders.
- Now it's time to configure all the files. so let's start
API Setup
- Step 1 - Hosting server and domain required to install the API. we are insisting API in sub domain.
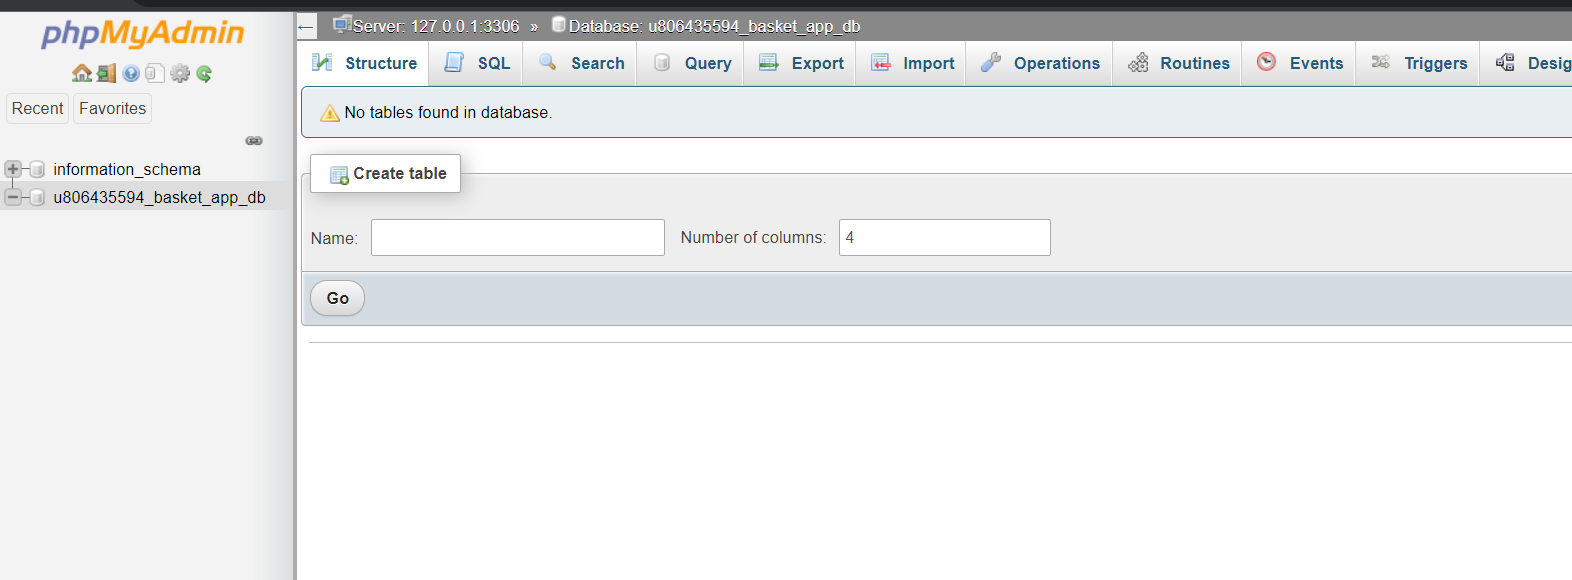
- Step 2 -Create a database and copy the DB name, username, and password we will use this later.
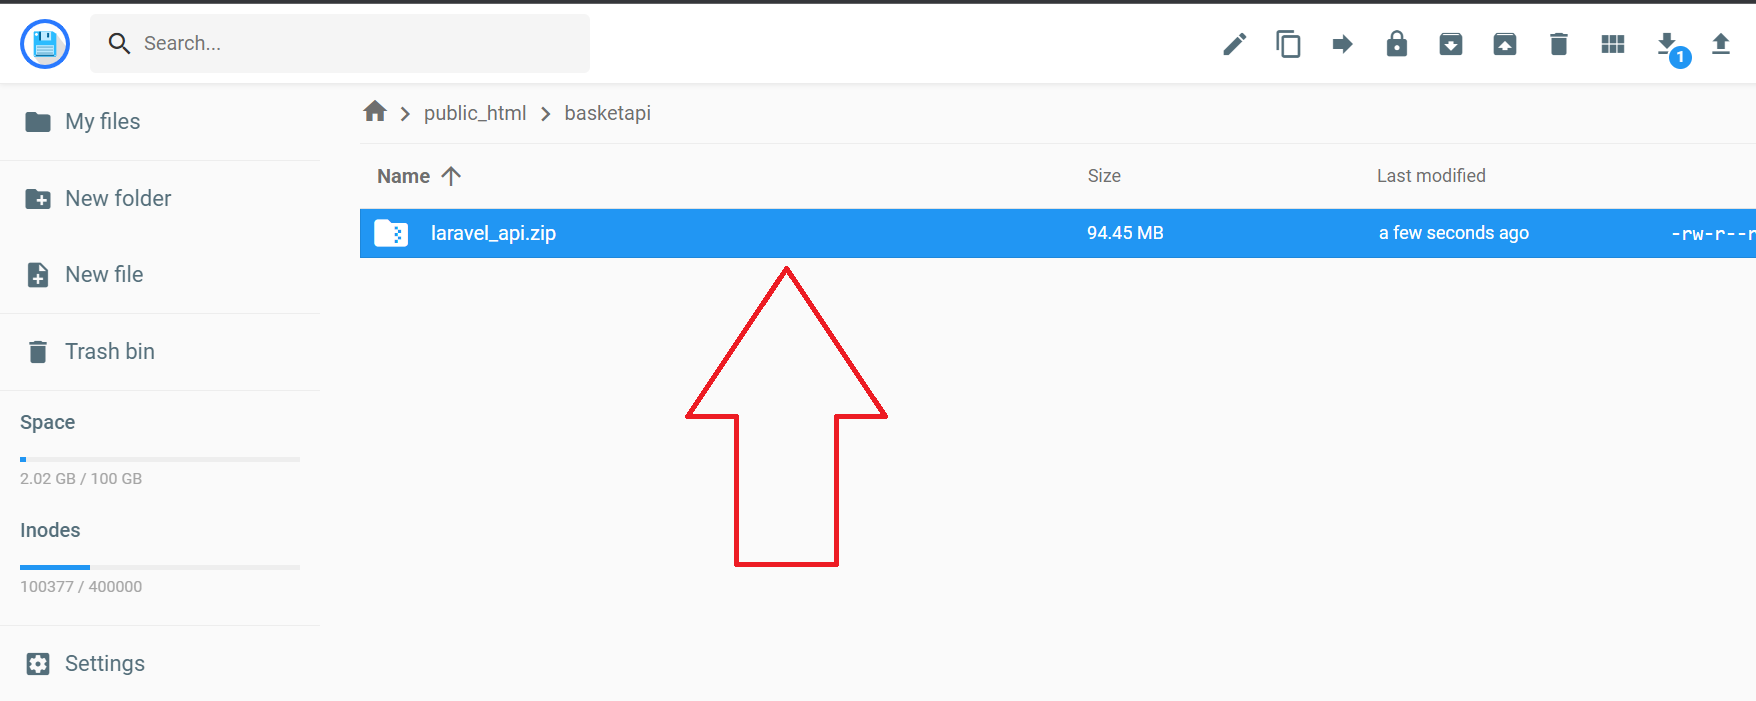
- Step 3 We recommend you to install api in subdomain. create new sub domain (basketapi). open the sub domain folder and extract the the laravel_api file.
- Step 4- Once you extract the file open your sub domain URL in the (ex https://basketapi.yourdomain.com) browser
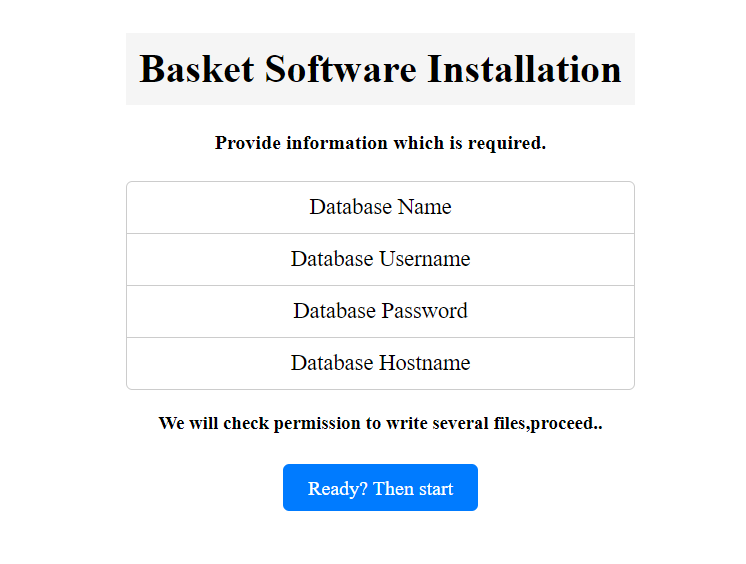
- Step 5- Press Next.
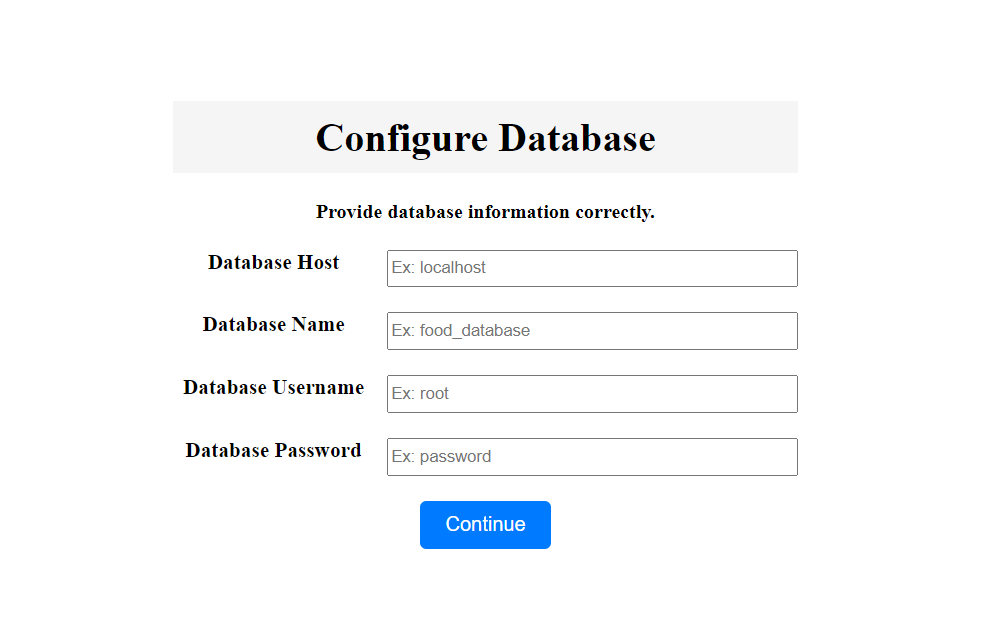
- Step 6- Fill the information.
- Step 7- Fill the information.
- Step 8- Once the software is activated click on the continue installation process.
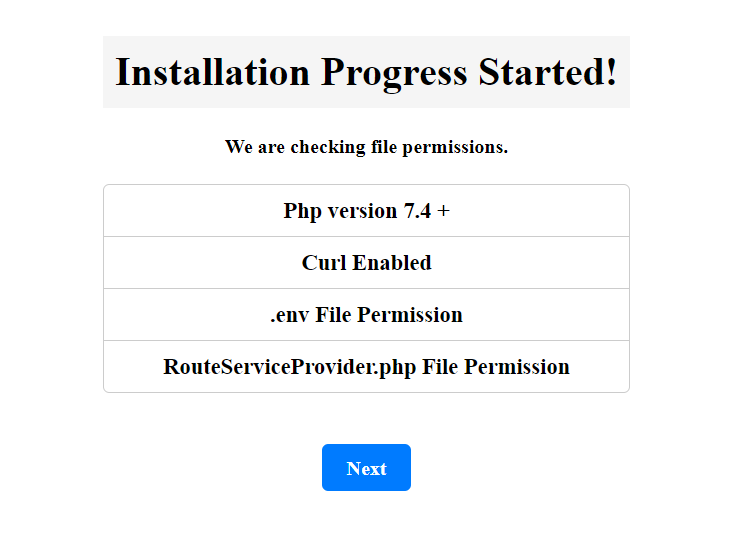
- Step 9- Now click on Ready? Then start then click on Next then click on Proccess to Install
-
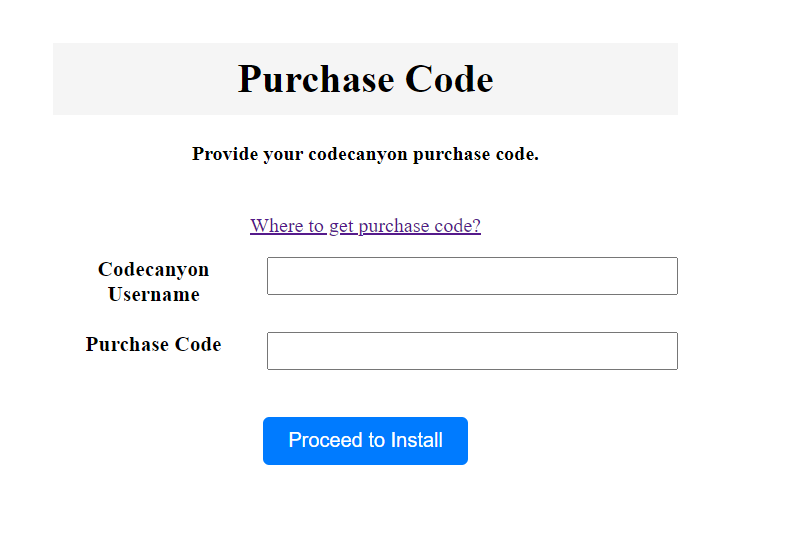
Step 10- Fill the information.
-
Step 11- Click on import database.

-
Step 12- Fill the information.

-
Step 13- Now api has been successfully installed in your
server you can close the browser tab.


SMTP Configuration
- Step 1 - Go to your hosting panel and add new email.
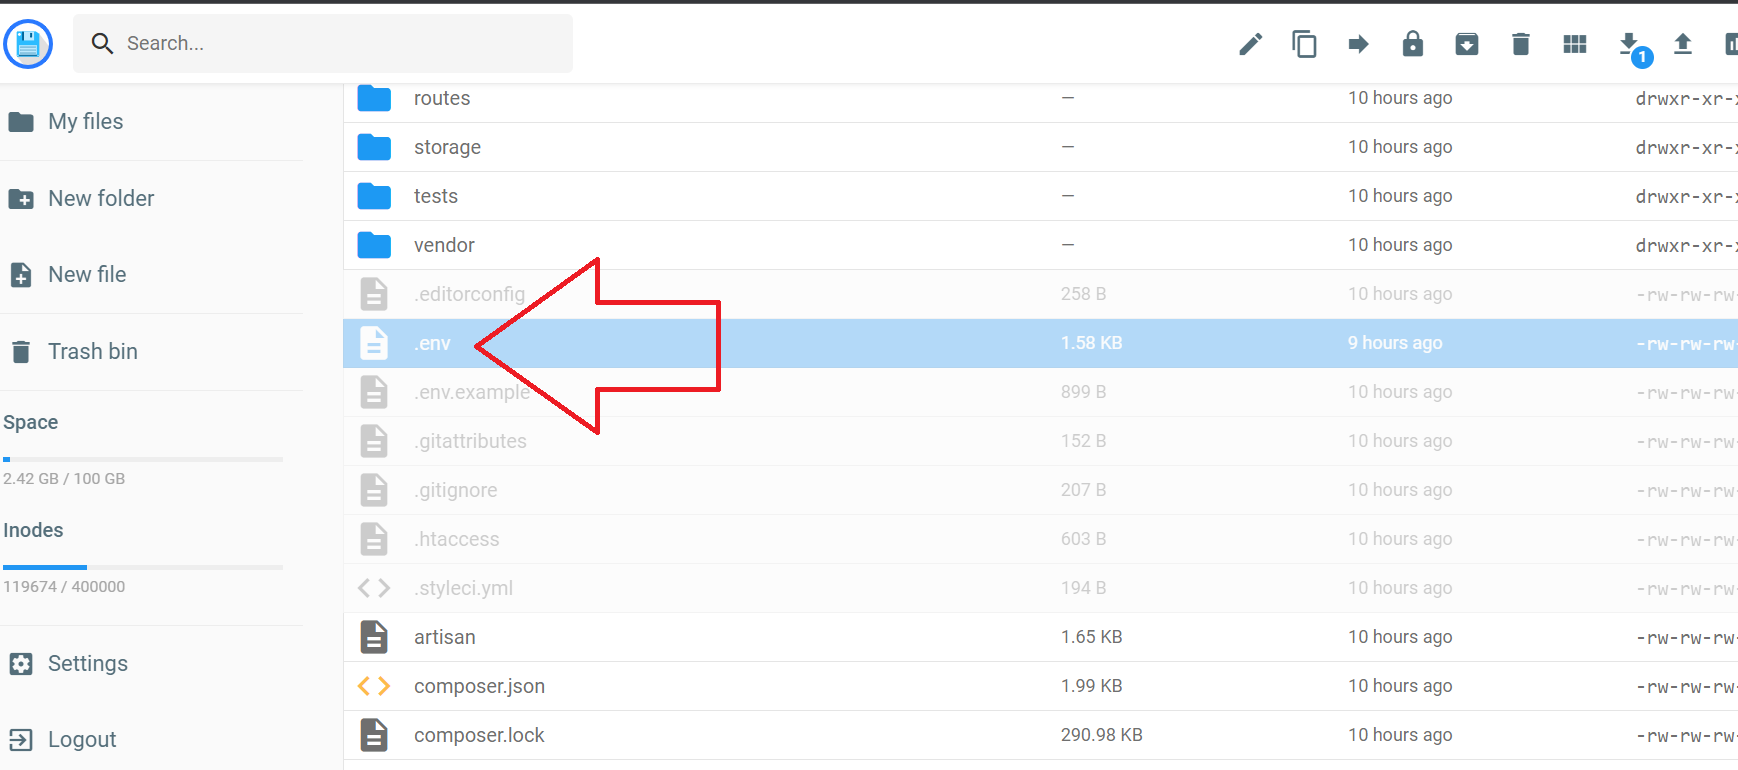
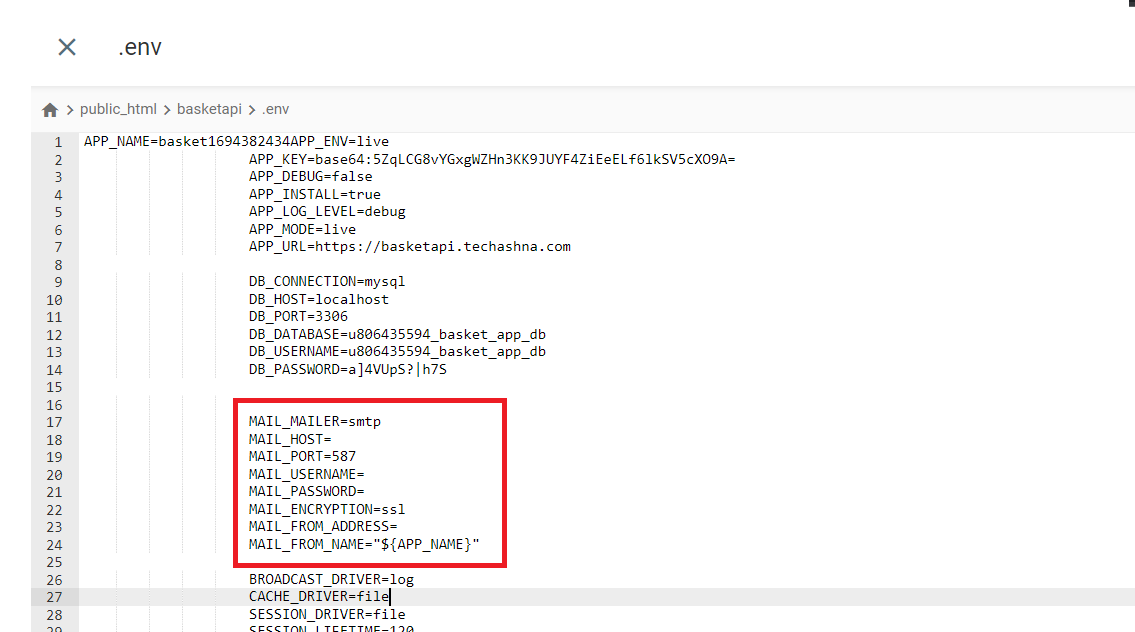
- Step 2 - Open .env file from the domain API folder that we installed in the server
- Step 3 - Now fill hosting SMTP details in the variables MAIL_HOST, MAIL_USERNAME, MAIL_PASSWORD, MAIL_FROM_ADDRESS
Admin Panel Setup
Please complete API setup before moving forword in admin panel
- Step 1 - Unzip the source file, we have provided in your downloaded package from codecanyon.
- Step 2 - Admin Panel is created with ReactJs , so you need to install NodeJs 16 or 16+ and packege manager like NPM in you system
- Step 3 - Open the basket-admin-panel Folder in your IDE or code Editor like vscode
- Step 4 - Open terminal and navigate to basket-admin-panel folder and run command npm install
-
Step 5 - Now navigate to (src/data/apiAddress.js) and
replace the apiAddress with your api domain address
(Ex.- replace the "https://basketapp.techashna.com" with "https://basketapi.yourdomain.com") -
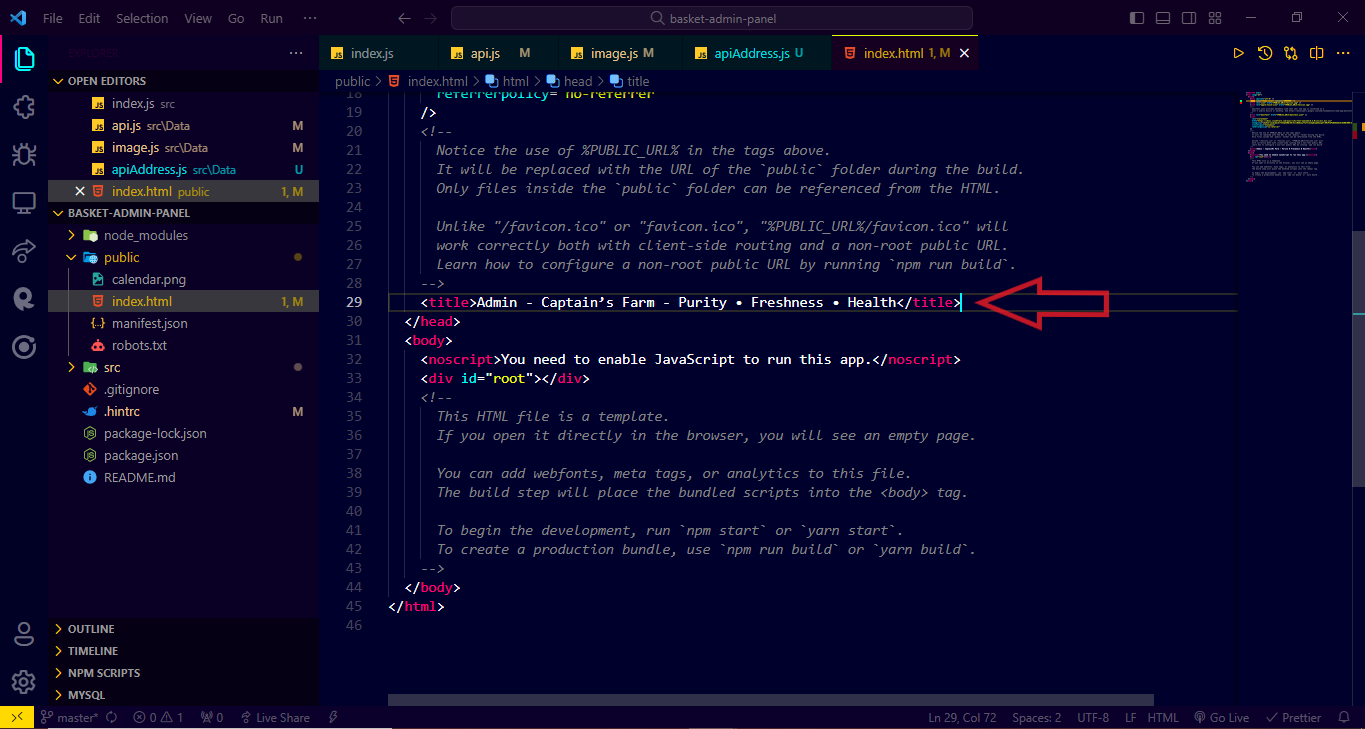
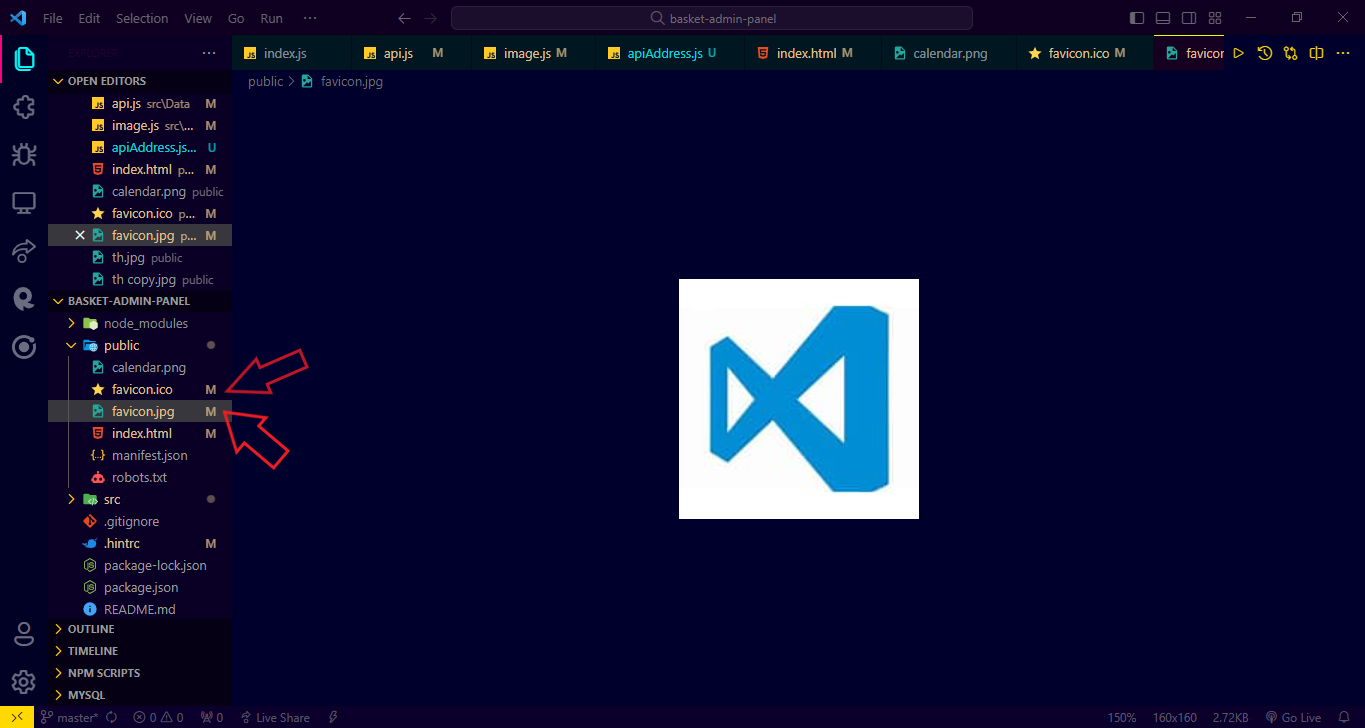
Step 6 - Now navigate to ("public/index.html") and change
title of your admin panel
and navigate to ("public") folder and replace the favicon.jpg and favicon.ico file with same "name" and "file extenstion" with your app icon

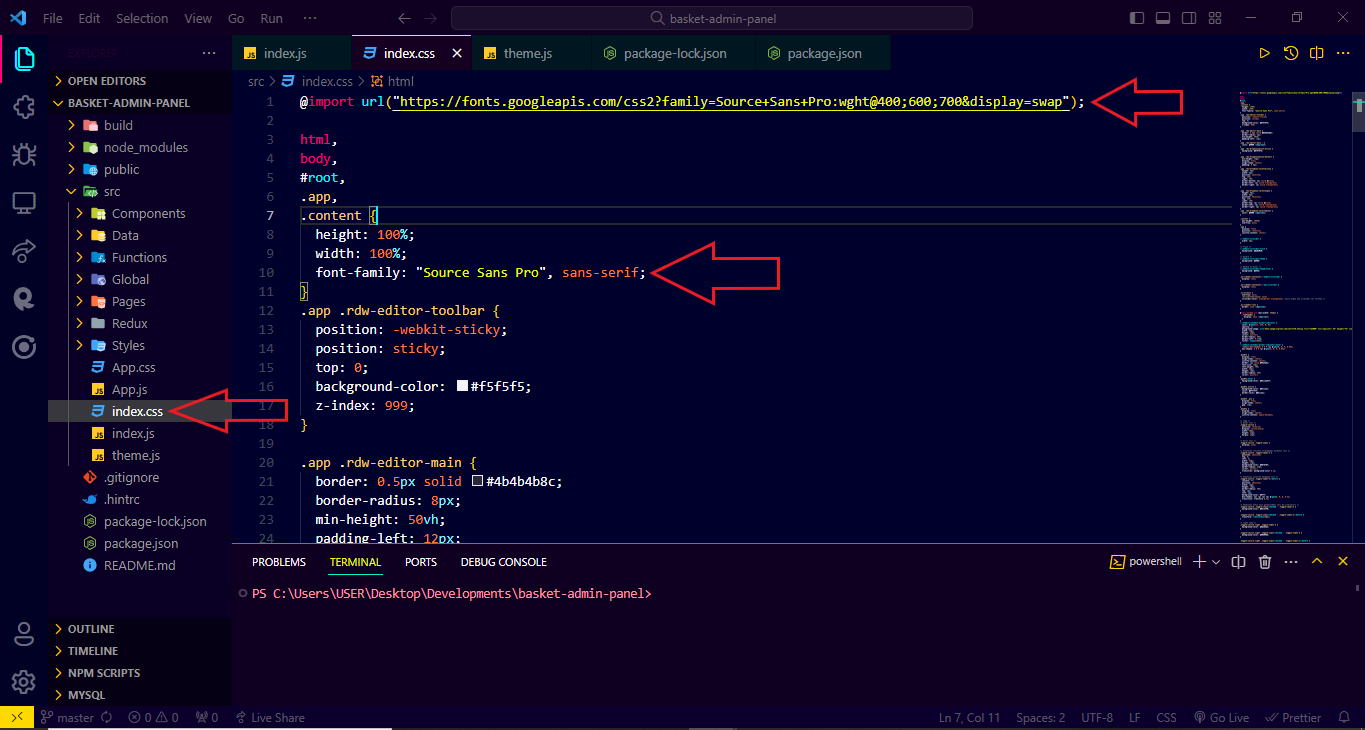
Customize Admin Panel Fonts
-
step 1 - Navigate to
src/index.cssand impote your desired fonts from Google Font - Step 2 - Changet the font family
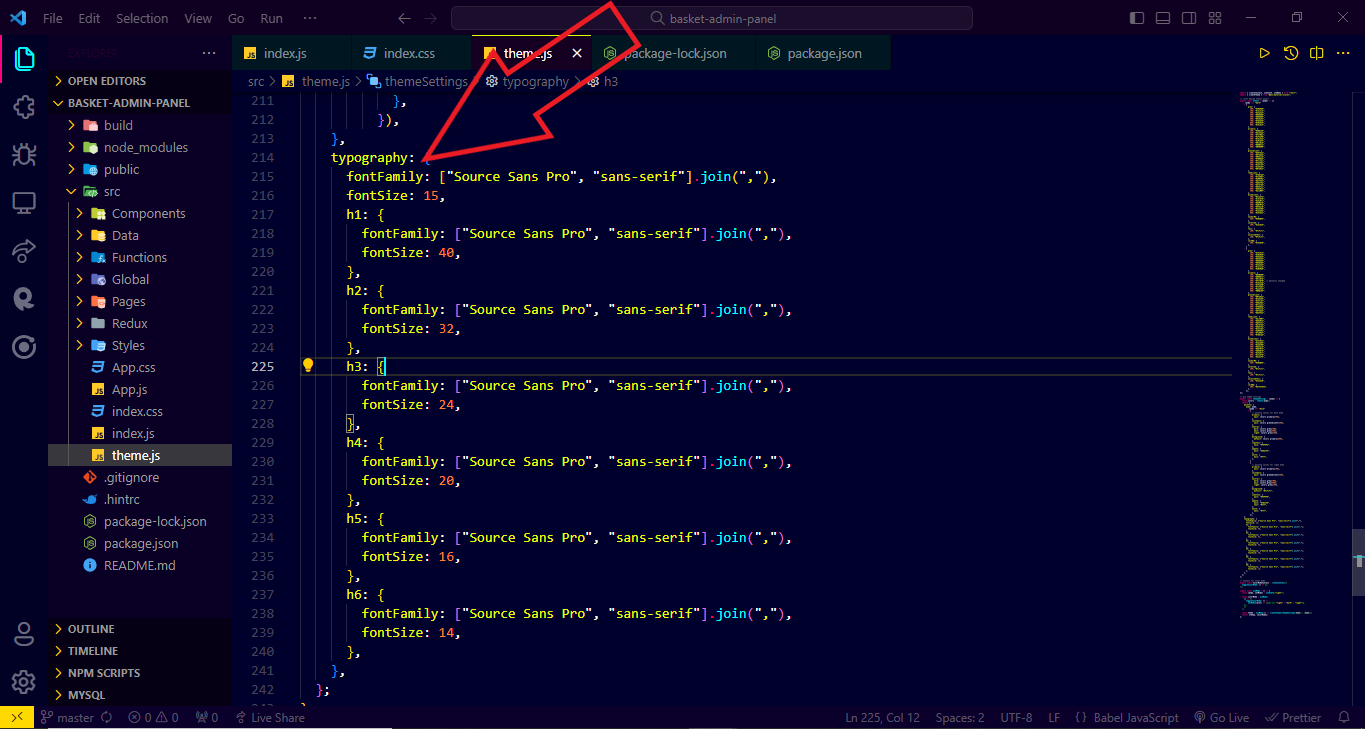
-
Step 3 - Navigate to
src/theme.jsand change the font family on typography section
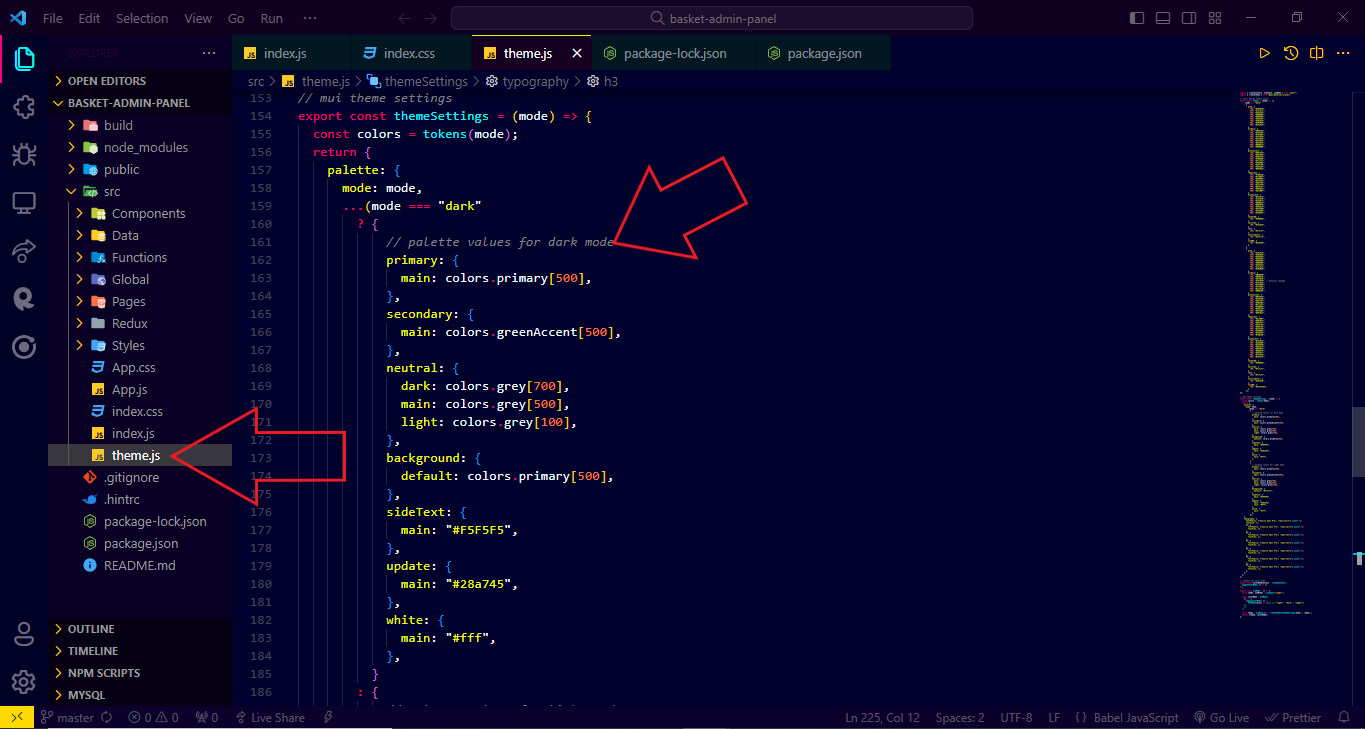
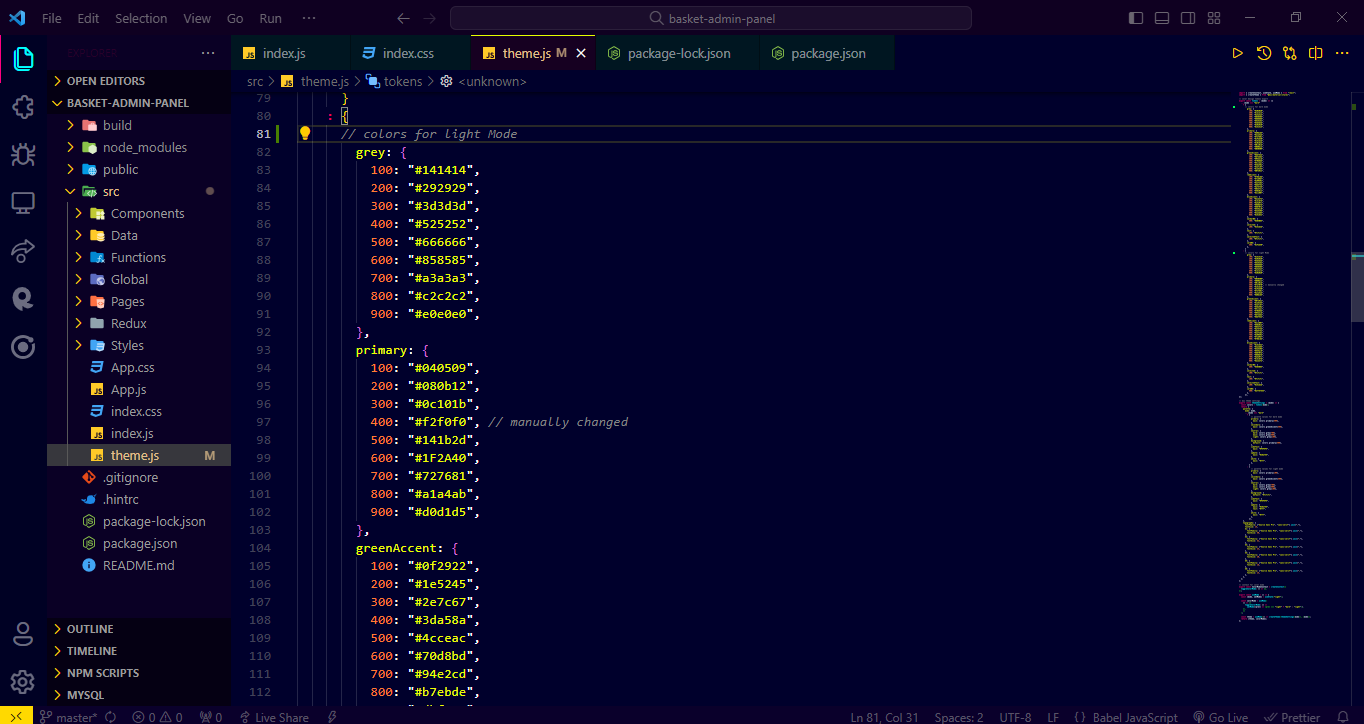
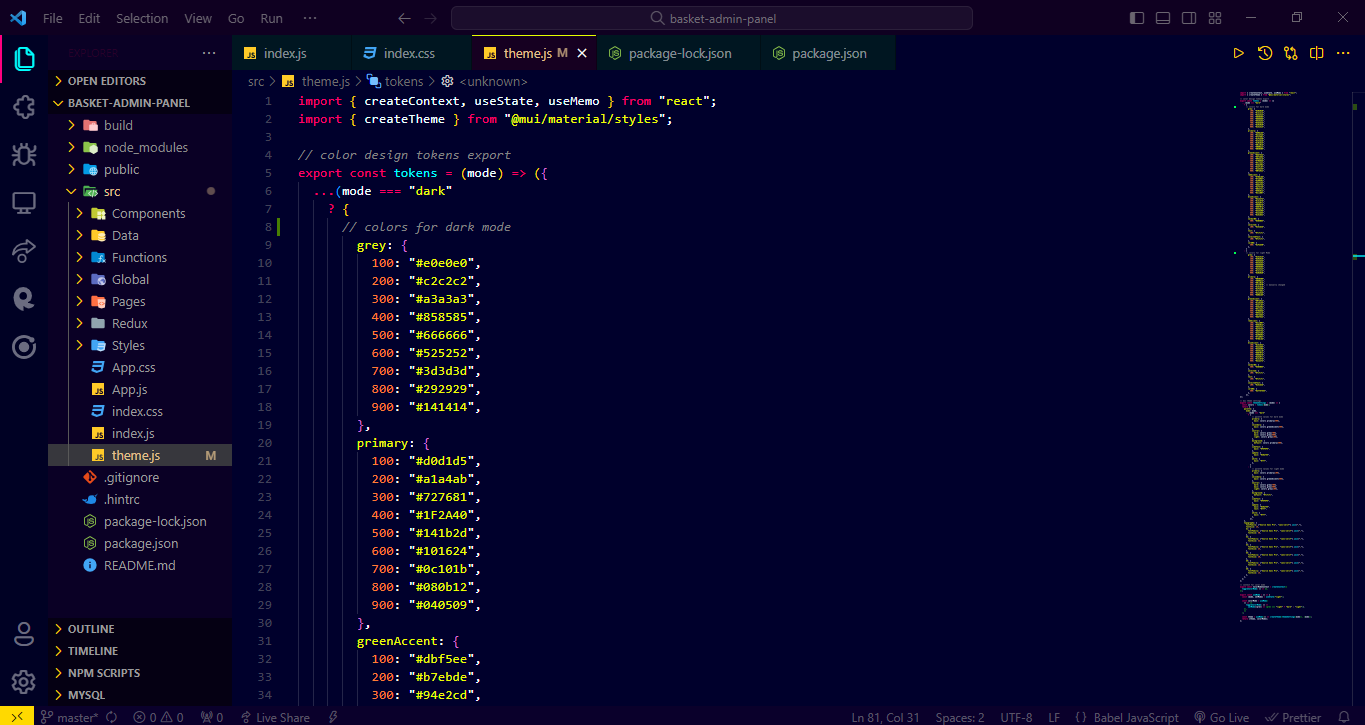
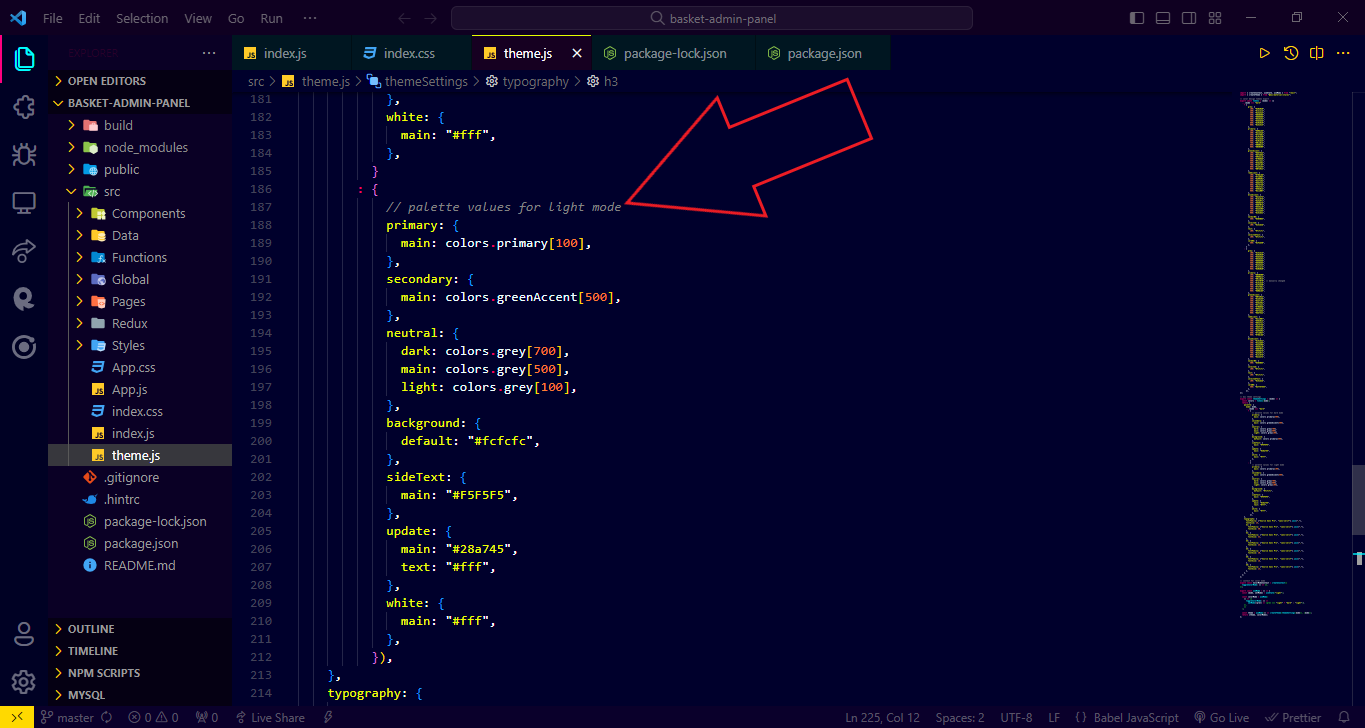
Customize Admin Panel Colors
-
step 1 - Navigate to
src/theme.jsand toggle all the color hex code according to your taste
Admin Panel Deployment
Please complete API setup And Admin Panel Initial setup before moving forword in admin panel Deployment
- Step 1 - Navigate to package.json and chnage the packege name.
-
Step 2 - Navigate to package.json and in Homepage add the
address where you are gonna host your admin panel we suggest
you to host your admin panel in sub-domain ,
Ex - "admin.yourapp.com" -
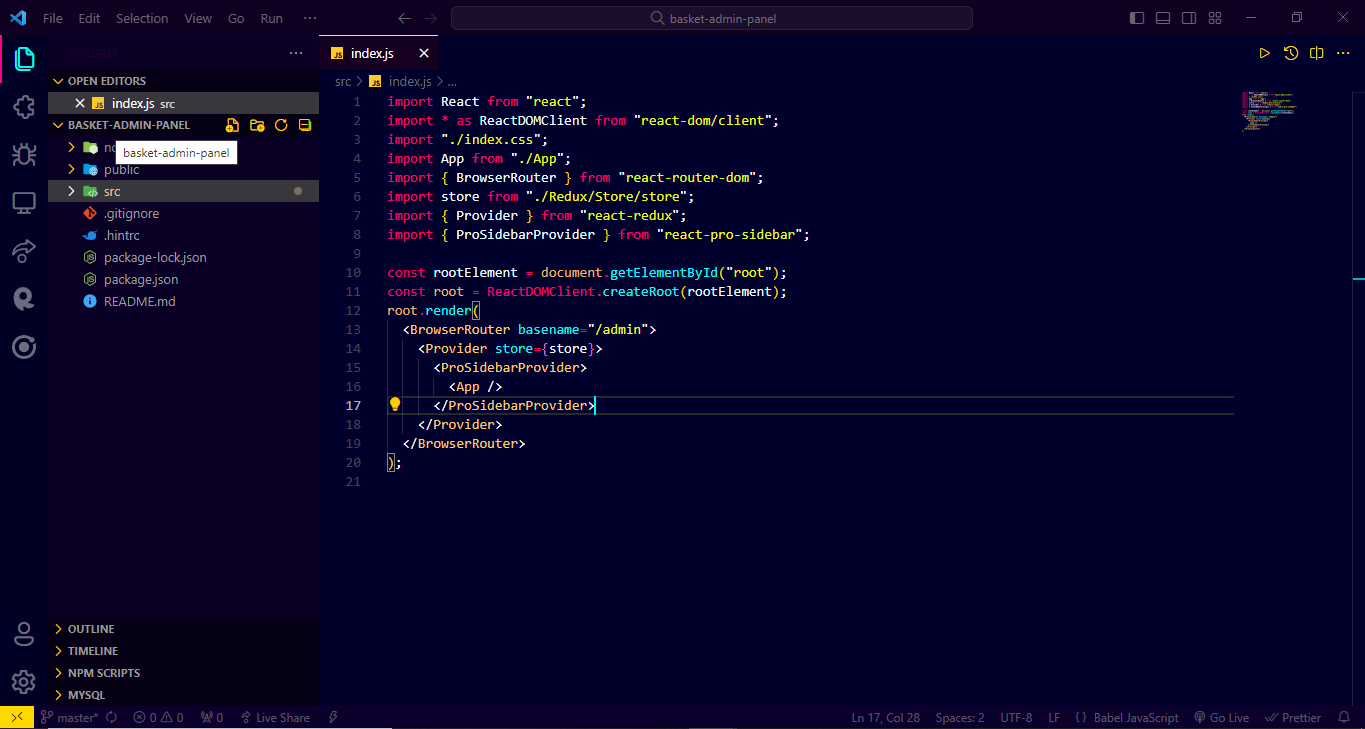
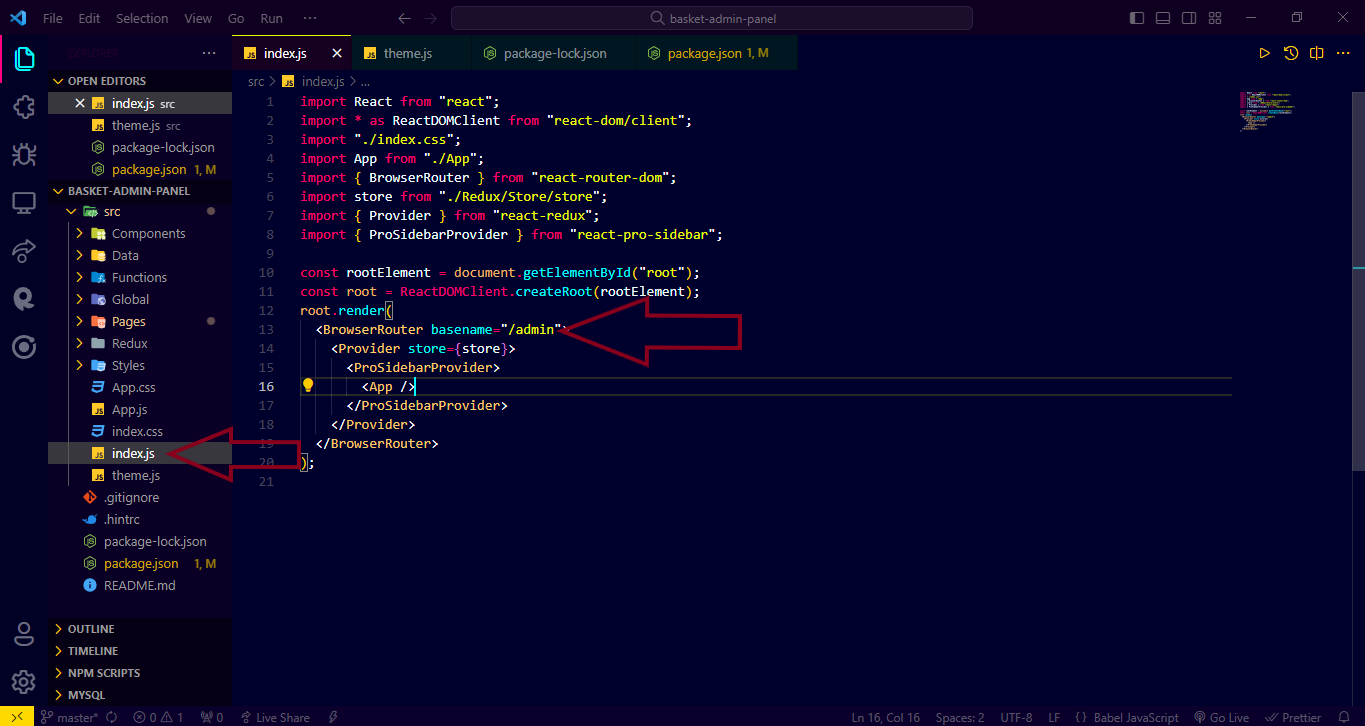
Step 3 -however If you want to host your panel in
subdirectry like "yourapp.com/admin" , navigate to
"src/index.js"
and add the basename property at BrowserRouter , value of basename properly is same as your subdirectry name , in our case it is Admin
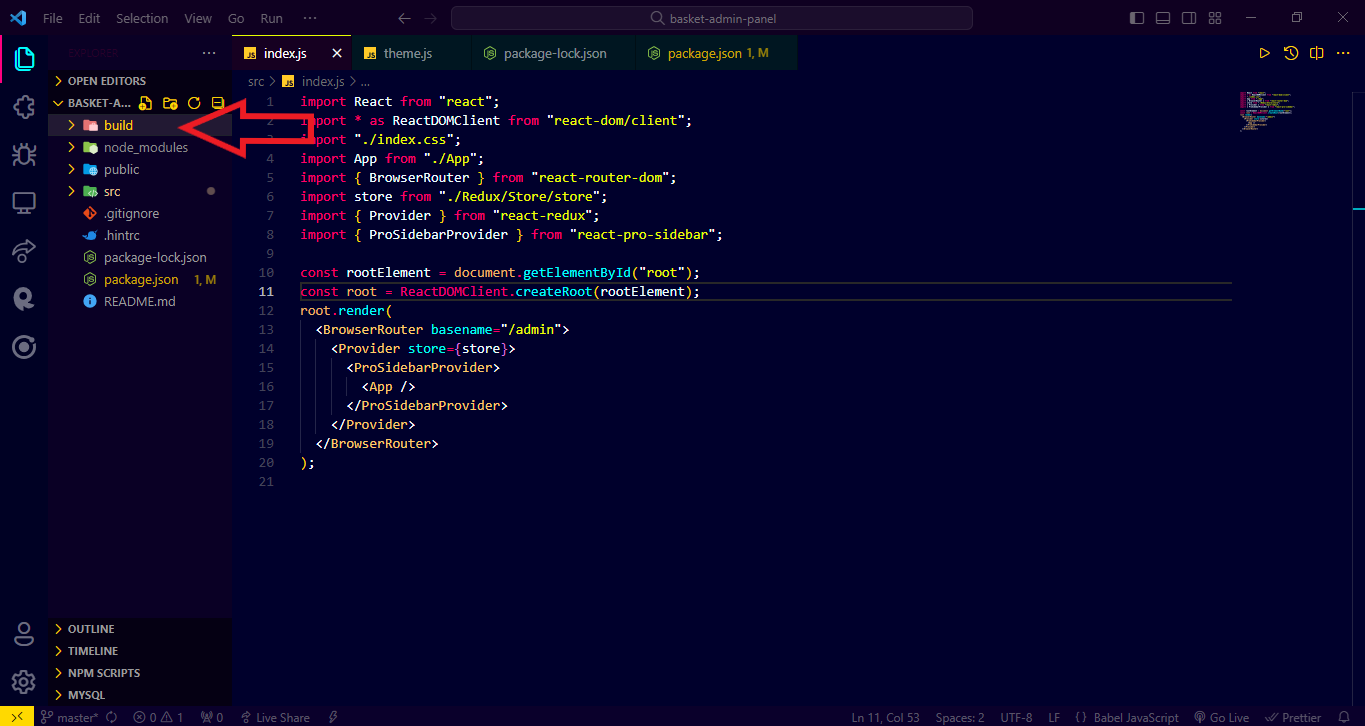
(Skip this step if you are not hosting your admin panel in subdirectry) - Step 4 - Now open terminal and run command npm run build
- Step 7 - After Build is complete , you'll see build folder inside basket-admin-panel folder , open the build folder and upload the files in your desired location


Firebase Setup
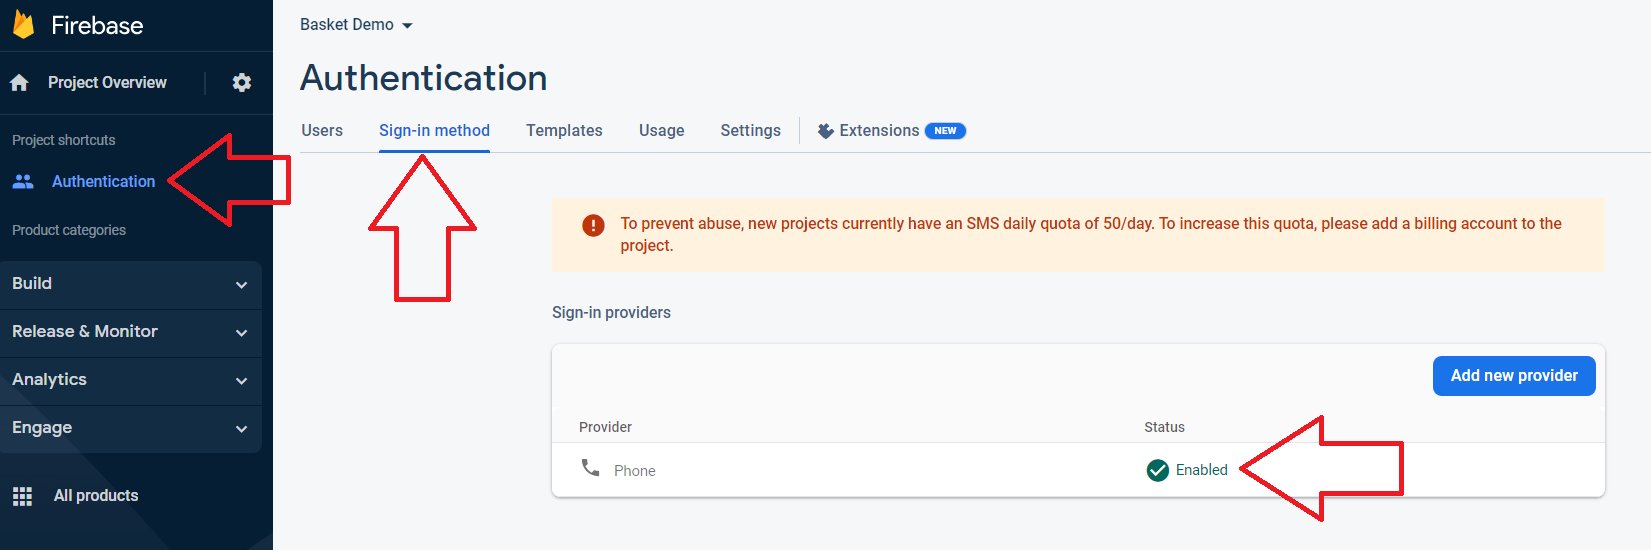
- Step 1 - Log in to your Firebase account and create a new project.
- Step 2 - Enable firebase phone authentication in "authentication/Sign-in-method" and follow their rules for enabling firebase authentication.
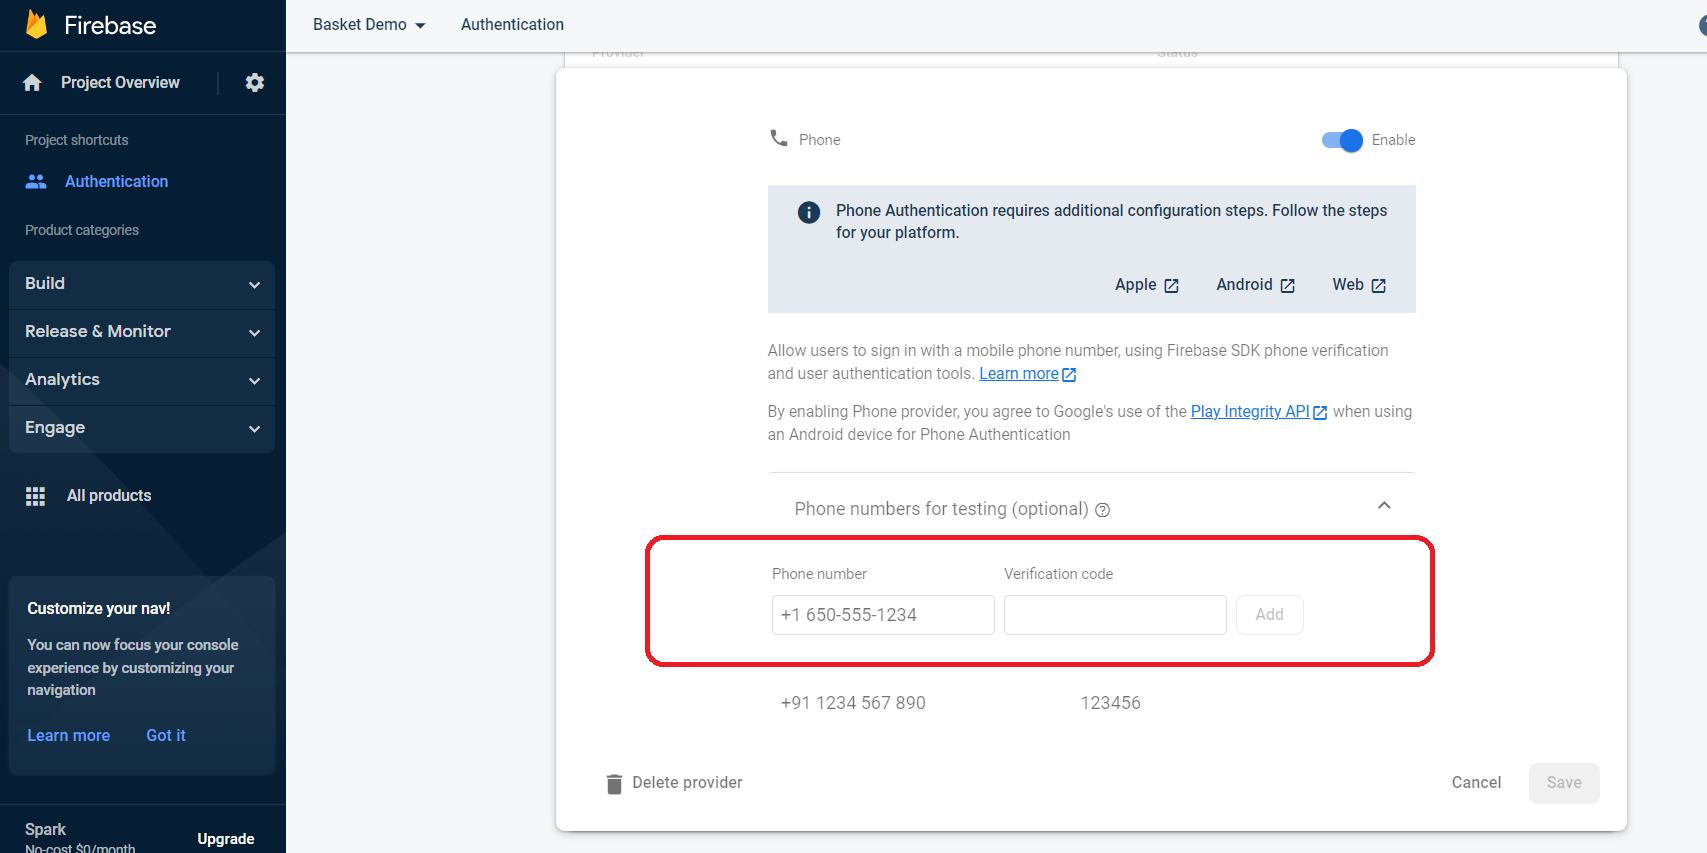
- Step 3 - After enabling Firebase auth you can add a phone number and OTP for testing purposes
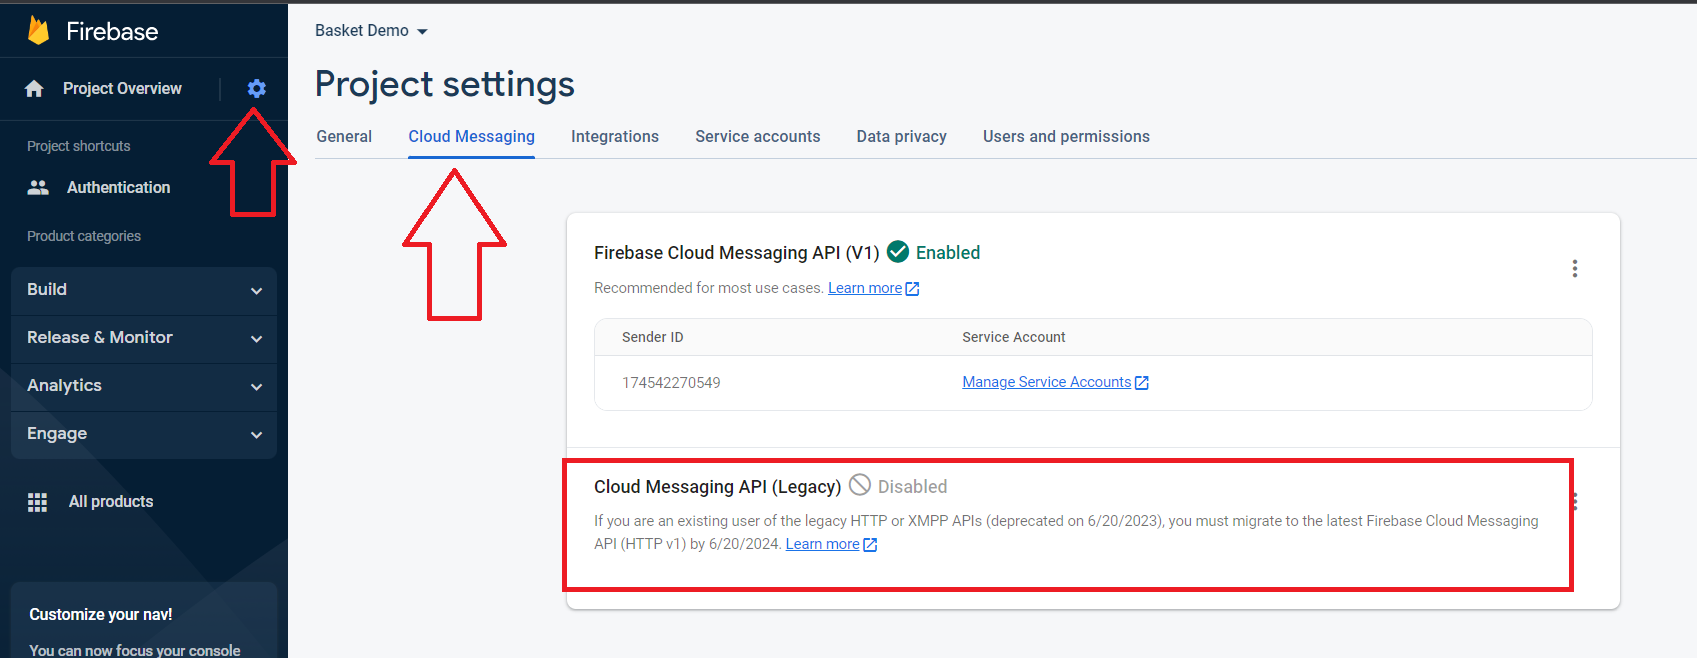
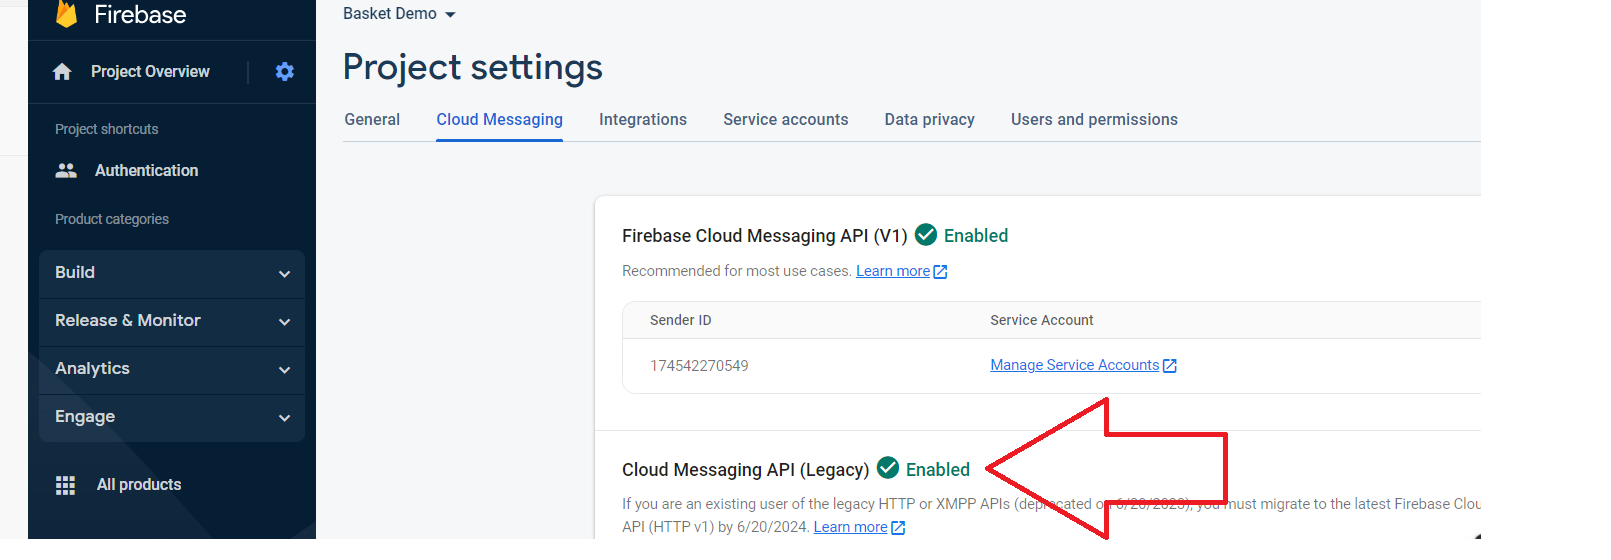
- Step 4 - Enable Cloud Messaging API (Legacy).
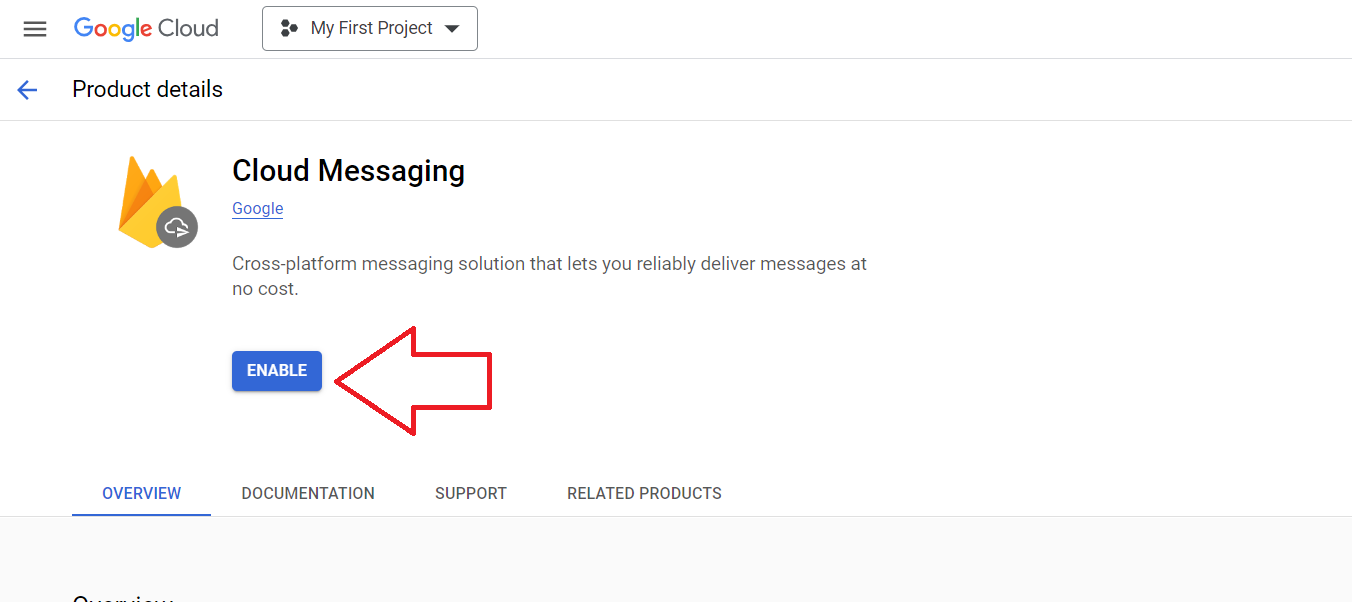
- Step 5 - Open the Gogole Cloud Messaging Api
- Step 6 - Select your firebase projetc and search for Cloud Messaging then enable the API
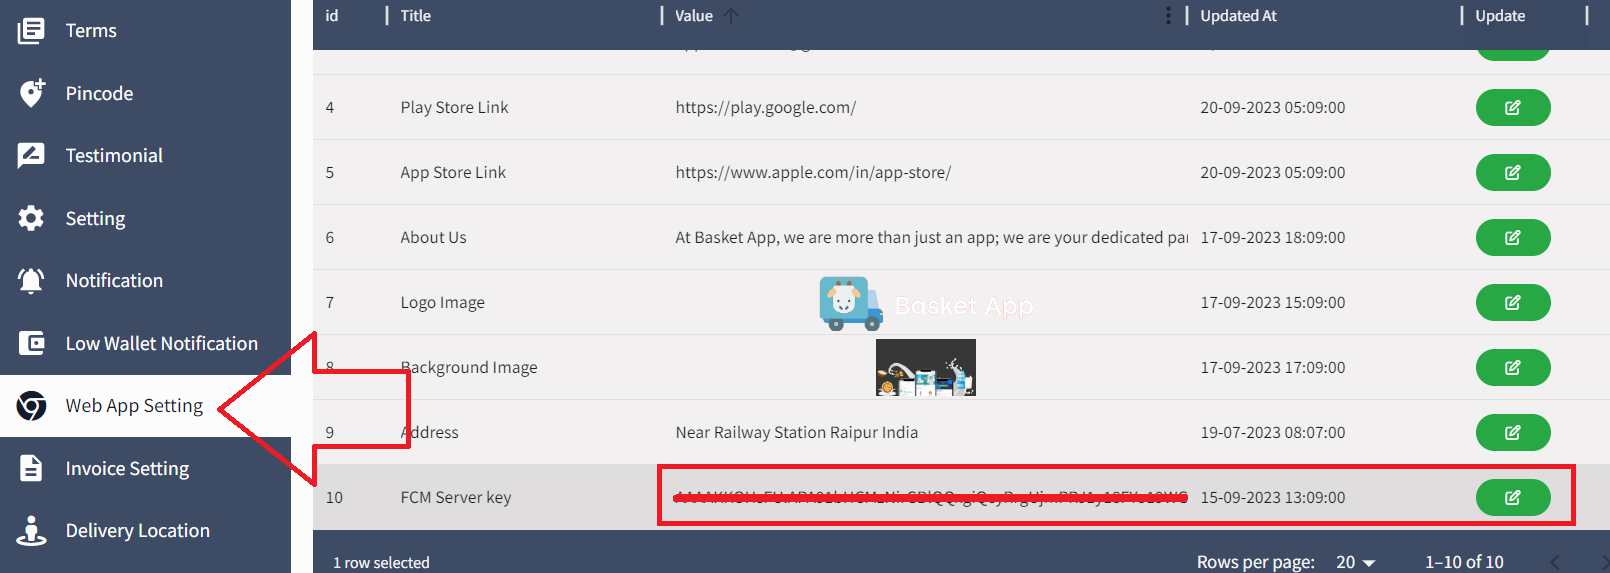
- Step 7 - Add firebase Messaging server key in admin panel, open (admin/web-app-setting) and find the point 10 FCM Server key then past the
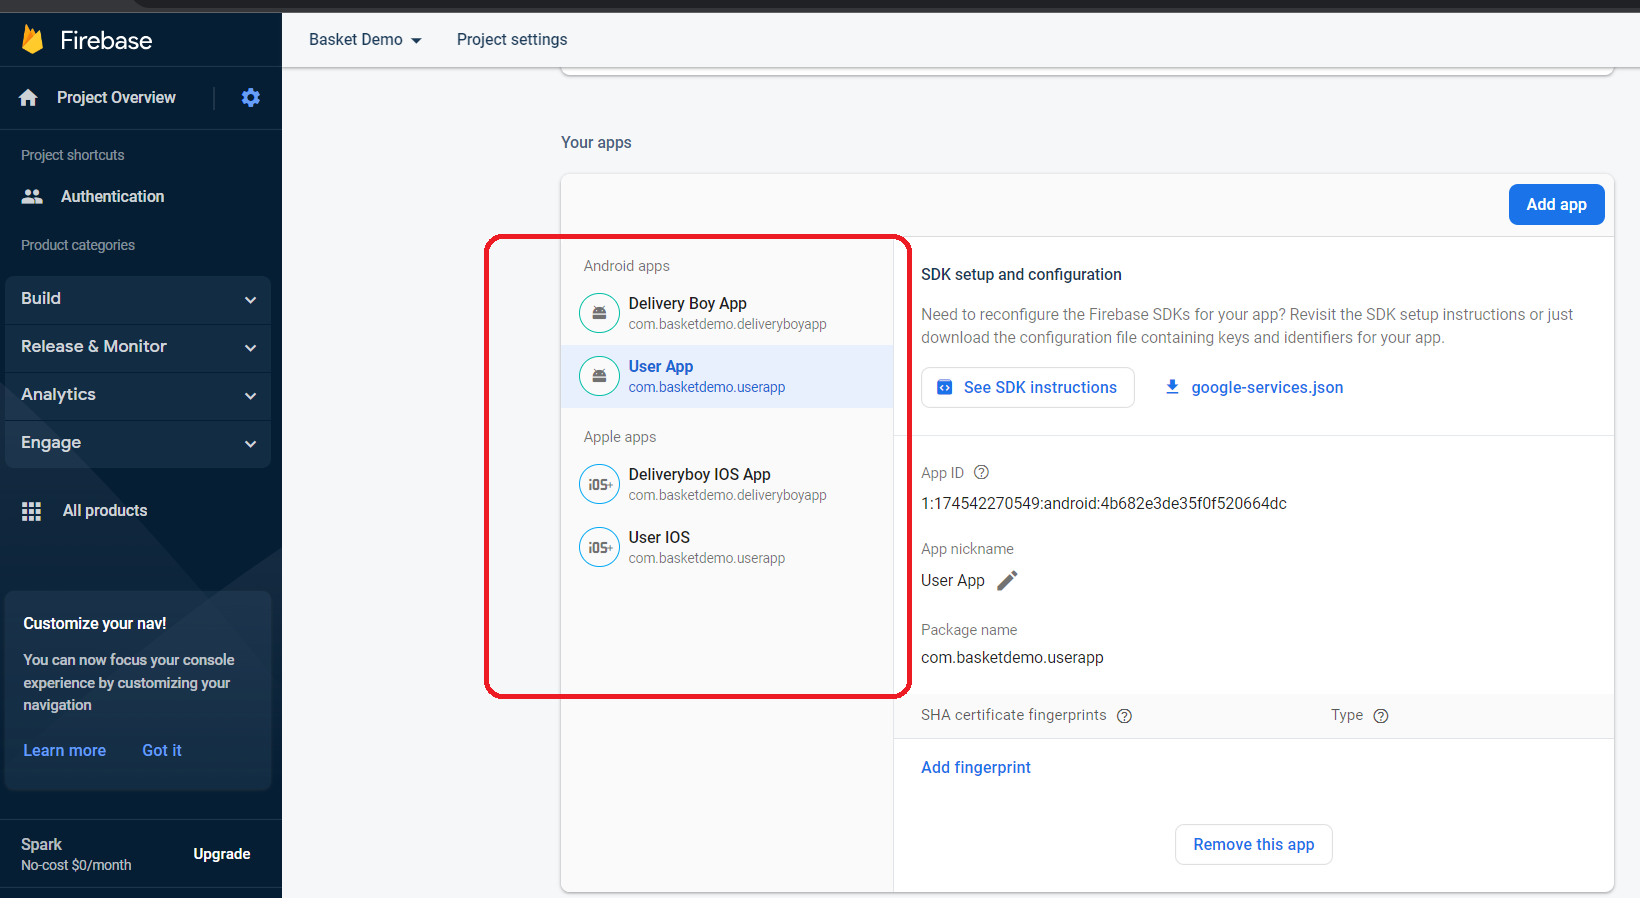
- Step 8 - Add the userapp and delivery boy android and ios app into your project while adding the app you can skip all the steps only keep the google-services file. open project setting and add both app and set package name, in our app we are using these pkg name com.basketdemo.userapp and com.basketdemo.deliveryboyapp you can use another one according to your business domain.
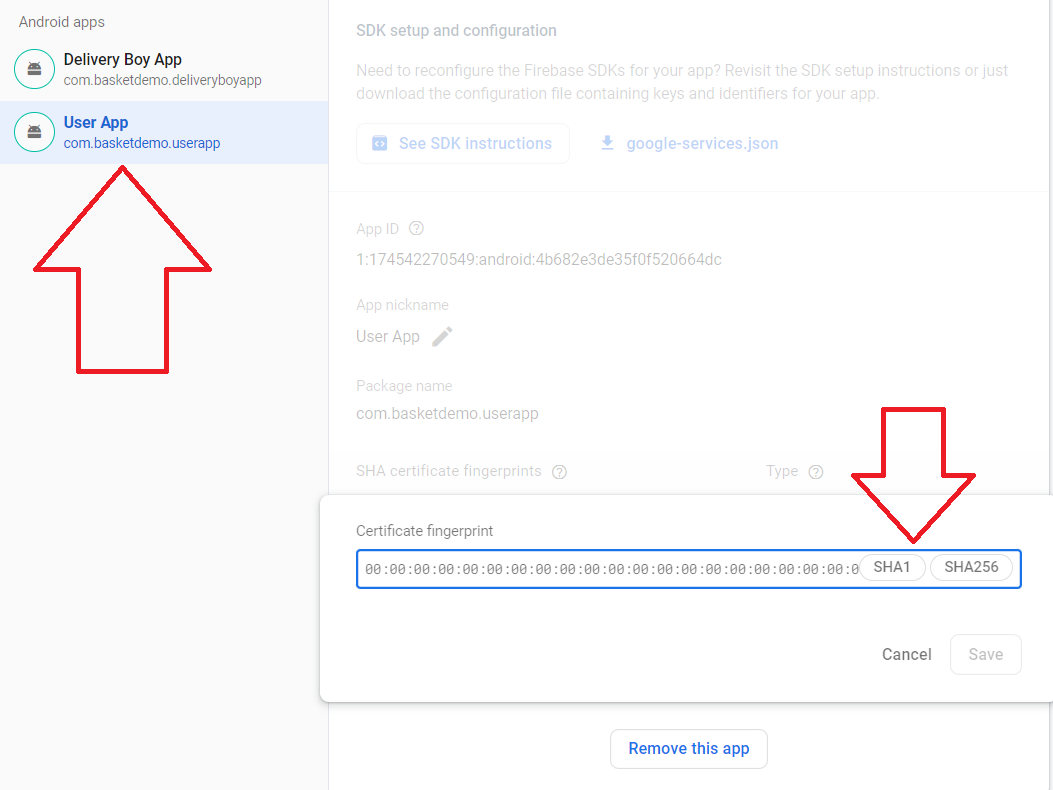
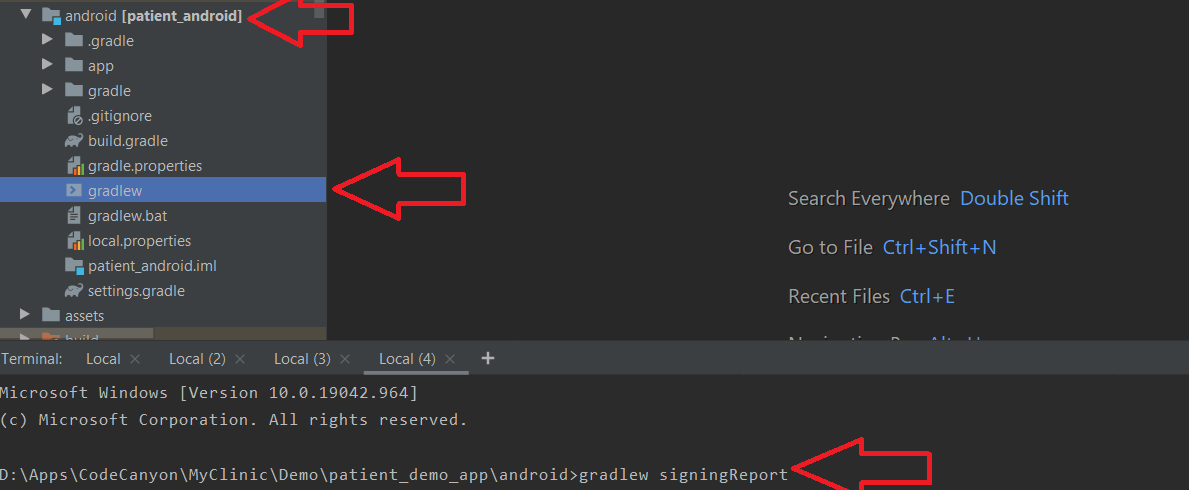
- Step 9 - Now put the SHA1 and SHA256 key in both apps. You can generate SHA Key from this method Open Android Studio Open Project Reveal android folder Right click gradlew file and select Open in Terminal - Go to the terminal view and paste gradlew signingReport (You can also skip this step for now)
User And Delivery Boy Flutter App
Environment Setup Android Studio
Install Android Studio in your system. for ios build you need also xcode setup in your mac.
Flutter SDK
You have to download and setup flutter from flutter.dev. You can follow documentation with your own device.
App Setup
- Step 1 - Unzip the source file, we have provided in your downloaded package from codecanyon.
- Step 2 - Make Sure you have installed Android Studio and setup Flutter version 3.13.1 Stable and Tools • Dart
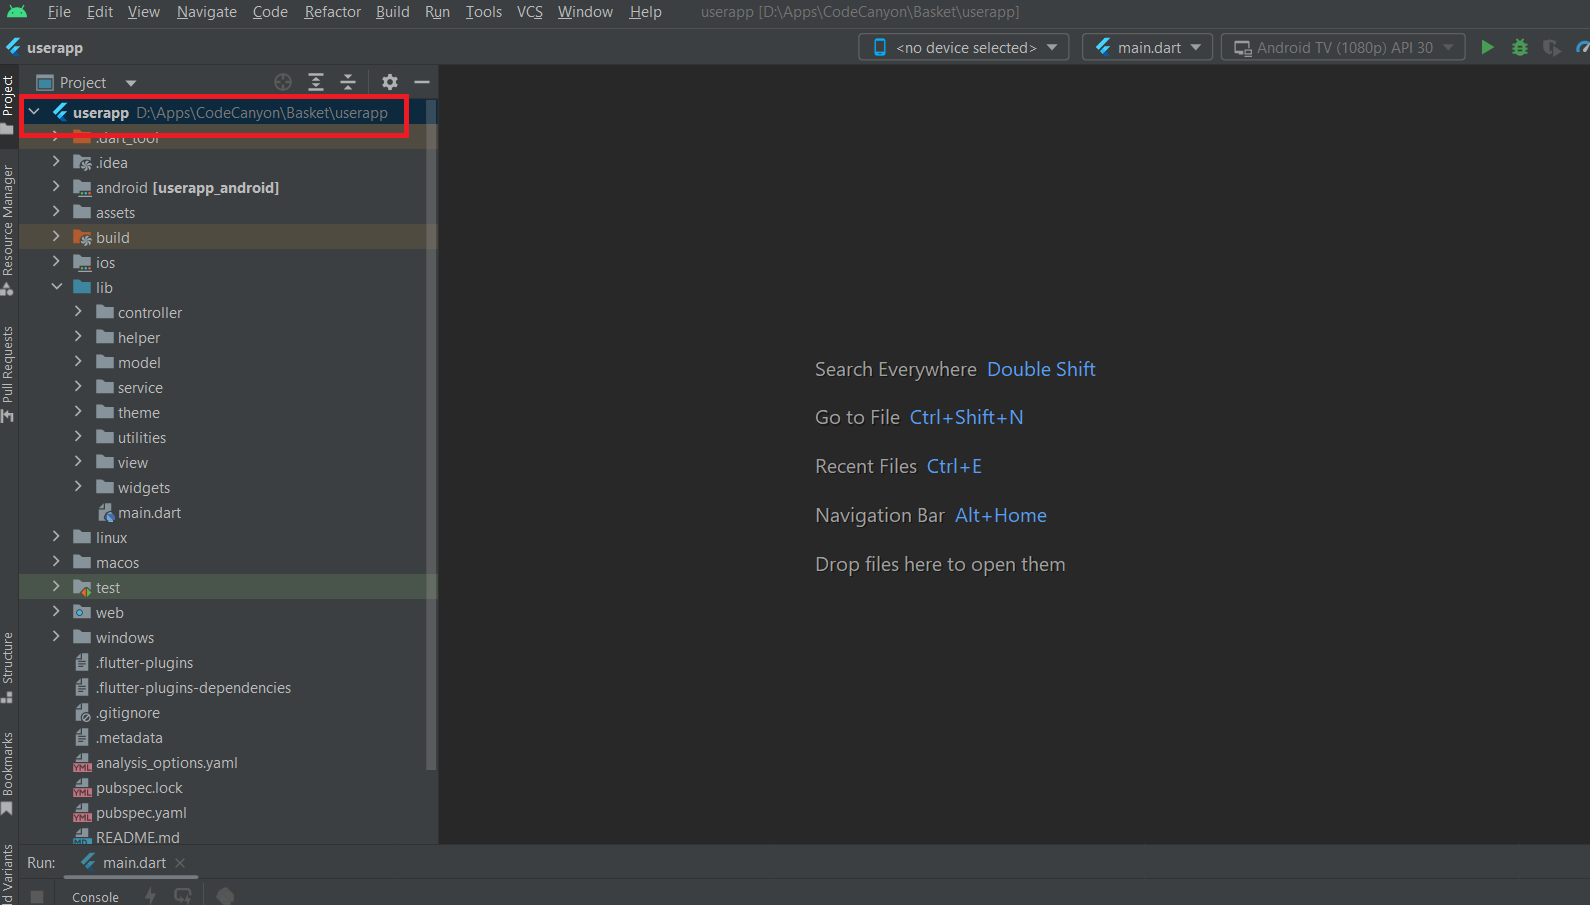
- Step 3 - Open the userapp folder in android studio.
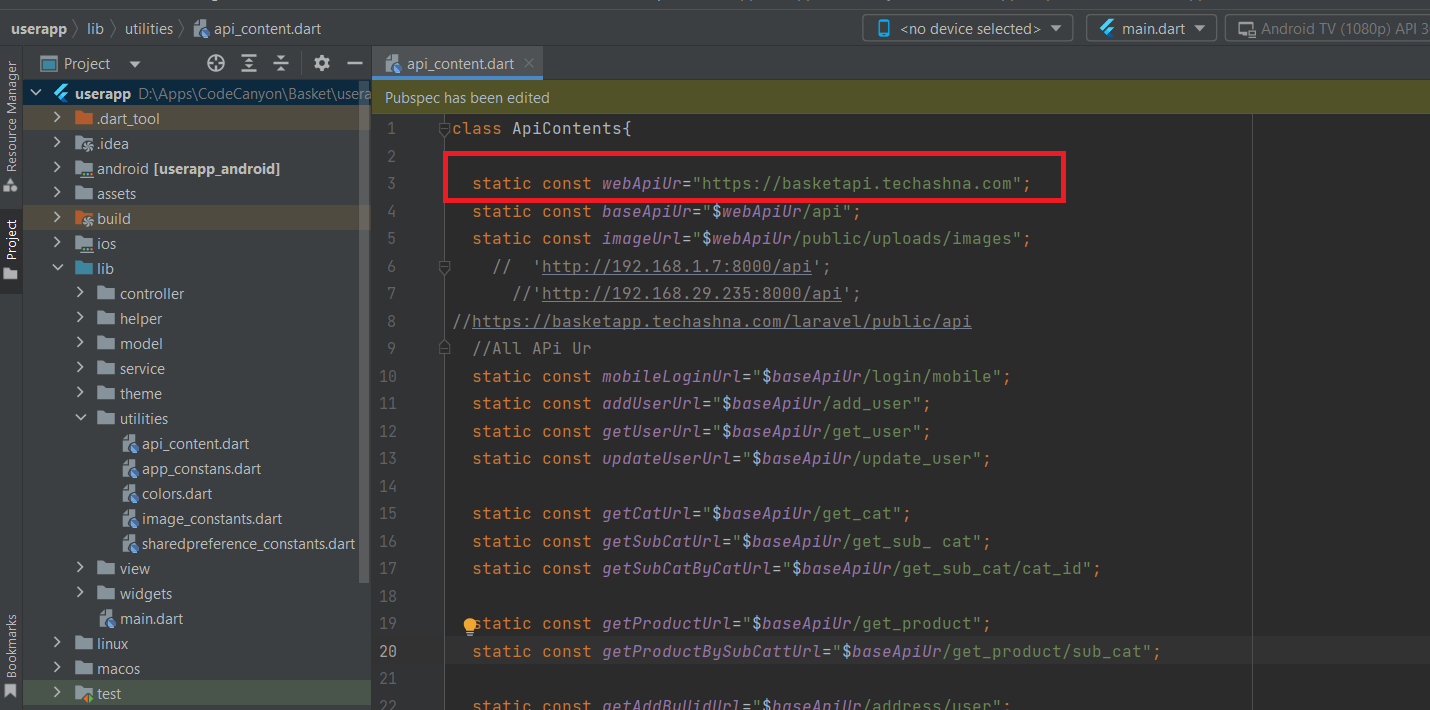
- Step 4 - open lib/utilities/api_content.dart file and replace the webApiUr as followed by the image. (API url will be the link of installed api server location HERE Ex https://basketapi.yourdomain.com)
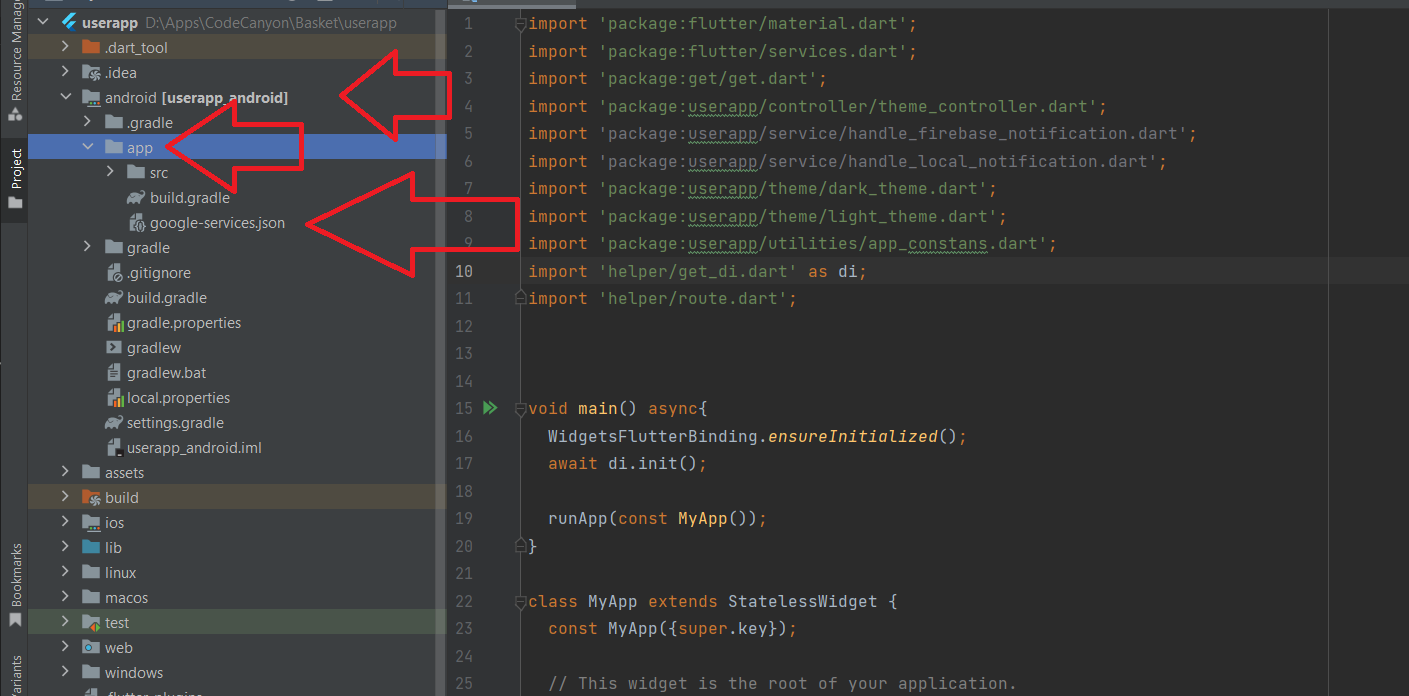
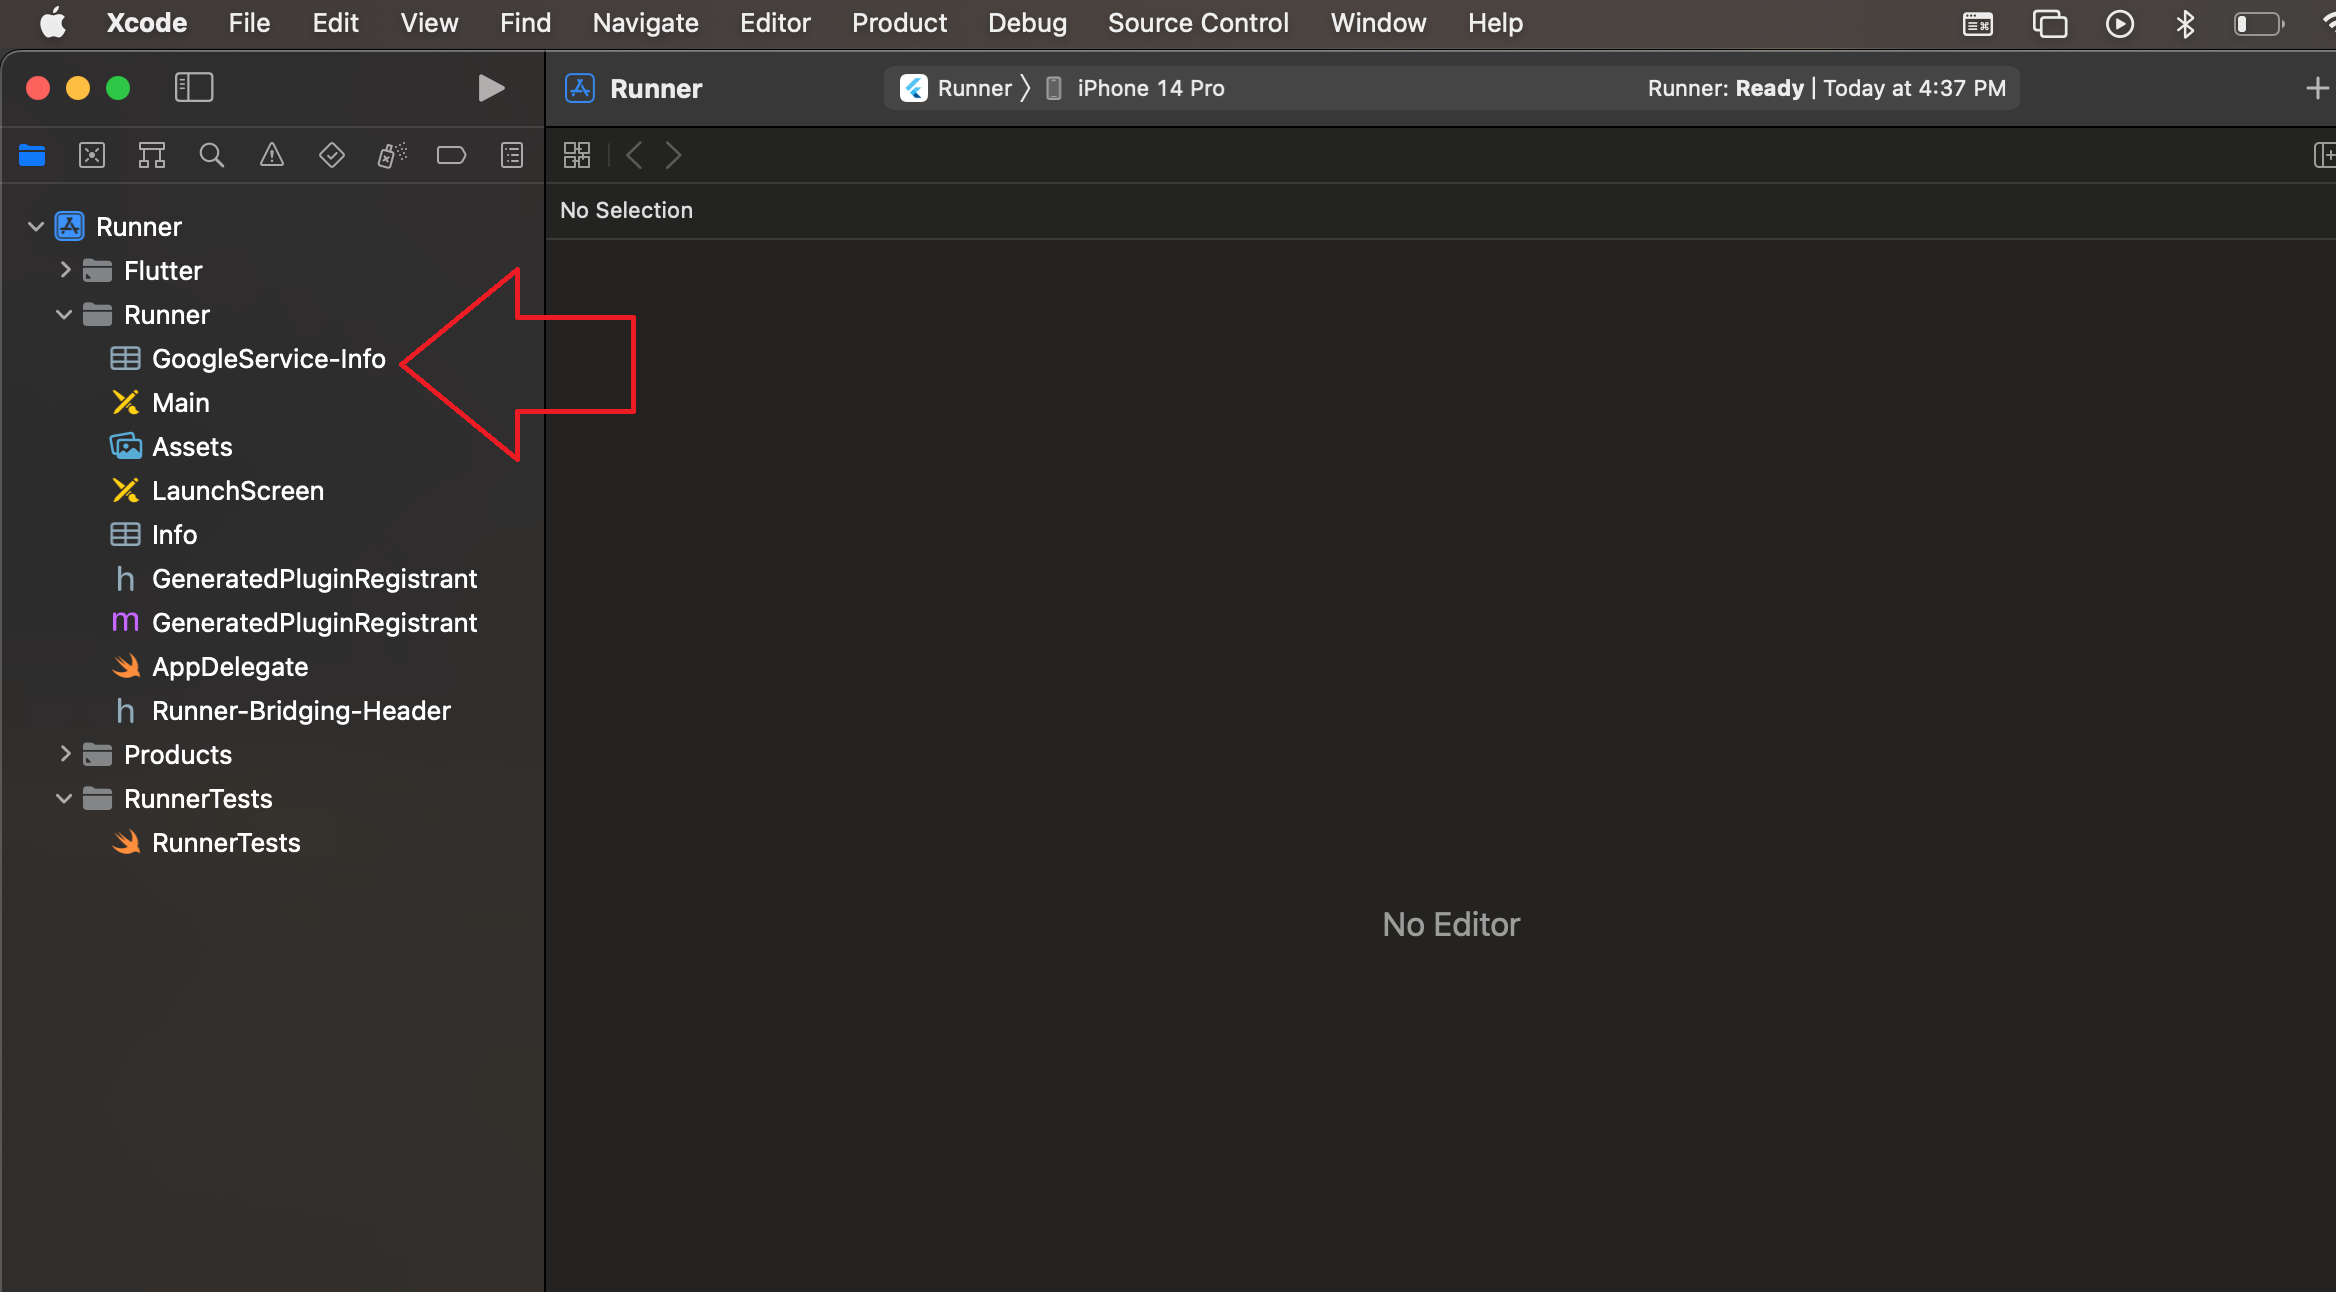
- Step 5 - Put or replace the google-services file here (userapp\android\app) and (userapp\ios\Runner)
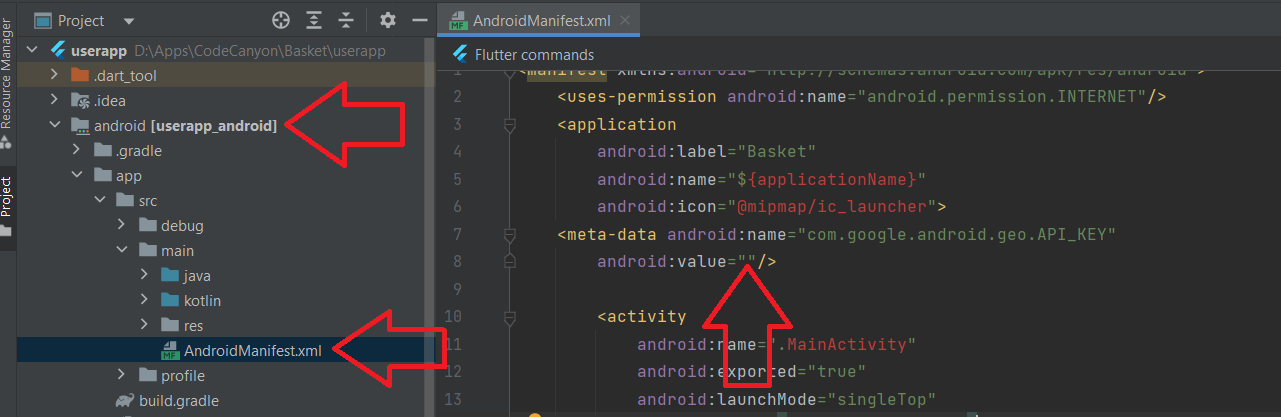
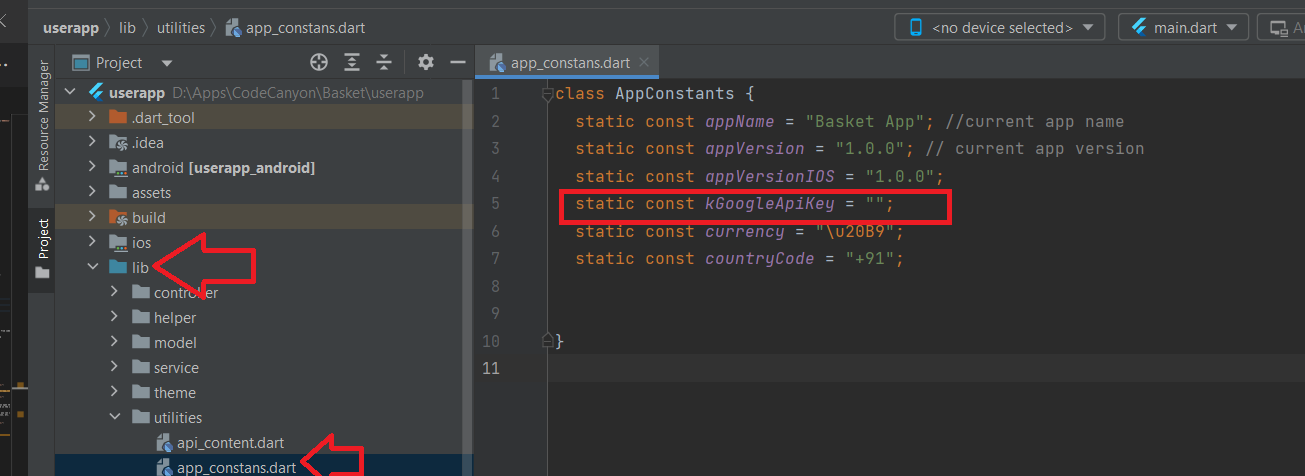
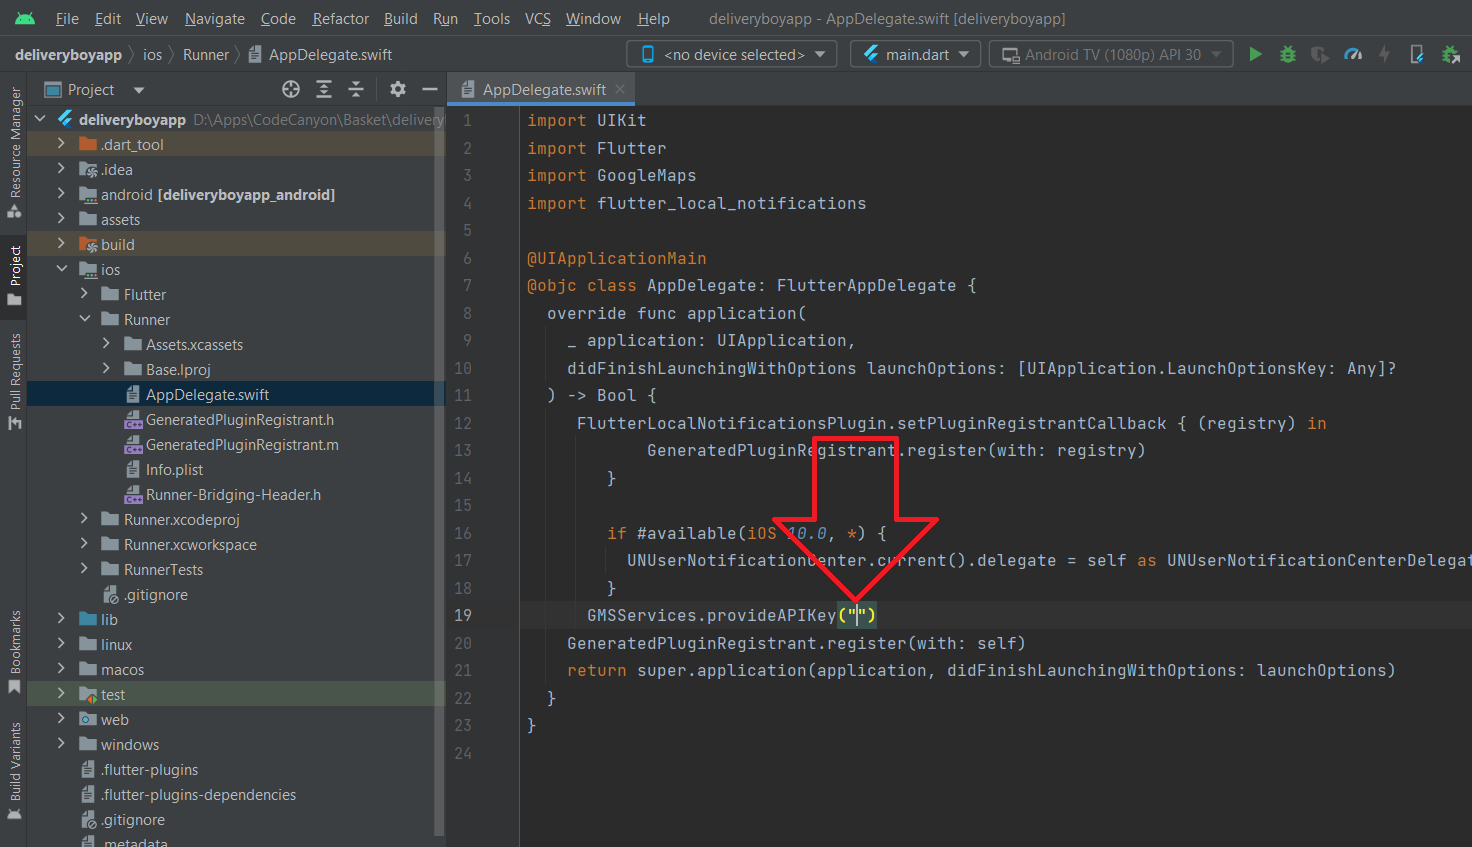
- Step 6 - Past the google map api key in AndroidManifest.xml and lib/utilities/app_constans.dart file and ios/Runner/AppDelegate.swift. if you do not have Google Map API key then you can create one from here (How to create key) and enable the ANDROID MAP SDK and IOS MAP SDK
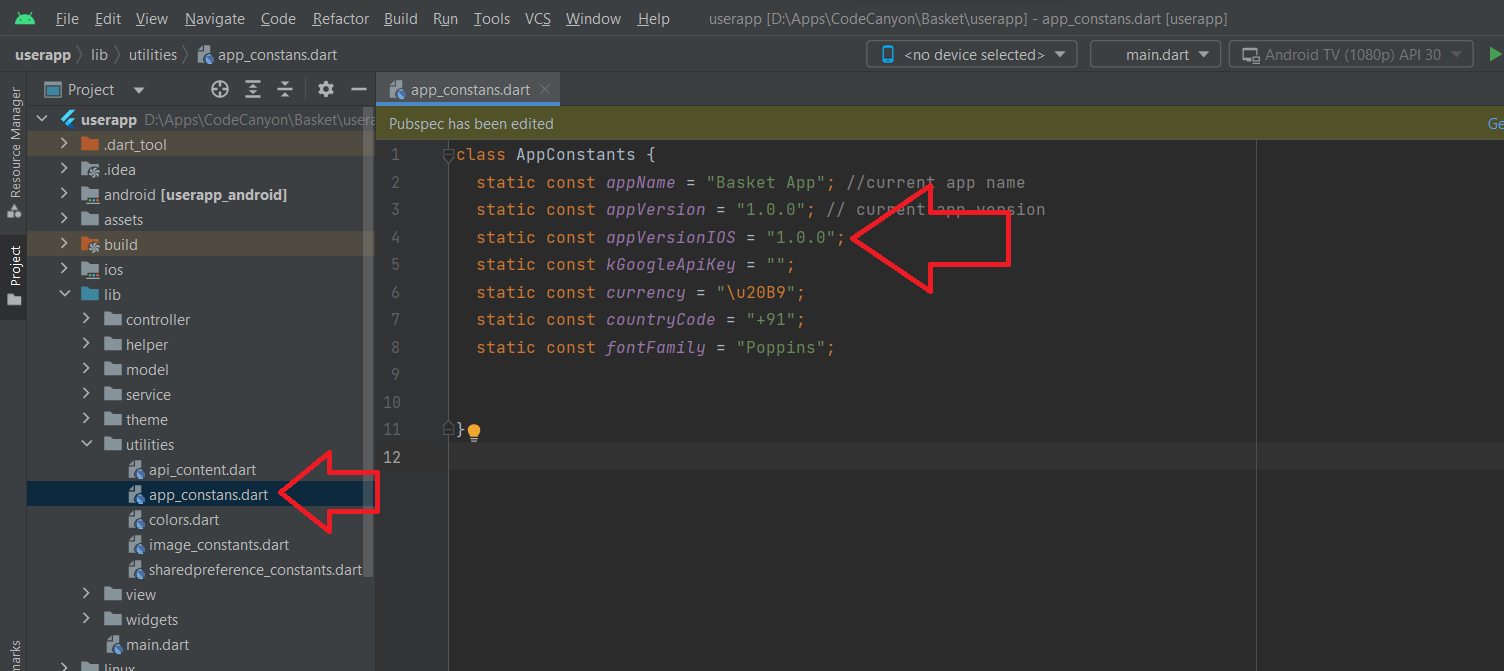
- Step 7 - Open lib/utilities/app_constans.dart and change the app name,currency.
- Step 8 - if you are using different pkg name then you can change from here How To Change App Package Name
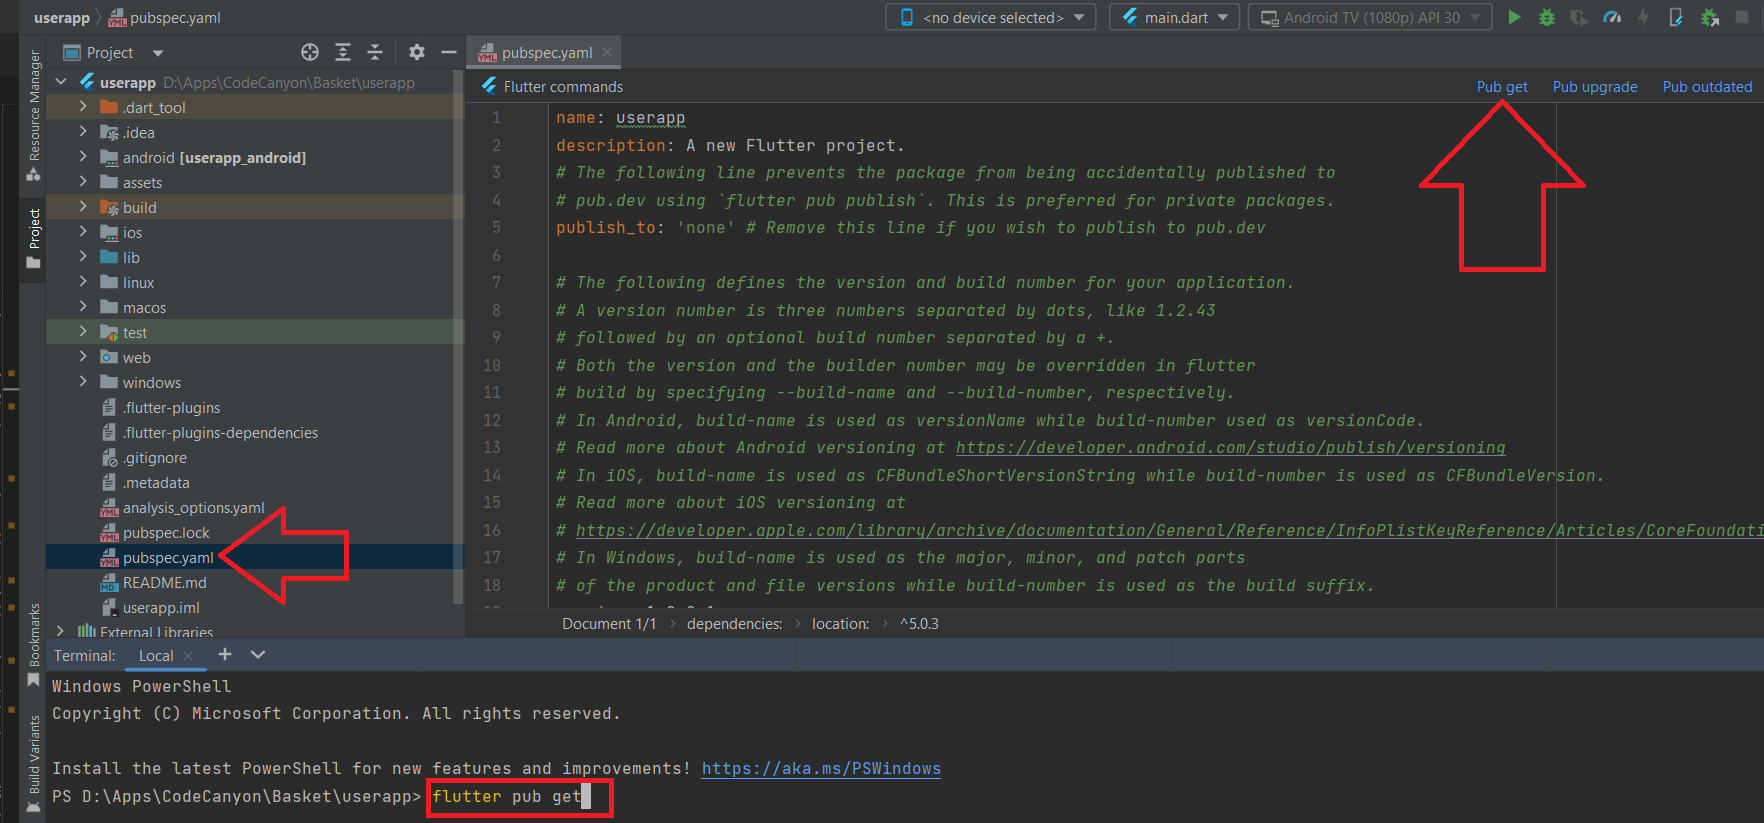
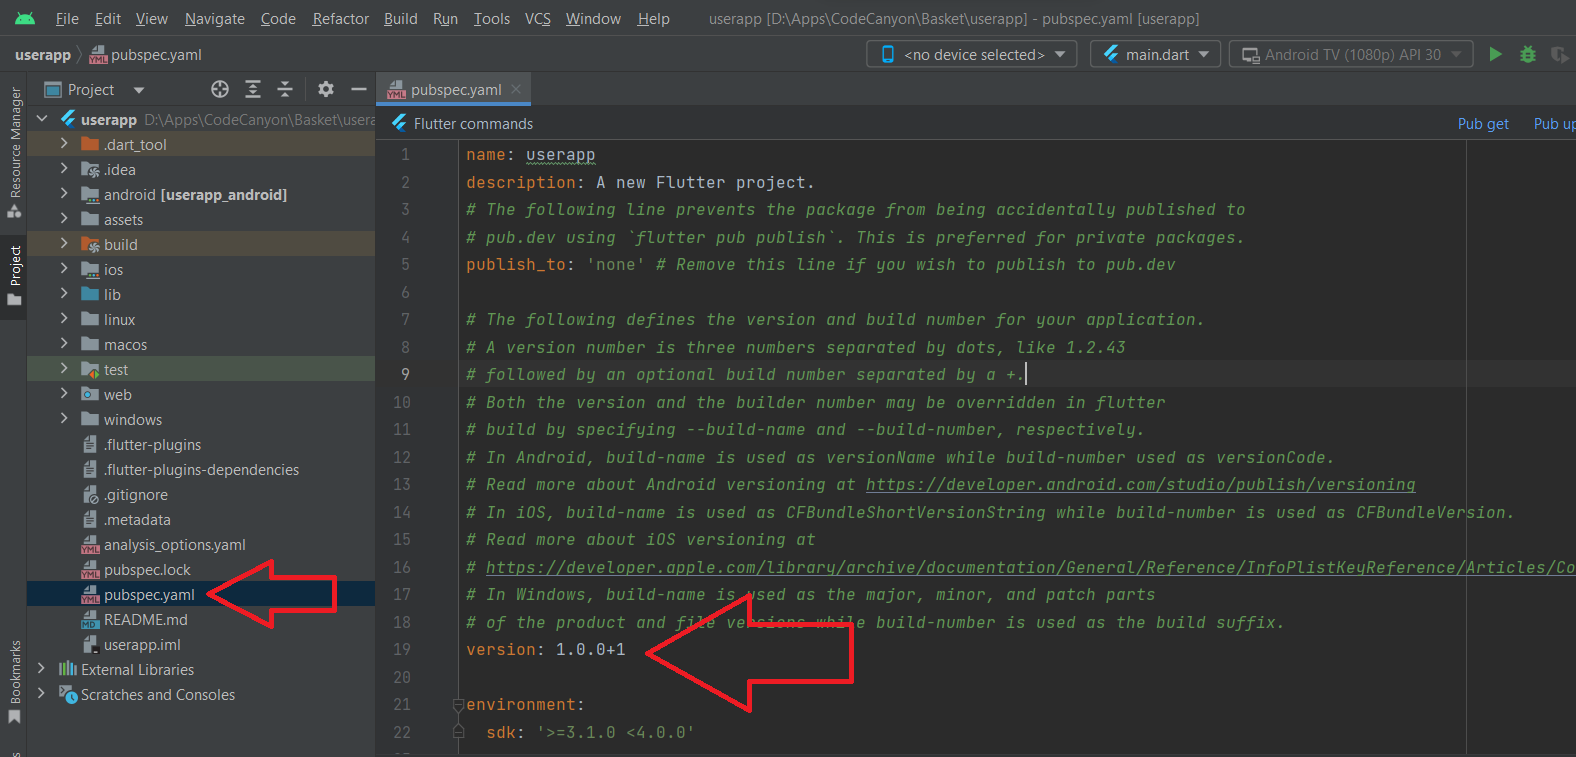
- Step 9 - Now run the pub get by this command (flutter pub get) or you can open the pubspec.yaml (userapp\pubspec.yaml) and hit the pub get as mentioned in the image.
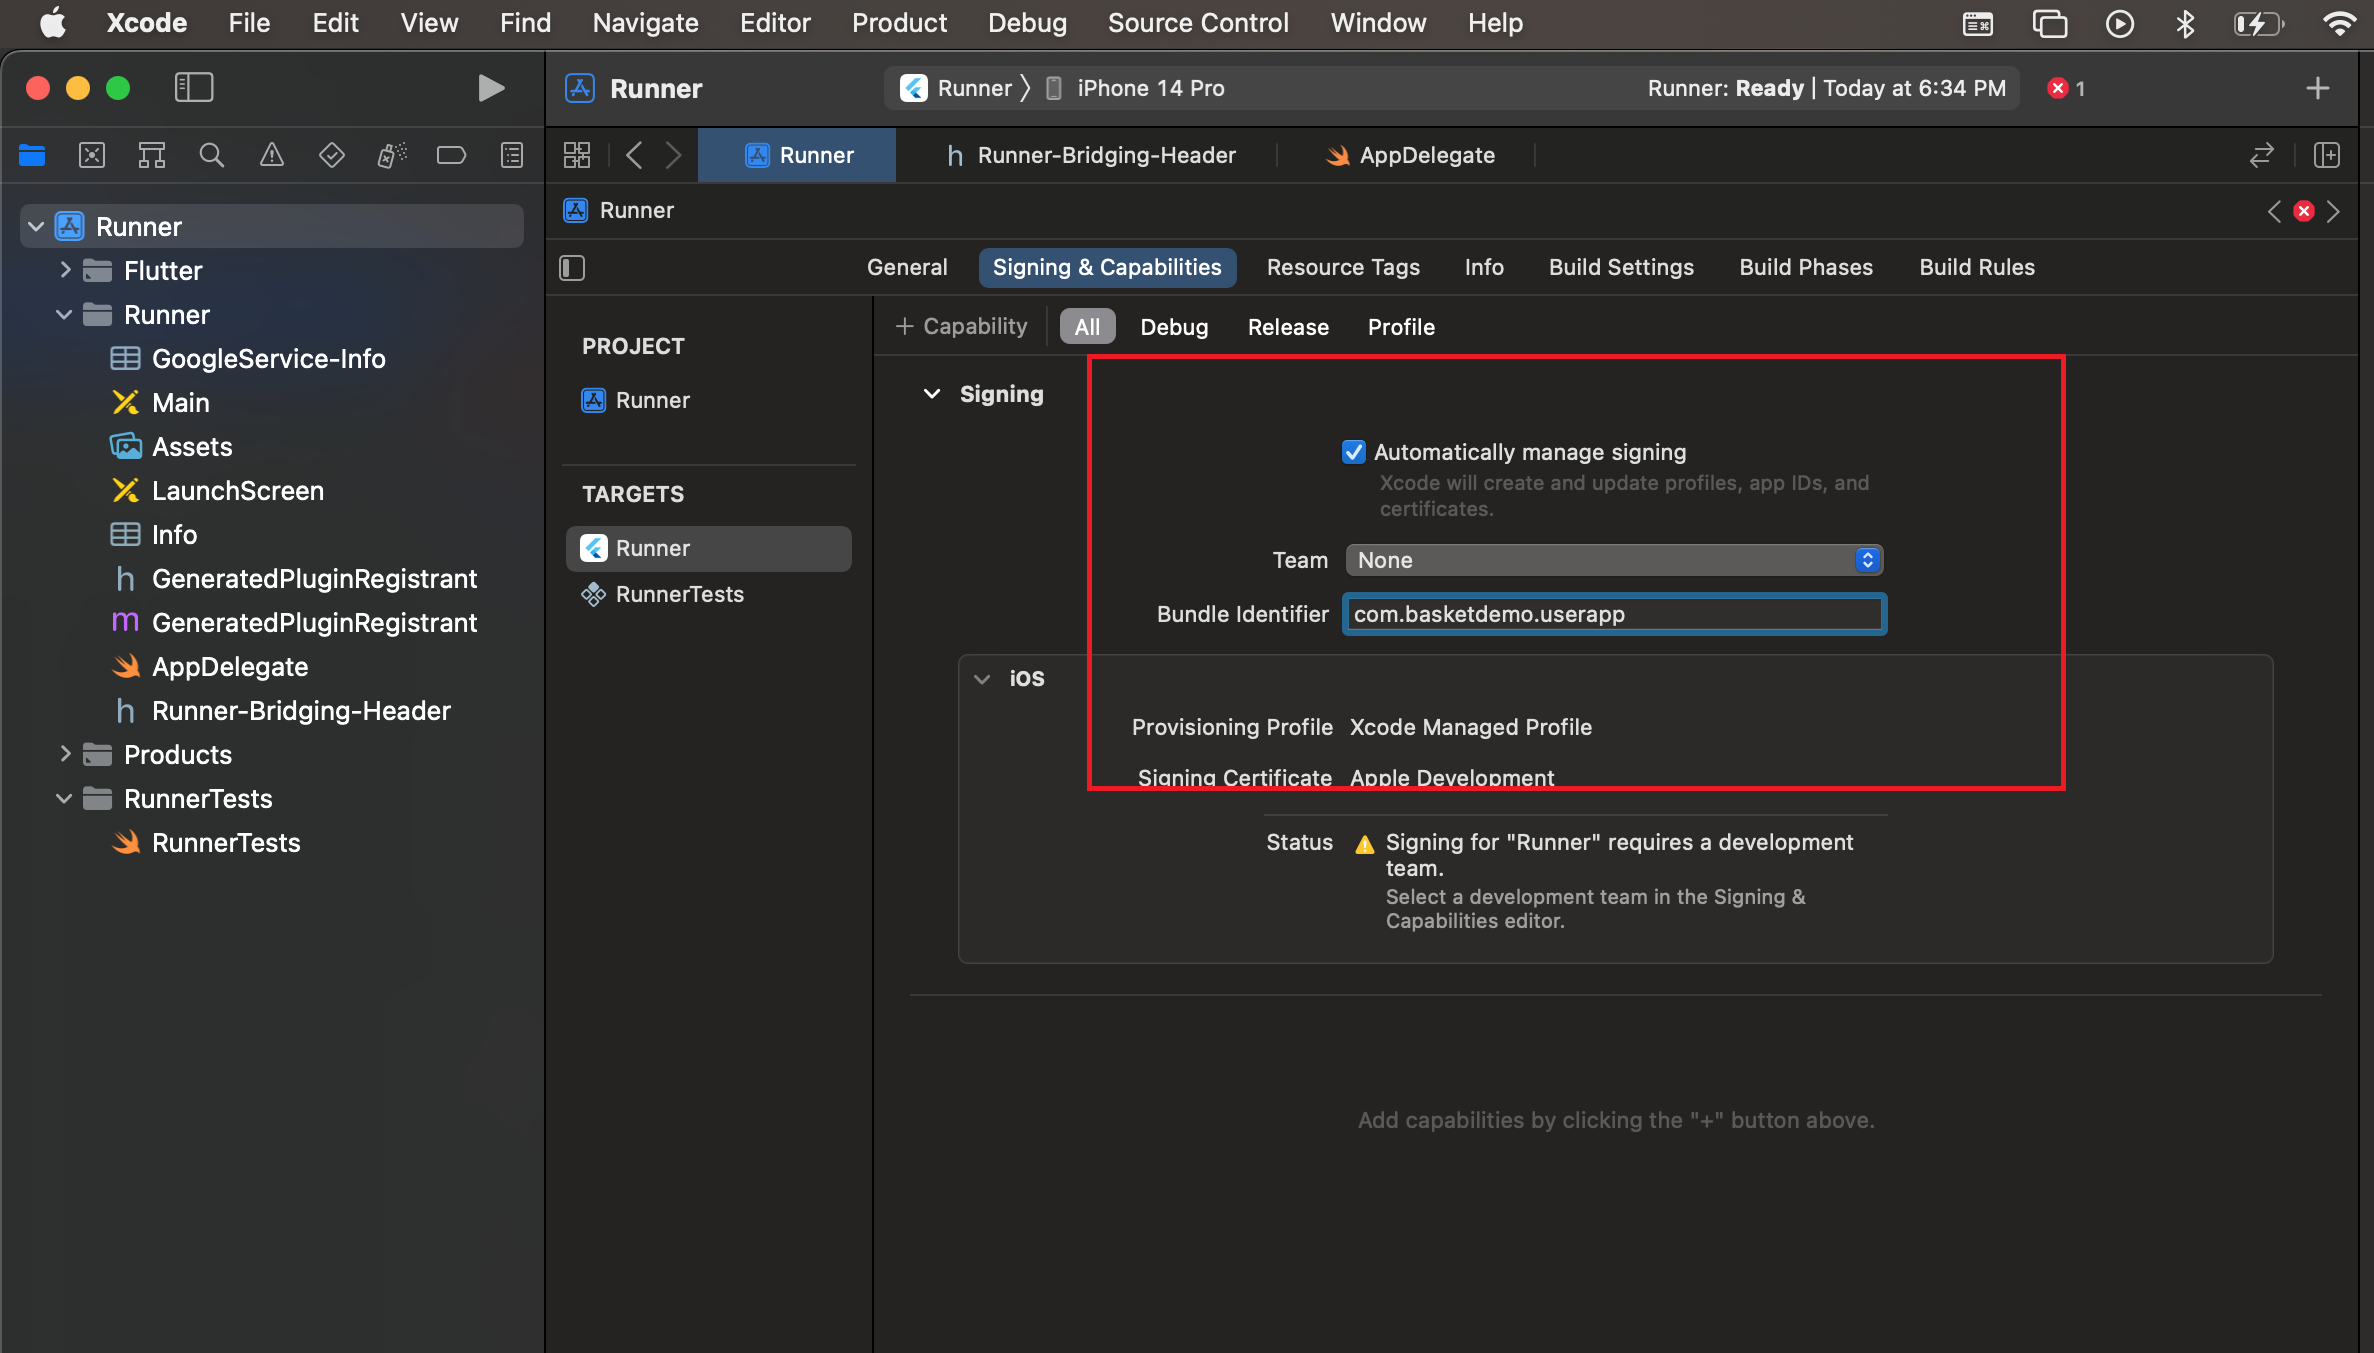
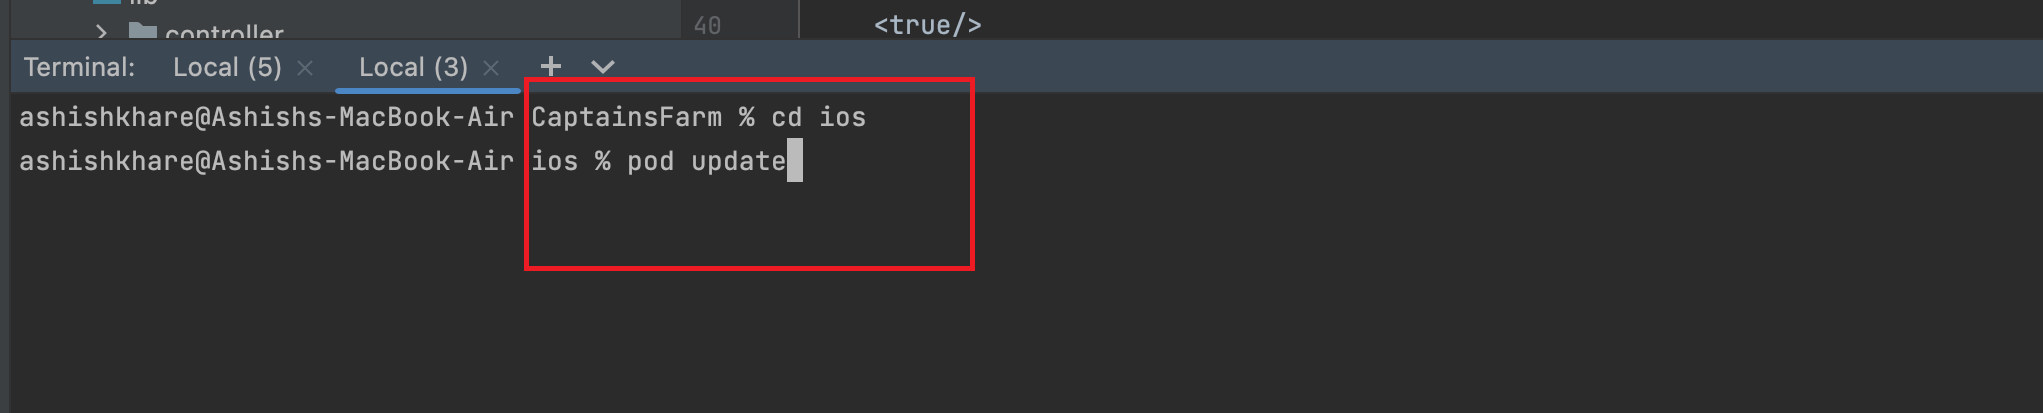
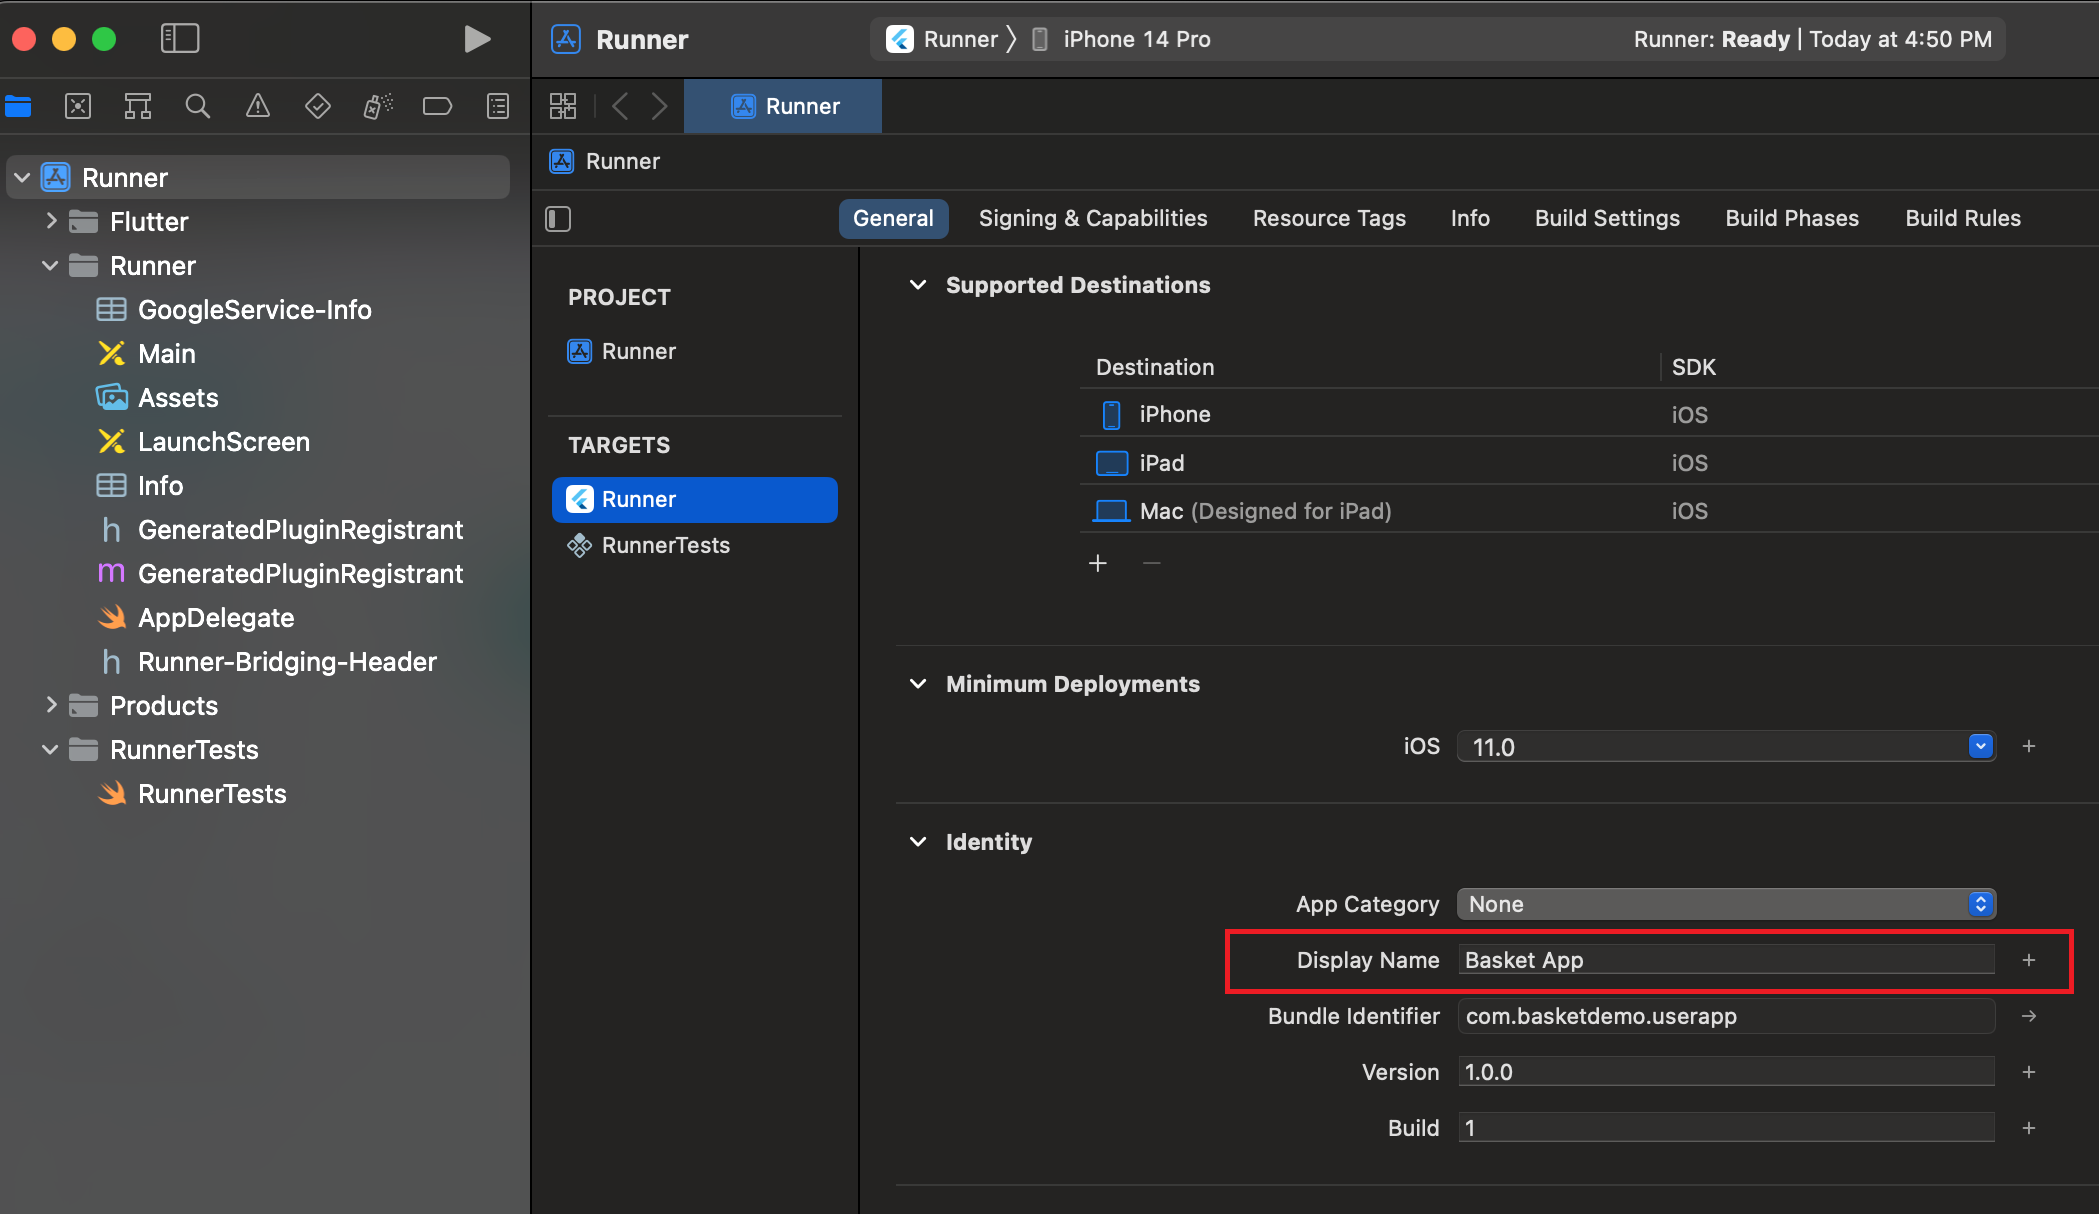
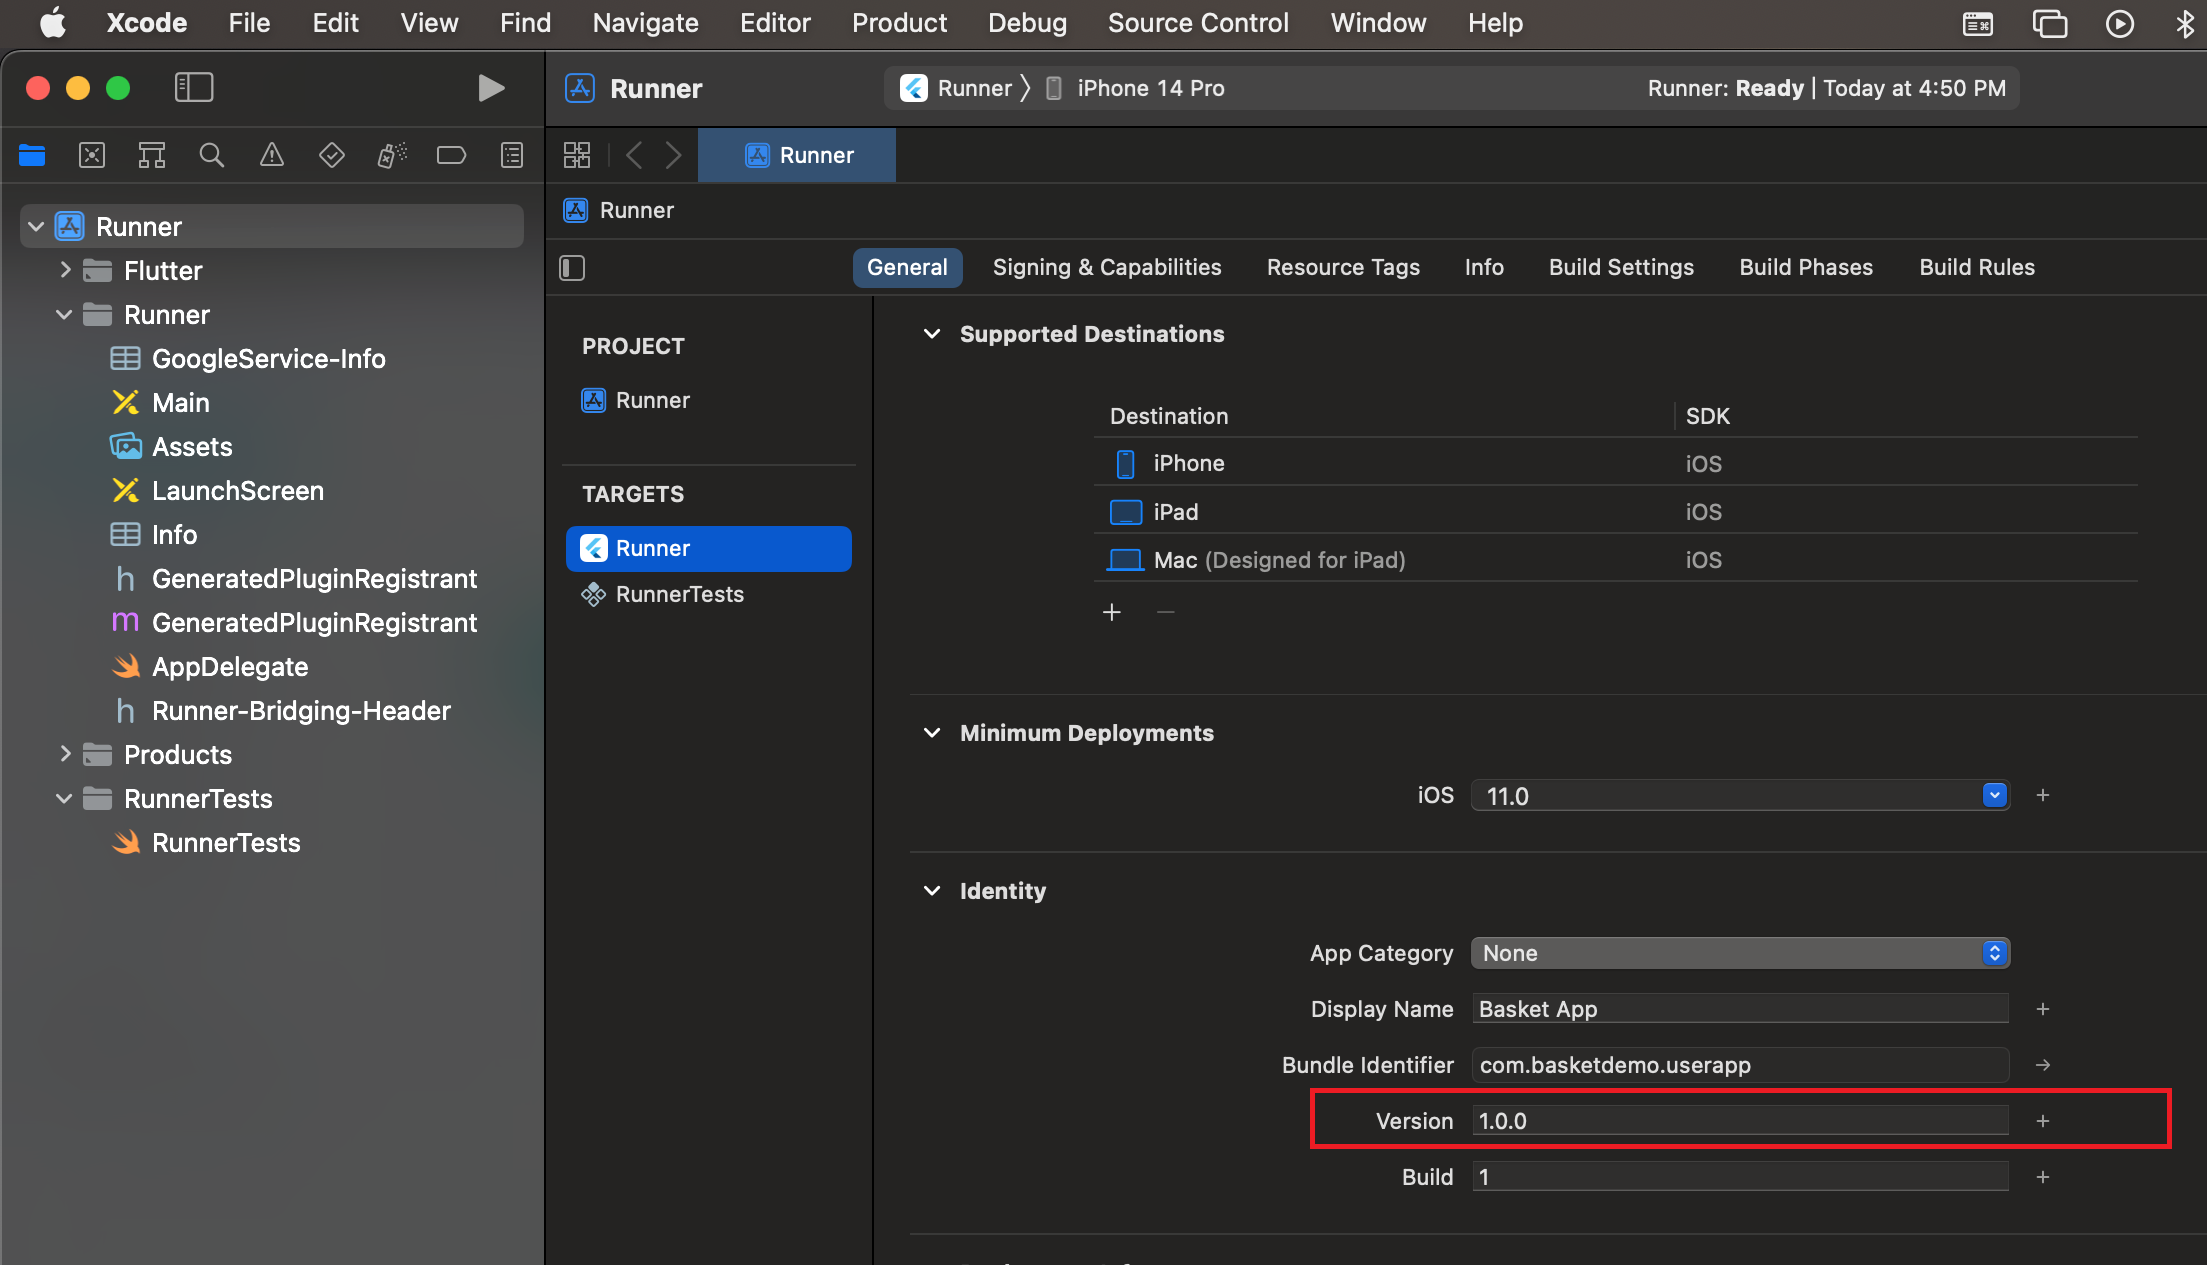
- Step 10 - For ios first make sure you have logged in to your apple developer account and registered the app bundle name.after this move to the ios folder by this command (cd ios) and run (pod install) then (pod update) command.
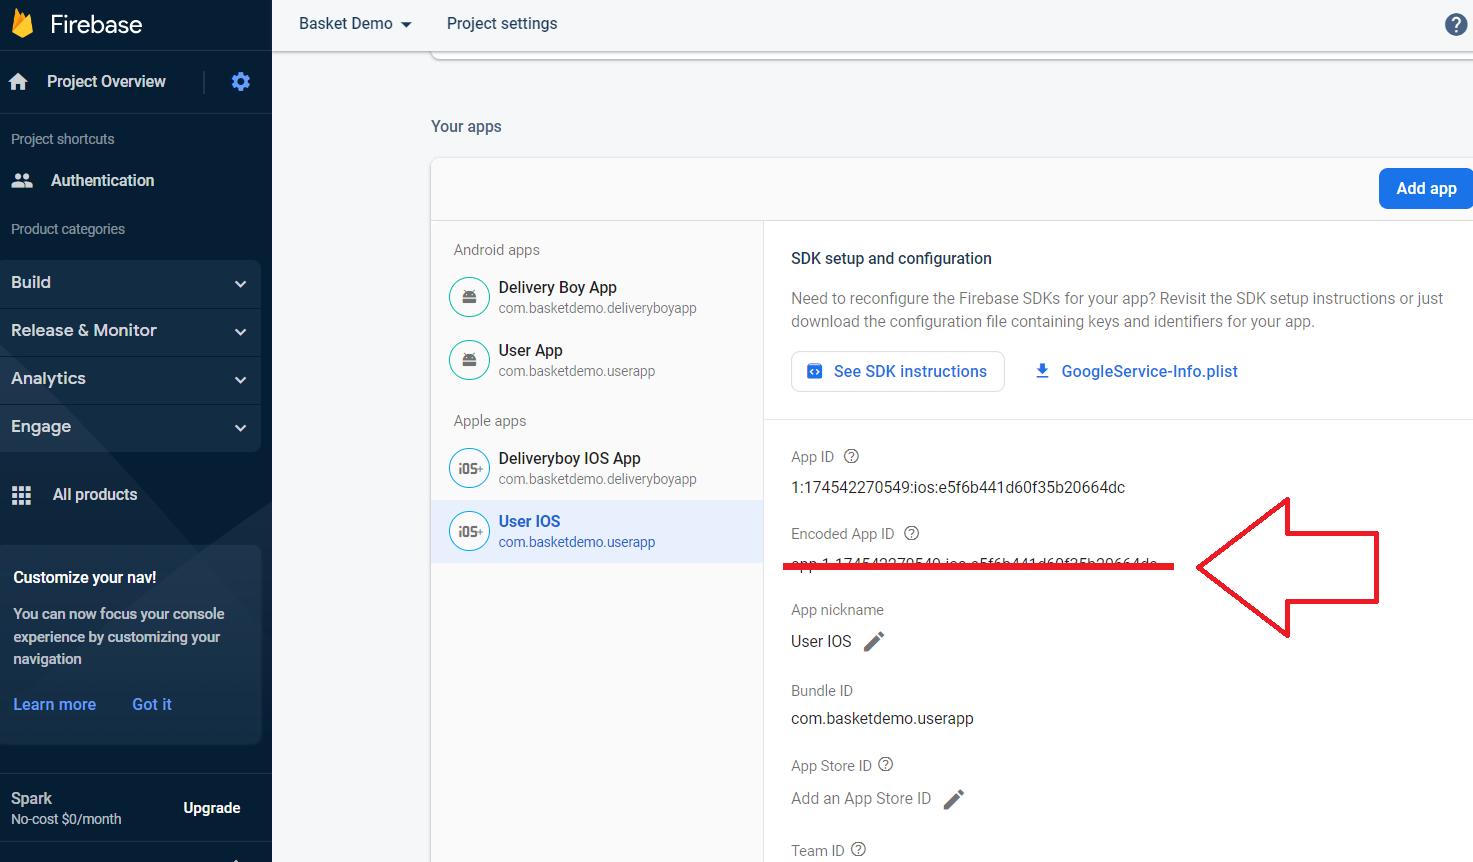
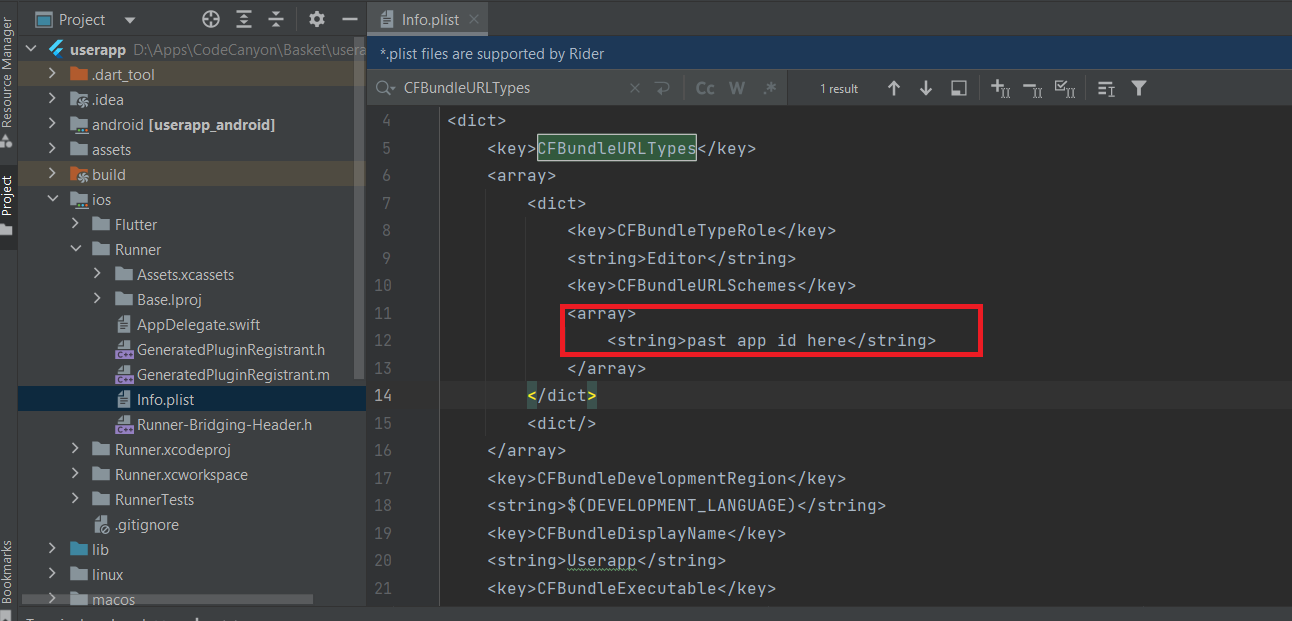
- Step 11 - Go to the firebse project setting, click on app and copy the app id then past in ios/Runner/Info.plist as followed by image.
- Step 12 -Now Our app is ready to run you can run the app or before this, you can change some basic configuration like app name, app package name, color, font, logo, icon, etc.

How to Change The App Name
Android
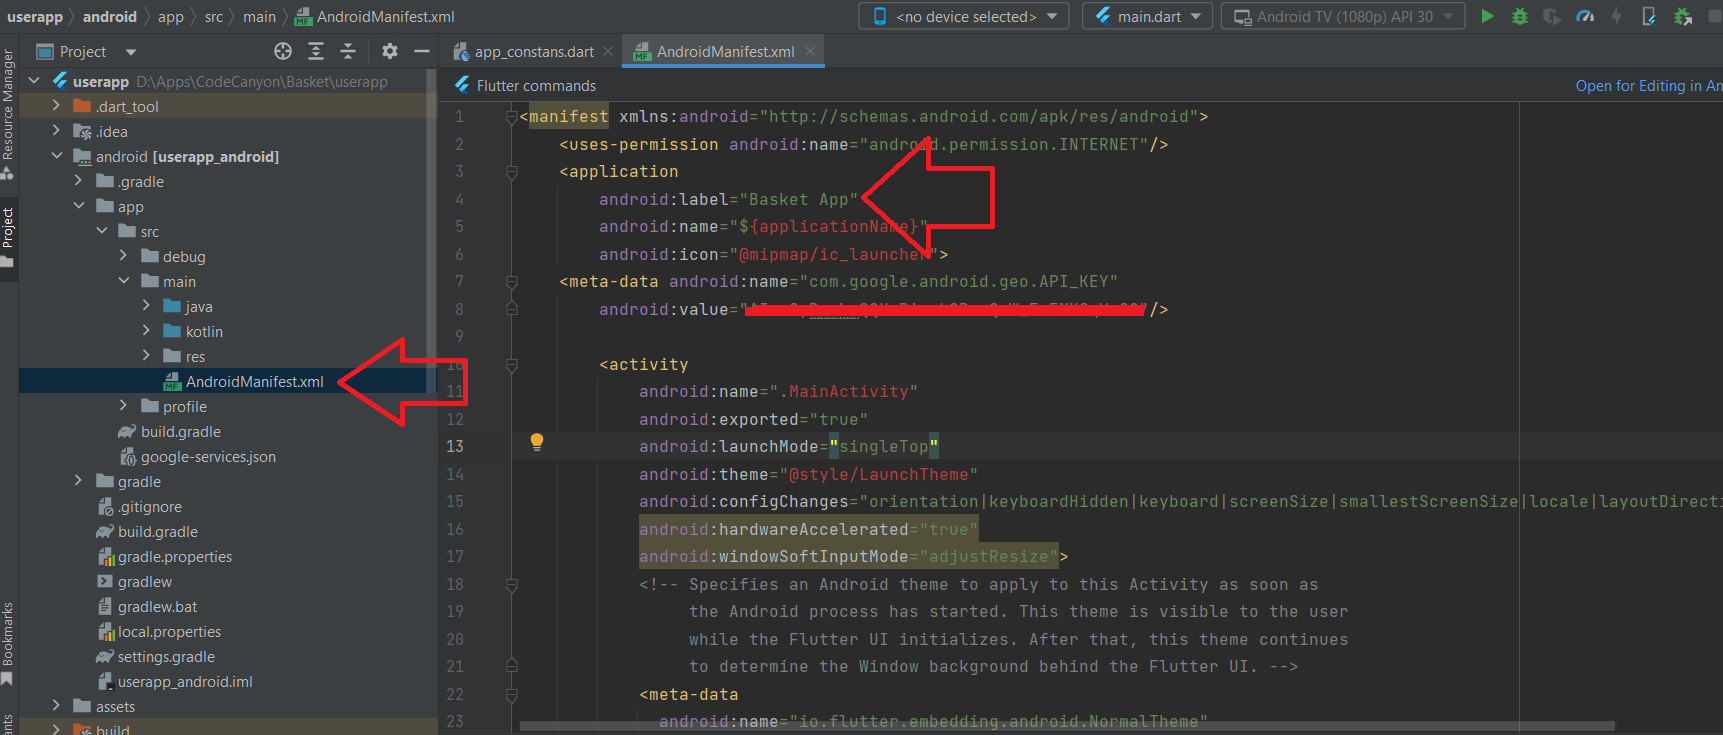
- Step 1 - Open AndroidManifest.xml file from here userapp\android\app\src\main\AndroidManifest.xml and Open lib/utilities/app_constans.dart
- Step 2 - Replace the "Basket App" with your app name. followed by image android:label="Basket App"

How to Change icon
Android
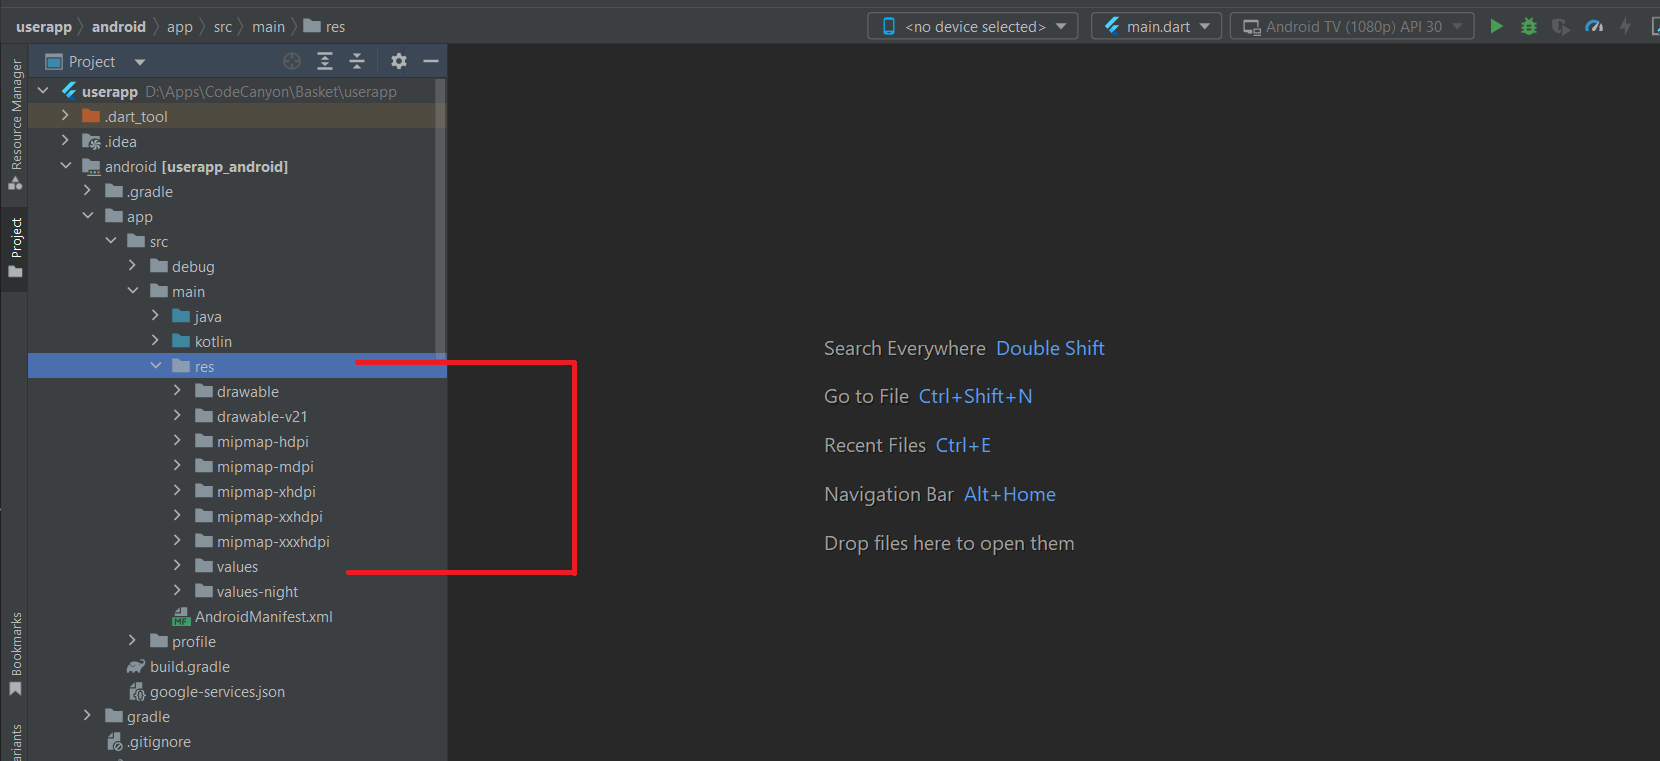
Put or replace all icon png file with icon named 'ic_launcher.png' in the following folders:
- userapp/android/app/src/main/res/drawable-mdpi - with a size of 48px x 48px
- userapp/android/app/src/main/res/drawable-hdpi - with a size of 72px x 72px
- userapp/android/app/src/main/res/drawable-xhdpi - with a size of 96px x 96px
- userapp/android/app/src/main/res/drawable-xxhdpi - with a size of 144px x 144px
This URL will help you resize your images or event create new icon to your app Launcher Icon Generator
IOS
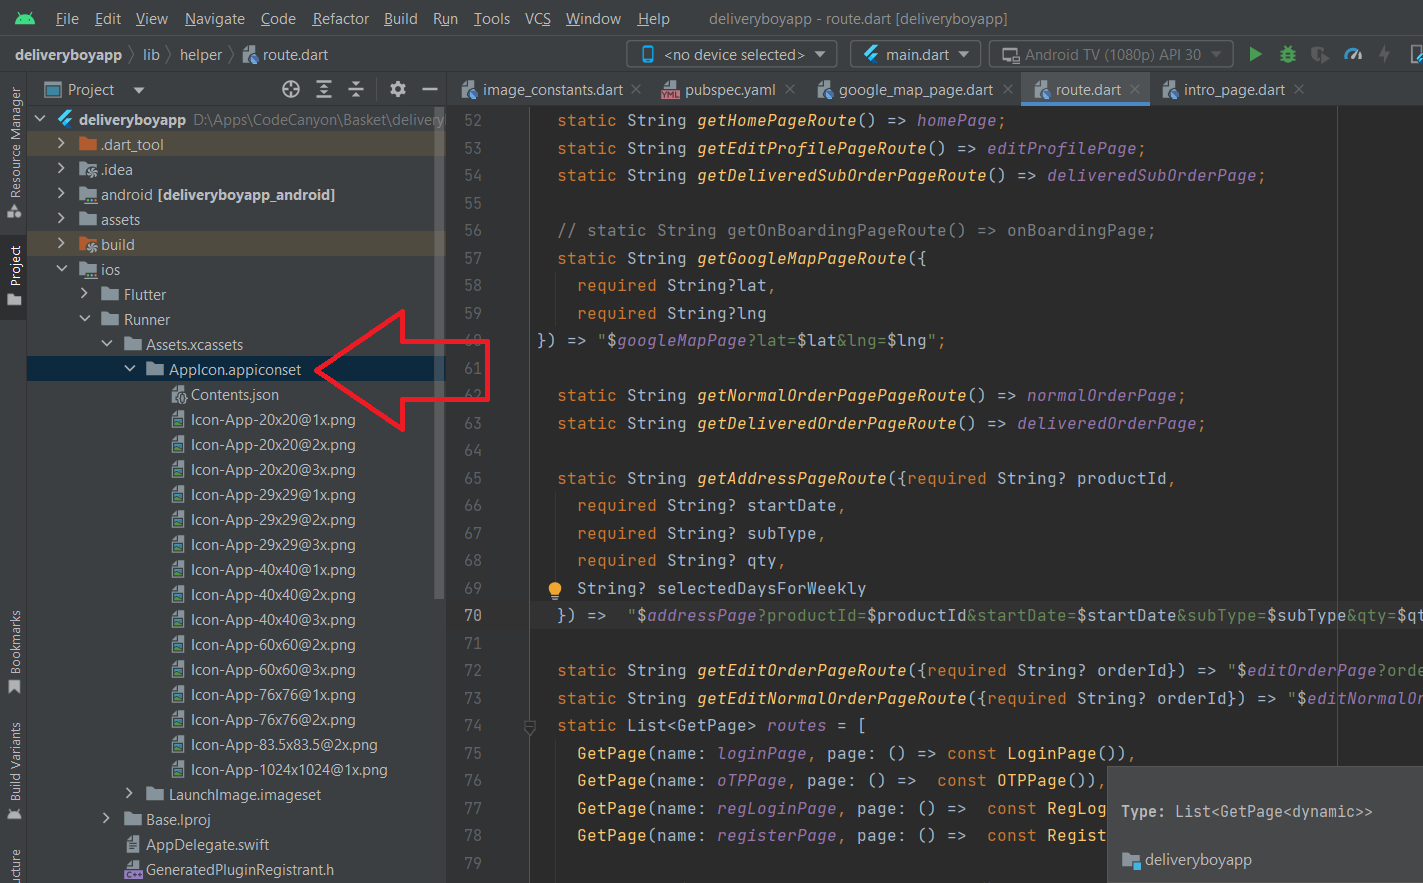
Put or replace all icon png file in the following folder (userapp\ios\Runner\Assets.xcassets\AppIcon.appiconset)
How to Change The App Splash Screen
Android
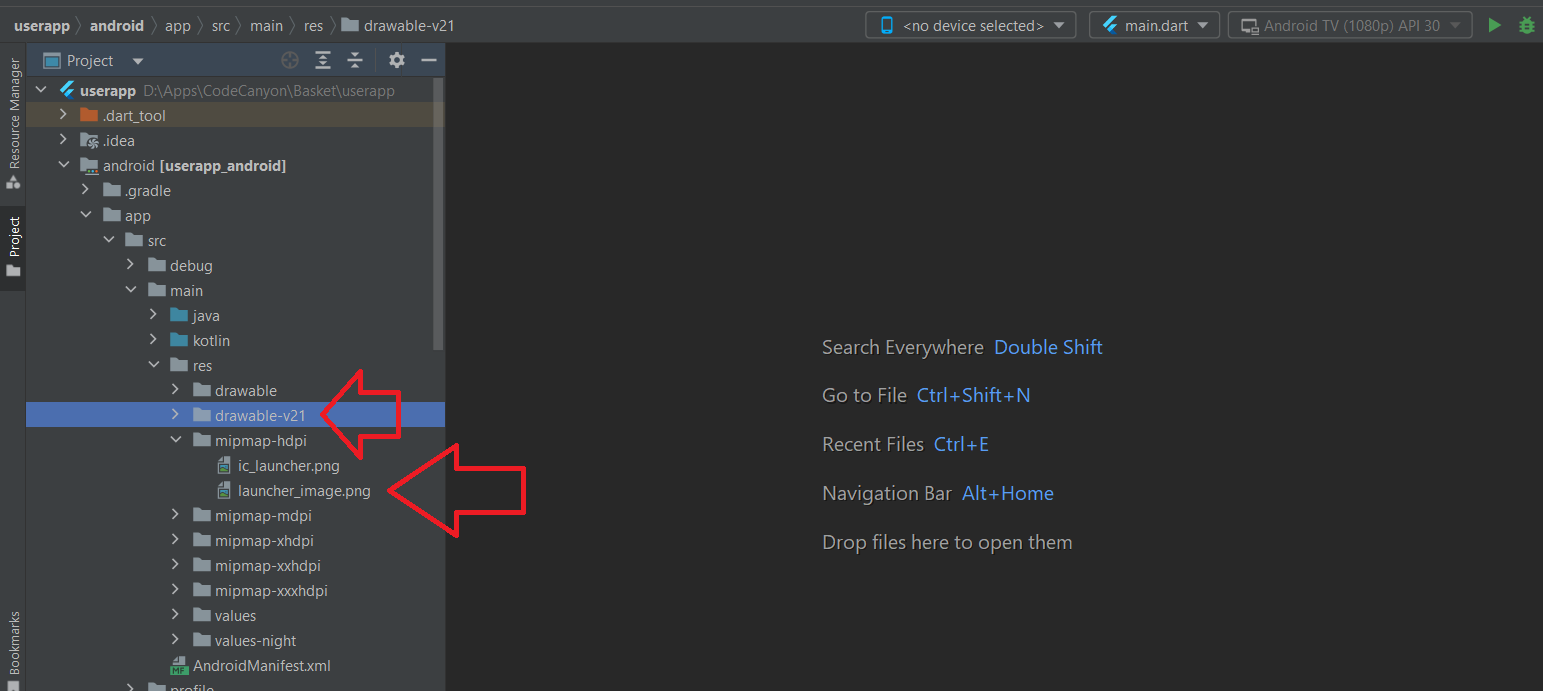
Put or replace a png file with new splash image named 'launcher_image.png' in the following folders:
- userapp/android/app/src/main/res/drawable-mdpi - with a size of 512px x 512px
- userapp/android/app/src/main/res/drawable-hdpi - with a size of 512px x 512px
- userapp/android/app/src/main/res/drawable-xhdpi - with a size of 512px x 512px
- userapp/android/app/src/main/res/drawable-xxhdpi - with a size of 512px x 512px
IOS
Put or replace png file with the new splash image in the following folders:
- consultancy\ios\Runner\Assets.xcassets\LaunchImage.imageset\LaunchImage.png - with a size of 512px x 512px
- consultancy\ios\Runner\Assets.xcassets\LaunchImage.imageset\LaunchImage@2x - with a size of 512px x 512px
- consultancy\ios\Runner\Assets.xcassets\LaunchImage.imageset\LaunchImage@3x - with a size of 512px x 512px
How to Change The App color
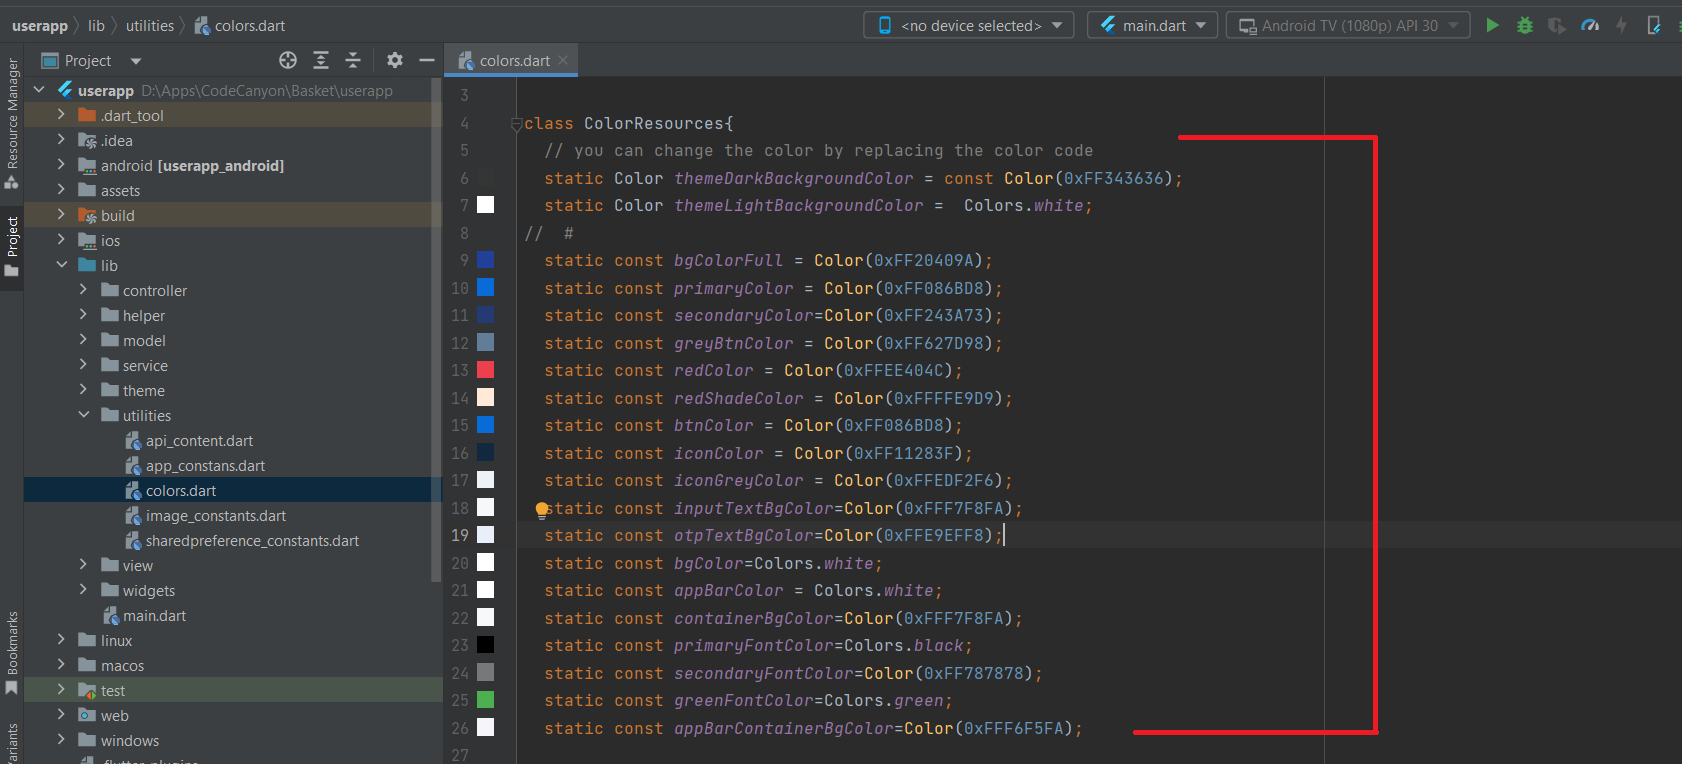
- Step 1 - Open color.dart file from here userapp\lib\utilities\colors.dart
- Step 2 -You can change your app's colors from here to create a custom look. you have to only replace the color code.
How to Change The Font Style
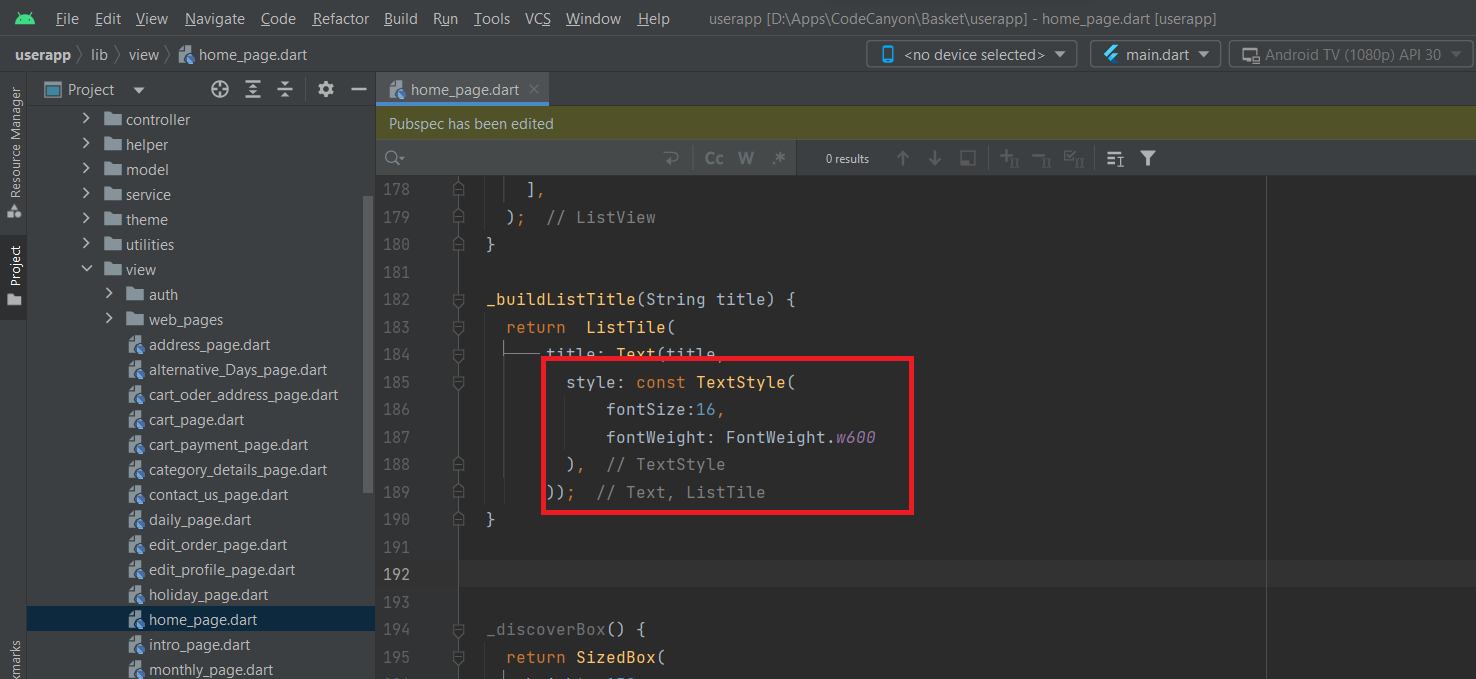
- Step 1 - To change the font size, color and weight, you have to search for the text that you want to change then you can edit fontSize, fontWeight, and color as per your requirement as followed by the image.
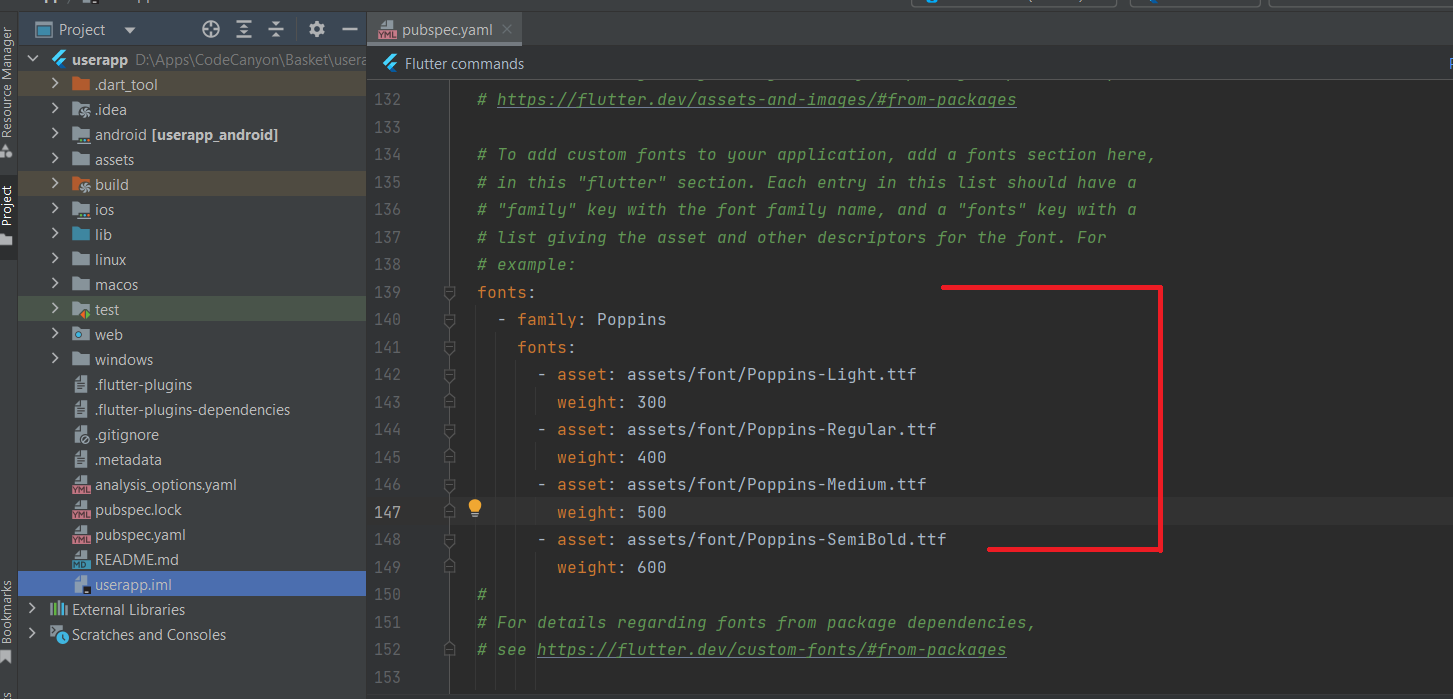
- Step 2 - To changes in font family, you have to past new font family in the "useraapp\assets\fonts" folder and mentioned in the pubspec.yaml file followed by the image.
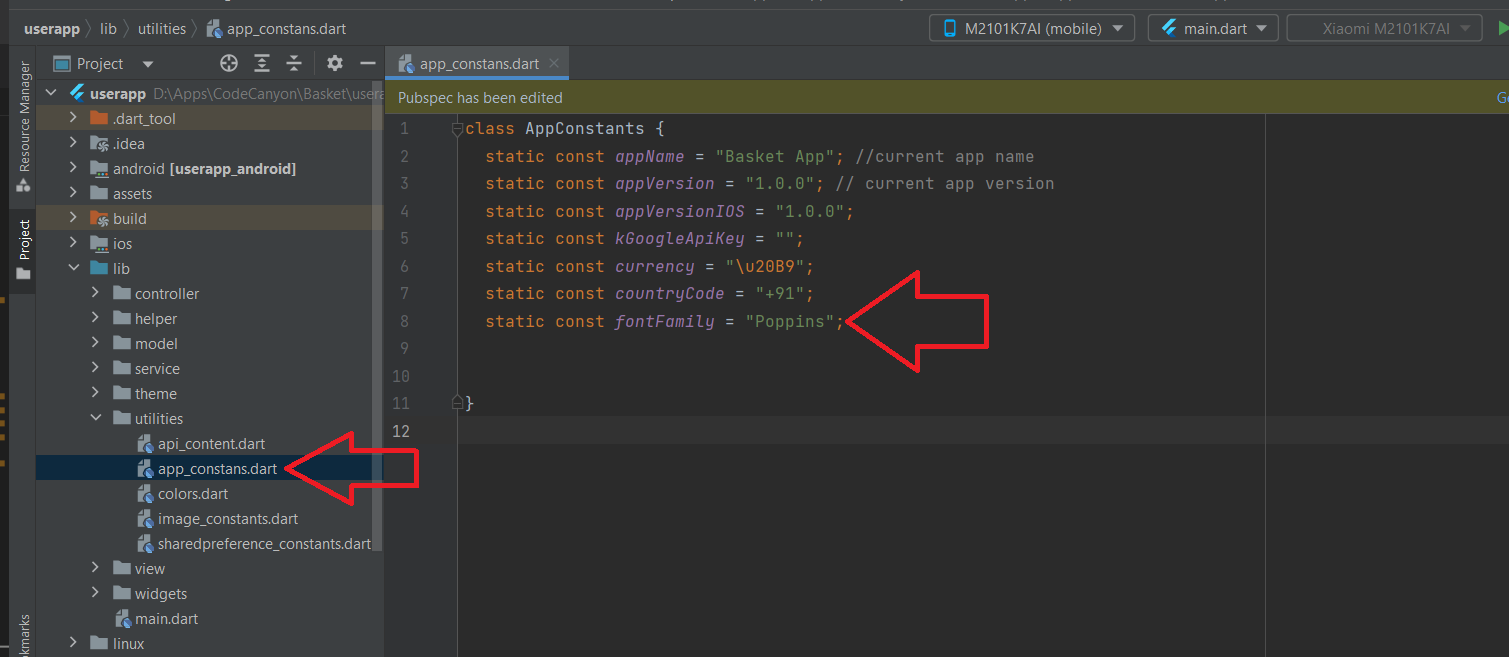
- Step 3 - Now mentioned the font family name in app lib/utilities/app_constans.dart.
How to Add Or Change The Image Asset
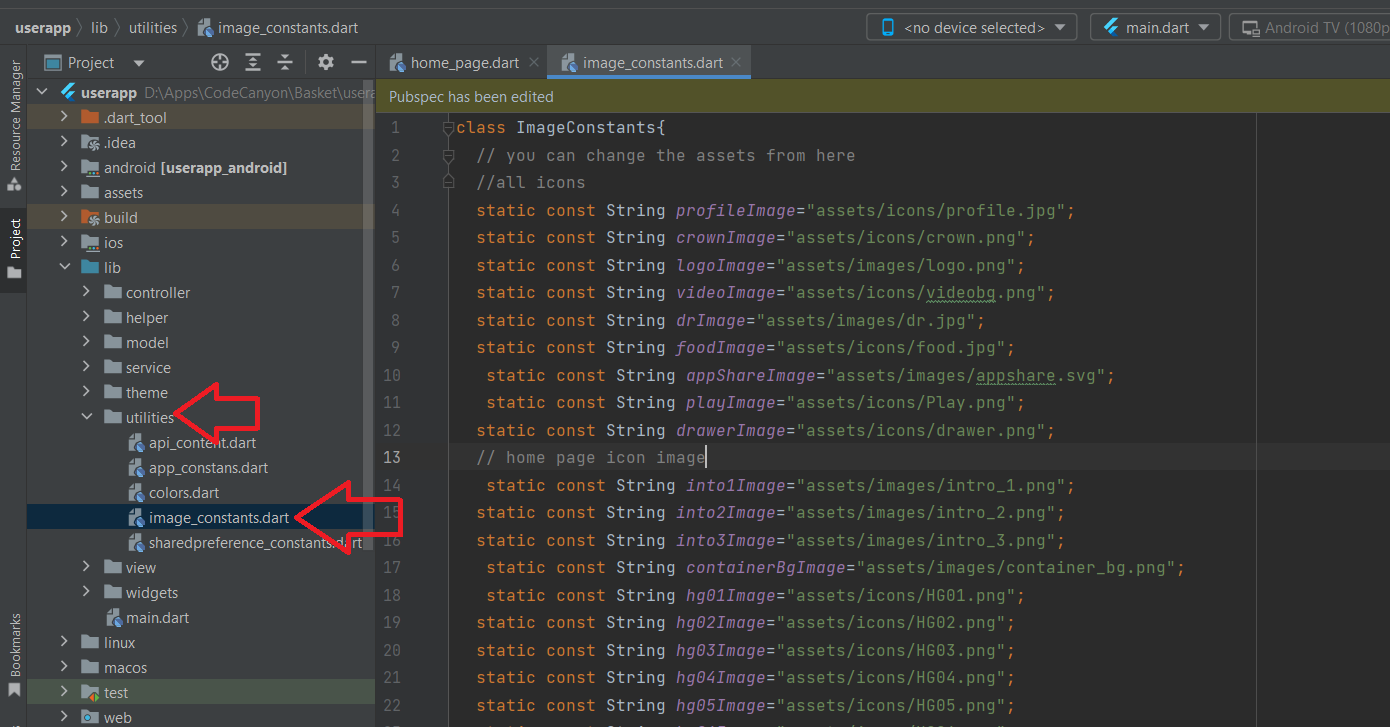
- Step 1 - open image_constants.dart from here userapp\lib\utilities\image_constants.dart.
- Step 2 - in this file, you can change the asset's name. or add a new image in the assets folder and copy the path
- Step 3 - past the assets path inside pubspec.yaml file and hit pub get
- Step 4 - make a new variable inside image_constants file and assign path to this variable
- Step 5 - Now you can use the image.asset(ImageConstants.varName) widget to show image
How to Add Or Change The App Package Name
Android
There are lots of methods to change the package name, we preferred the easiest following method:
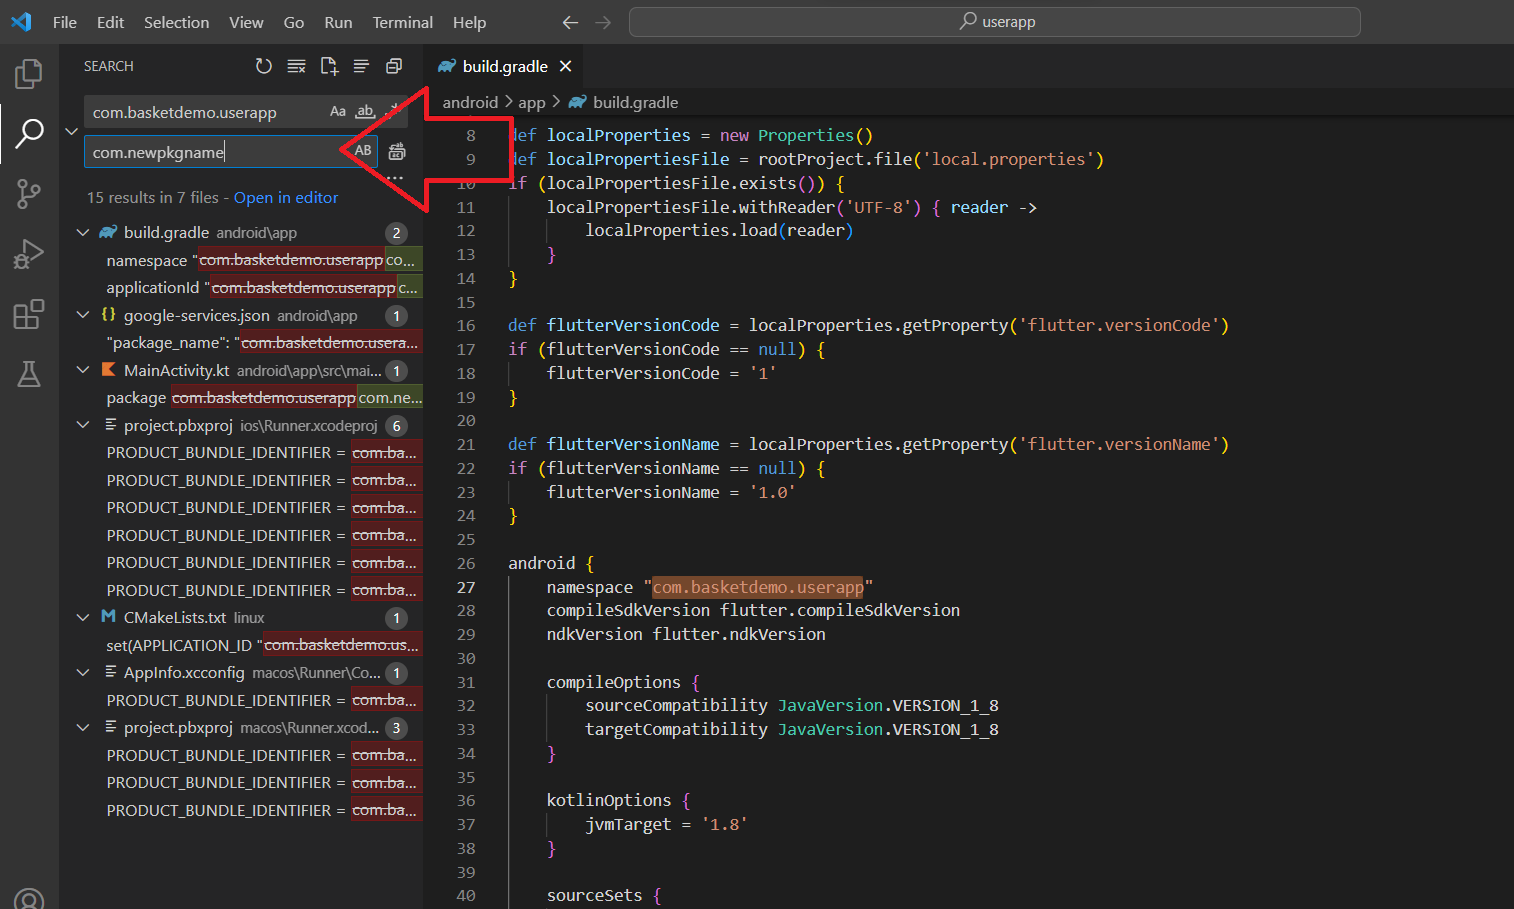
- Step 1 - open User app in vscode
- Step 2 - press ctrl+h or go here (edit/replace)
- Step 3 - Now you have to replace all old package names with new package names as mentioned in the image below.
IOS
Put or replace all icon png file in the following folder (userapp\ios\Runner\Assets.xcassets\AppIcon.appiconset)

How to Change The App version
Android
- Step 1 - open pubspec.yaml file from here consultancy\pubspec.yaml
- Step 2 - Replace the "1.0.0+1" with new version code
- Step 3 - Hit pub get button
- Step 3 - Change the version text here lib/utilities/app_constans.dart for both android and ios.
IOS
Password Forget Setup
Please complete API setup before moving forword in Password Forget
-
Forget Password Panel is created with ReactJs , so you need to install NodeJs 16 or 16+ and packege manager like NPM in you system - Step 1 - Open the basket-forget-password Folder in your IDE or code Editor like vscode
-
Step 2 - Open terminal and navigate to basket-admin-panel
folder and run command
npm install -
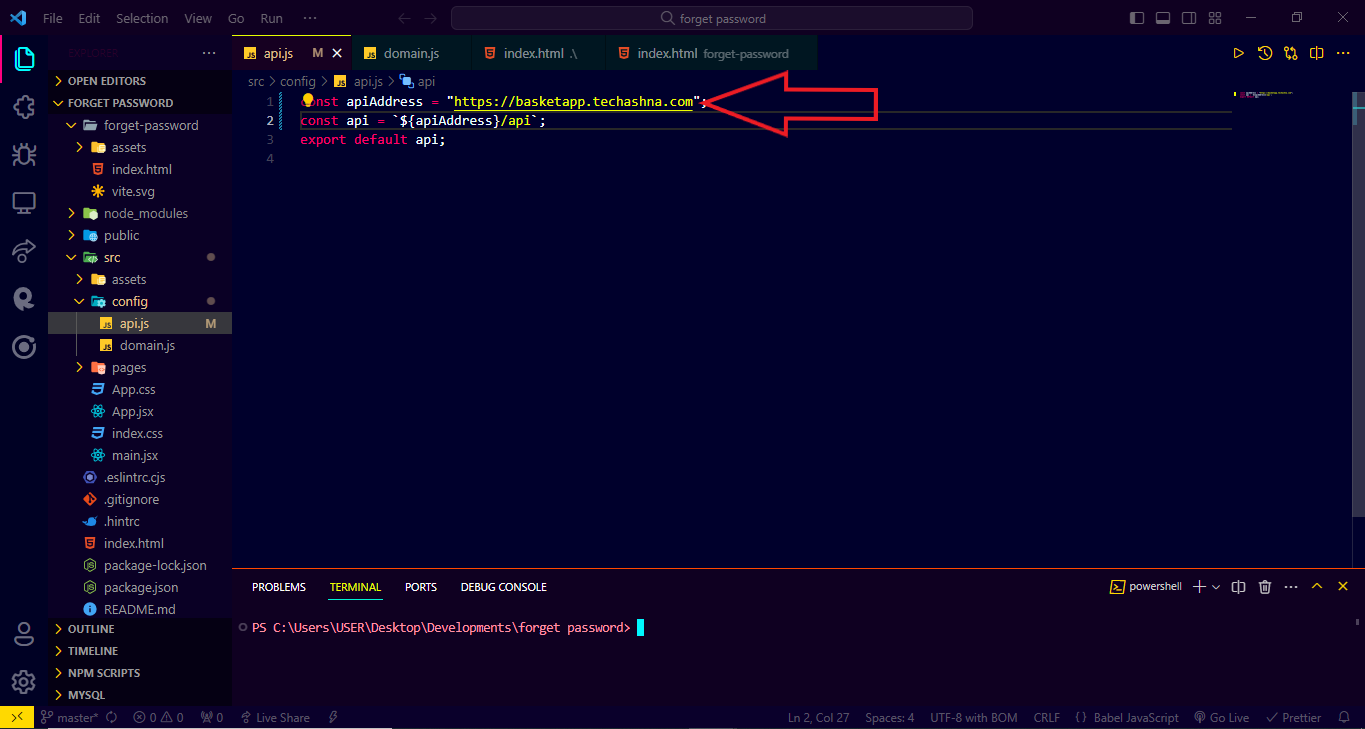
Step 3 - Now navigate to
src/config/api.jsand replace the apiAddress with your api domain address
Ex.- replace thehttps://basketapp.techashna.comwithhttps://basketapi.yourdomain.com -
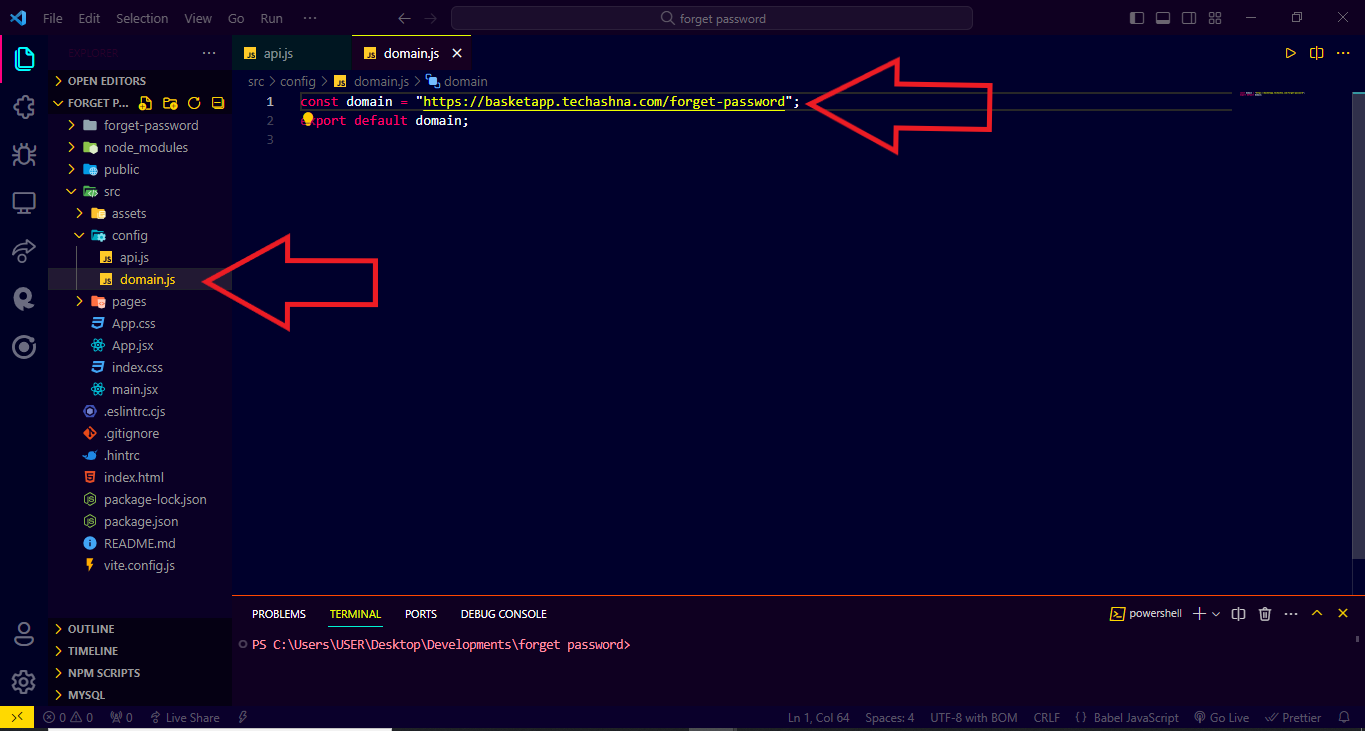
Step 4 - Now navigate to
src/config/domain.jsand replace the domain with your domain address where you gonna host this forget password panel
We recommend you to host this panel in subdirectry likehttps://youraddress.com/forget-password(Ex.- replace the "https://basketapp.techashna.com/forget-password" with "https://youraddress.com/forget-password") -
Navigate to
Publicfolder and change the favicon and title same as you done for admin panel.
Password Forget Panel Deployment
Please complete API setup And Forget Password setup before moving forword in Forget Password Deployment
- Step - Now open terminal and run command npm run build
-
Step 7 - After Build is complete , you'll see
forget-passwordfolder inside basket-forget-password folder , upload theforget-passwordfolder directly to your root folder or creat a subfolderforget-passwordand upload the files on it
now you can accesss forget password with URL - yourapp.com/forget-password -
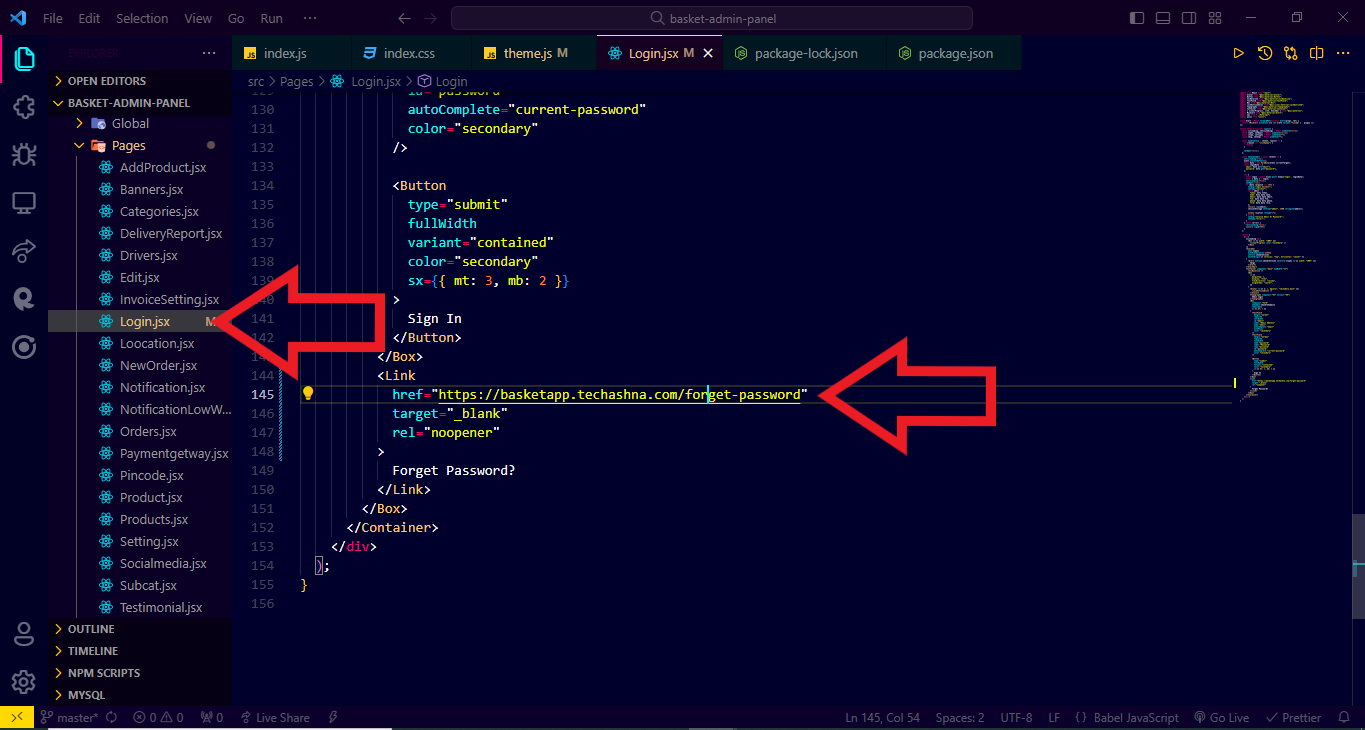
final step - open basket-admin-panel folder , navigate to
src/pages/login.jsxand replace the forget password link to your forget password address

Landing Page Setup
Please complete API setup And Admin Panel Initial setup before moving forword in Landing Page deployment
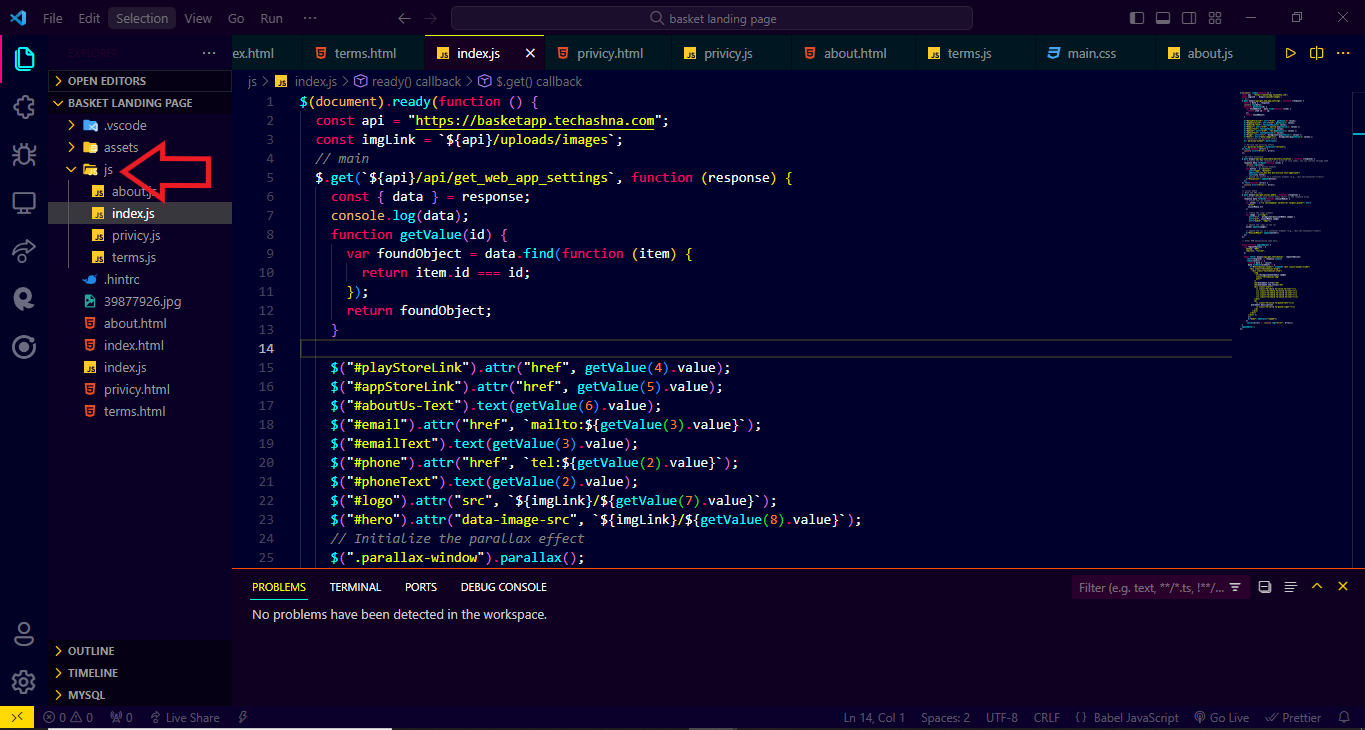
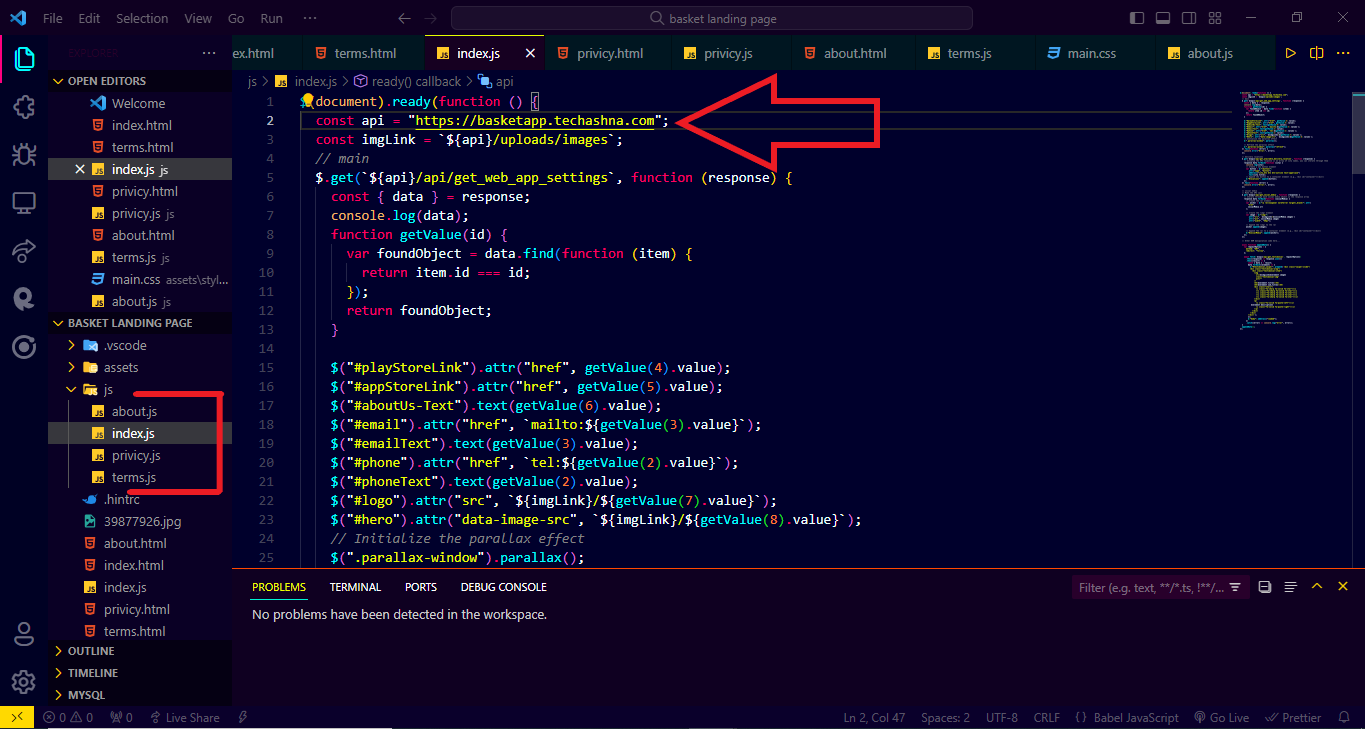
- Step 1 - Open the basket-landing-page Folder in your IDE or code Editor like vscode
- Step 2 - Before Deploying the landing page navigate to "js" folder and change default api address with your api address (ex https://basketapi.yourdomain.com ) on every file such as index.js , about.js , privicy.js and terms.js
Now Upload the Files in your landing page location
Postman Setup
For all API endpoint testing use postman.
- Step 1 - Download Postman
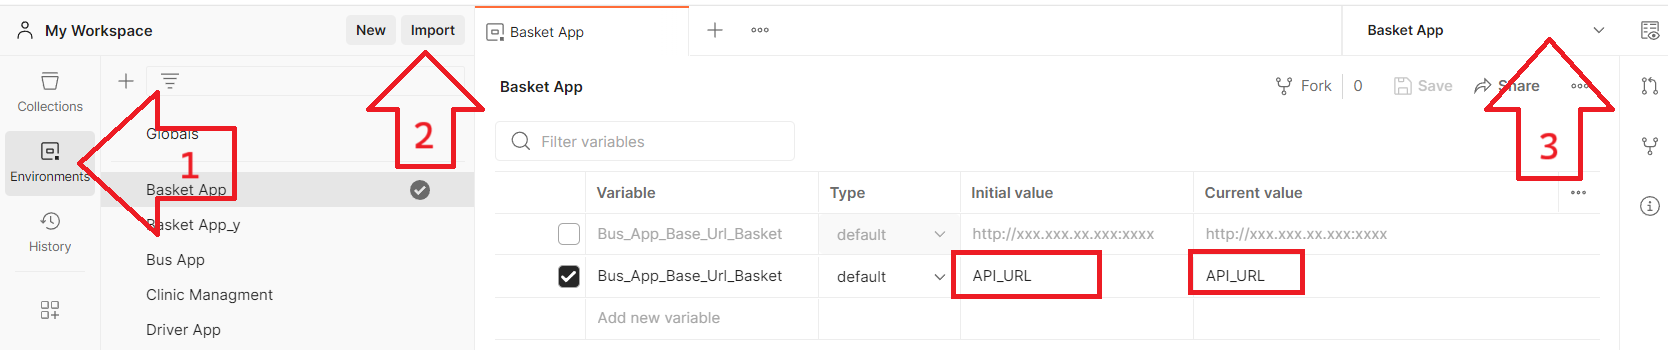
- Step 2 - Open postman folder from source file and import Basket App.postman_environment file in postman.
- Step 3 - Replace the API_URL with your hosted api url. (API url will be the link of installed api server location HERE (Ex https://basketapi.yourdomain.com)
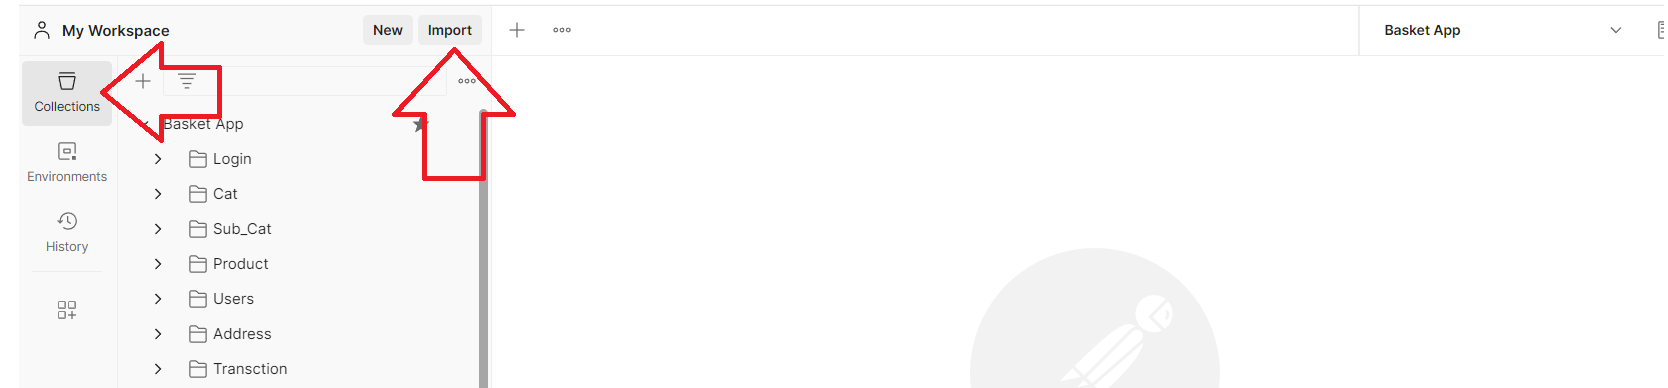
- Step 4 - import Basket App.postman_collection file in postman.
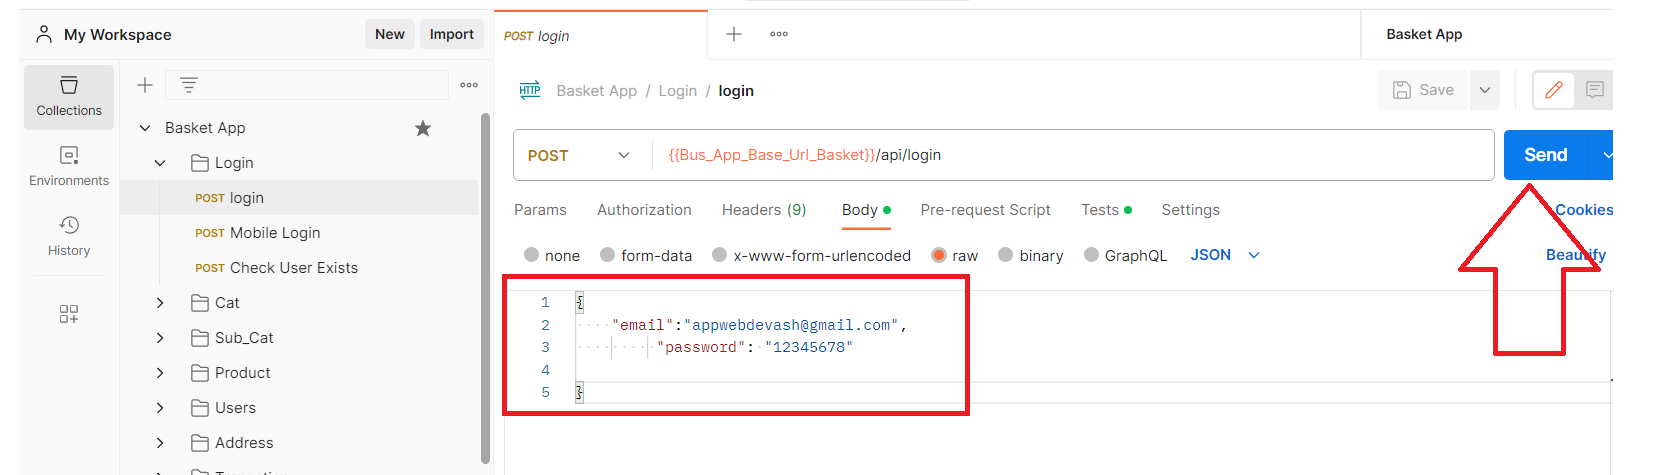
- Step 4 - It is now ready to run. Before checking the API, please log in by running the login API. Then, you will be able to test all the APIs. Put the same email and password that you created at the installation step if you have changed the email and password then use the new one.
Assets Creational
All the icons are free to use according to their websites, but you must place the attribution.
-
For PNG -
- - assets/icons/crown.png
- - assets/icons/logo.png
- - assets/icons/drawer.png
- - assets/icons/container_bg.png
Icons made by
Freepik
from
www.flaticon.com
-
For icons -
- - assets/icons/appshare.svg
- - assets/icons/noData.svg
- assets/icons/error.svg
SVG made by
unDraw
Support
I'd like to thank you again for your purchase and I hope you where able to successfully install the bakset app and using it in your future business . If you need support or have some questions. You can visit our support resources here at appwebdevash@gmail.com If you need any help using the file or need special customizing please feel free to contact me via my codecanyon profile also. If you have a moment, please rate this item, I’ll appreciate it very much!.... Thank you
What support does include
- Answers to (technical) questions about the item's features
- Assistance with reported bugs and issues
- Answers to questions about importing and setting up the item as is described in the docs.
Update V1.1
In the Version 1.1 update, we have introduced a new feature: Payment Gateways.
- Paystack
- Stripe
- Paypal
- Flutterwave
Step 1
Merge the new 'payment_gateway' table into the existing database.
Step 2
Replace all the userapp files from 'Step-2' folder.
Step 3
Replace all the basket-admin-panel files from 'Step-3' folder.